AE Weekly Feature : Hybrid/Digital Scrapbooking
Welcome to a new AE Weekly Feature: Hybrid/Digital Scrapbooking.
My goal for this week is part education, part inspiration. One of the things I don't want to do is spend time re-inventing the wheel so I will be directing you to some of my favorite hybrid/digital educators who have already laid out the how-to basics.
As Jessica Sprague says on her Sprague Lab Blog, hybrid scrapbooking is:
Paper and pixels. Type and titles, edited photos and embellishment, printed and placed on a page. Any use of your computer as a scrapbook tool on a paper layout is considered “Hybrid” these days. And many scrapbookers don’t realize that using your computer as a scrapbook tool isn’t an “all-or-nothing” proposition. You don’t have to create all-digital layouts just because you pick up your mouse.
To me, digital elements are simply another tool in my toolbox for telling my stories.
I will be focusing more this week on ways to incorporate digital elements into your current scrapbooking process and less on creating full digital layouts.
Most likely you already have on hand what you need for hybrid scrapbooking: a computer, Photoshop Elements (or Photoshop), and a printer. I use a HP Photosmart D3760 for printing digital elements and my photos here at home.
Here's my disclaimer when working with Photoshop: Photoshop is a huge, powerful program. I have always been one of those people that learned as I went along. I took one class back in 2001 when I was in school for graphic design. I learned the very basics in that class. These days I tend to rely on google a ton. The search box is one of my best friends and most relied upon tools in figuring out how something is done. I am by no means an expert in Photoshop. I know what I know through research, trial + error, and lots and lots of messing around.
One of my biggest tips is to save and save often. Make it become a part of what you do when you open the program. It has become second nature to me now but every once in awhile if I am distracted I will forget and I pay the price for not saving.
One of the things I hope you take away this week is the knowledge that you can do this if you want to. It will take a bit of playing around which is always a part of the creative process for me.
Let's take a look at one of my favorite digital elements: title + journal overlays.
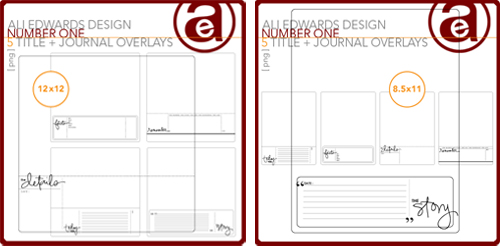
One of the digital elements I wanted to create for myself were these Title + Journaling Overlays. They provide a great foundation for either a 12x12 or an 8.5x11 layout. Print out an overlay onto the cardstock (or patterned paper of your choice) and then add your "real-life" elements right on top.
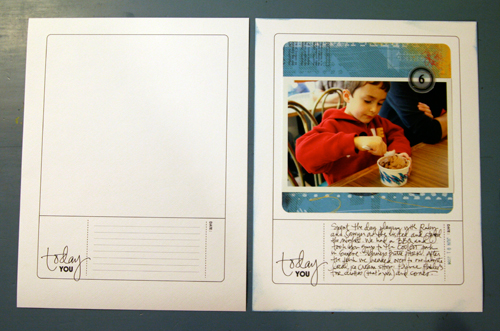
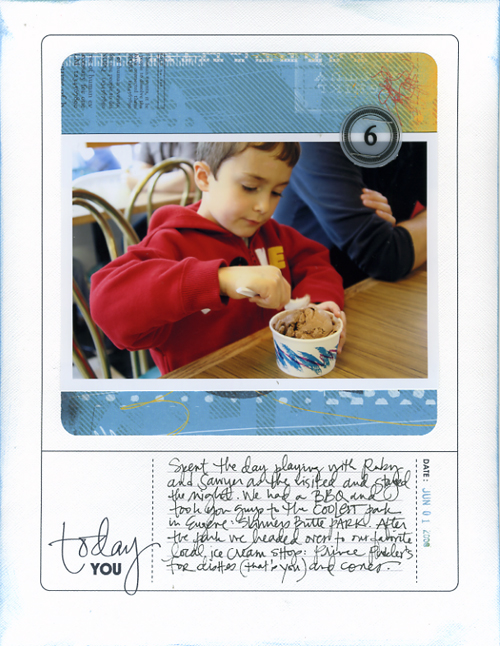
The page on the left is what that sheet of cardstock looked like after I printed the title + journal overlay. The second image is the completed page (photo, accents, words added with pen, adhesive & staples) which you can see in more detail below:
[ Hybrid Supplies: Title And Journaling Overlay No. 1; Ali Edwards for Designer Digitals; Cardstock: Bazzill Cardstock; Patterned Paper: Get Happy Collection from Cosmo Cricket; Circle Accent: Maya Road Calendar Set Sheers; Pen: American Crafts Precision Pen; Ink: ColorBox; Date Stamp: Office Max; Corner Rounder: ]
These overlays come in a file format called .PNG. The process for working with a .PNG file is super easy. After downloading from Designer Digitals, open the file in Photoshop. You will see that it appears on a transparent background that looks like a bunch of little checkerboards.
The canvas size is already set to 8.5x11 or 12x12 depending on which overlay you are working with. Grab your paper, load it into your printer, hit print and select "scale to fit media" (this will make it a bit smaller so that nothing gets cut off while printing) and you should be good to go.
.PNG files can be re-colored following Jessica's helpful tutorial here. It's as easy as selecting Edit/Fill, then choose your color and hit "preserve transparency."
You don't have to use an over-sized printer to work with the 12x12 overlays. Re-size to 8x8 (under Image/Image Size) and print out in multiple quantities to create an entire mini book.
PHOTO ENLARGEMENTS
Another way to work with these overlays is to use them on top of an enlarged photo.
I love creating layouts where one whole page of the two-page spread is an enlarged photograph. Here's an example of that concept from Life Artist (traditional, non-hybrid layout):
And here's that same layout with an overlay and text added to the enlarged photo:
Overlays can be added to a photo and then printed at home or at your favorite developer. I can envision some of the framed enlarged photos I have hanging around here printed with a simple overlay that tells a bit more of the story.
To add an overlay to a photo in Photoshop open both the photo you are wanting to use and the .PNG overlay file. Using the move tool (that's the black arrow), simply select, drag and drop the overlay on top of the photo. I usually resize my photo first (for example, to 12x12 at 300dpi) and then click, drag, and drop the overlay onto the photo.
TRANSPARENCY
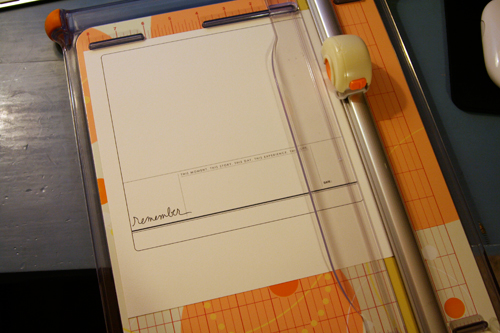
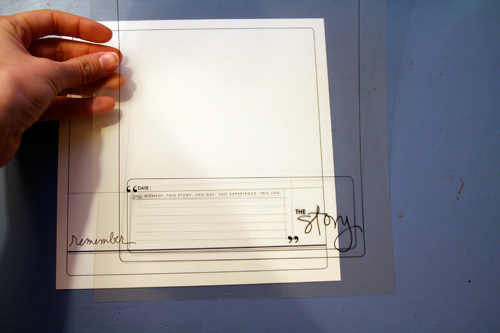
One more fun thing to do is to print the overlays onto a transparency. The one below was printed onto 3M Inkjet Transparency Film. This could be laid over top of cardstock, patterned paper, or be used to create a transparent layout (photos + elements added to the top). I would recommend adding your jounraling in Photoshop first and taking advantage of the lined journaling area before printing.
I highly recommend checking out Jessica Sprague's Photoshop Friday tutorial index (free tutorials listed by topic - a great reference) as well as her online classes at www.jessicasprague.com. She has a great $3.00 video class called Just For Beginners: Create Your First Digital Layout.
For more information on hybrid and digital check out Getting Started With Digital Scrapbooking.







Looking forward to your new series! Ali and Jessica - there is my dream match up! WOW
Sign in or sign up to comment.
You continue to blow my mind!! THIS is shock and awe!! Love your DD stuff--you give me faith!!
Sign in or sign up to comment.
Thanks for sharing this! This is just the kind of thing that I am interested in doing right now to expand my skills. :)
Sign in or sign up to comment.
love these ideas Ali!
Sign in or sign up to comment.
This is EXACTly what I need for what I'm trying to do now. I'll have to come back and check all your links. I think you have a full day's course right there!! Merci, Thanks, Shukran ..
Sign in or sign up to comment.
This is great Ali, just shopping around for a new computer and will be purchasing a Wacom tablet and getting photoshop elements!! I am so excited and this helps, so so much.
Nicky
Sign in or sign up to comment.
Ali, as I read your post today I had photoshop open and when I saw Jessica's description of the edit/fill preserve transparency, a lightbulb went off, and I went right into photoshop to try it!! I have been filling all my brushes manually with the bucket tool! What a time saver this will be! I have learned photoshop by trial and error as well and I think this post made me realize one of Jessica's classes could really speed up my photoshopping.
I used one of your overlays just this weekend on a hybrid layout I was working on. :) Love them!
Sign in or sign up to comment.
I love this! I wanted to buy your digi stuff last week, but I honestly didn't know where to start. All of these are great (and easy) ideas!
Sign in or sign up to comment.
Thanks so much for doing this. As much as I love the look of using digital elements with my paper scrapbooking I find it a bit intimidating. Can't wait to see what you do this week.
Sign in or sign up to comment.
Ali!
You rock! This is just what I have been looking for! Can't wait for more info! TFS!
Sign in or sign up to comment.
Great ideas. Photoshop can be a maze as well as a time trap. Your tips simplify things. Your results are so sharp looking.
Sign in or sign up to comment.
wow -- thanks so much. I just downloaded your overlays the other day. When I go to photoshop I get so overwhelmed and this just so sent it home for me.
Thanks Ali -- I think you are amazing.
Sign in or sign up to comment.
Cool, Ali. You've sold me now...I'm buying your kit today. I love the layouts you shared. I especially love the idea of having a Today You template to return to again and again to focus more on what we did over a typical day.
Sign in or sign up to comment.
Thanks so much for clearing up so many of the questions I've been having about digi-scrappin'. Thanks for using terms that I can understand too - that makes a huge difference. I've dabbled here and there, but definetly am lacking in some basic digi concepts, plus I struggle with how to adapt it to paper scrapping. Thanks again!
Sign in or sign up to comment.
Great post! I am currently working my way through Jessica's beginner class and she is just an amazing teacher. I'm with you - I need to learn slowly over time when it comes to a new program.
Thanks!
:) Becky
http://www.stinkylemsky.typepad.com/
Sign in or sign up to comment.
Ali, I've read your blog for years and I can't tell you how much I APPRECIATE you taking the time to really walk people through techniques in a step by step, very "you can do this!" kind of way. I think I'm like a lot of scrapbookers -- it can be easy to feel like scrapbooking the way we see it done in magazines is beyond us, like it's something for only the most seasoned and artistically gifted. But you put it within reach for us. And I love that because it brings added joy to the creative process for me...and I know that that joy will come through in what I create for my family to remember. So thank you!!
Sign in or sign up to comment.
Thanks so much! This is exactly what I needed! I can't wait for more info.
Thanks
Sign in or sign up to comment.
Thanks for the great tutorial with today's post! The clear explanation takes some of the mystery (and fear) out of digi scrapbooking making it easy to understand and to include in my own work! I'm anxious to see what you have in store for the rest of the week!
Thanks so much!
Cindy
Sign in or sign up to comment.
I wonder if I can use transparancies in my laser printer. I know I can't use cardstock.
Great tutorial.
Sign in or sign up to comment.
Thank you Ali for the information and for the inspiration! Coincidentally, I just had a very basic introduction to Photoshop last week in a Visual Arts course (as an accounting student fulfilling my arts requirement), and now am working my way through Adobe's 'Classroom in a Book'. This is all perfect timing: the figure it out myself route has been quite frustrating for me - patience is not my virtue, but I am trying to work on that. (hmmm, sounds like a scrapbook page, no?).
Sign in or sign up to comment.
I had no idea about the inkjet transparencies, how fabulous, thanks so much for that tip!!
Sign in or sign up to comment.
so many good tips. I can't wait to try a few of these.
Sign in or sign up to comment.
Ali, I have your journaling spots already. I am having a real hard time adding the text into that journaling box and then getting it to be the size that I want for my page. Any pointer, please!!! It is so frustrating not being able to quickly create what I want.
Eternally grateful if you can help...
Darlene
Sign in or sign up to comment.
I definitely want to give this a try and you have made it less intimidating. Thanks, Ali!
Sign in or sign up to comment.
Jessica's classes are awesome and well worth every penny. I have taken 3 of her classes and have learned so much.
Sign in or sign up to comment.