My 2008 Week in the Life Album: Album Creation Part Two

[ American Crafts Chestnut 8.5x11 D-Ring Corduroy Album; American Crafts Mumbo Jumbos Letter Stickers; vintage "E" ]
Super happy with how this week in the life project finally turned out, especially in the arena of keeping it simple. I ended up embellishing the patterned paper rectangles that fit into the baseball card page protectors and machine stitching on the second page of each day.
After placing all my photos into the page protectors I was able to take a look at how many rectangles needed embellishing. Go here for a look at what I had already done so far.
Here's a look at the second half of my creative process:

1. Gather up a bunch of things I think are pretty likely I will use for embellishing the patterned paper rectangles. Some of the things worked out and others I decided not to use. I really like having it all out on my table so I don't spend a ton of time looking for stuff to add.
2. Decide on how I want to embellish each group and then go for it.
Here's a look at each group and a close-up of an individual rectangle from within the album (and a quick how-to for each group):


[ Bazzill Swiss Dots Cardstock; Heidi Swapp Brown Felt Flowers; 7gypies Red Photo Turns; 7gypsies Fortunes Family Matters Rub Ons ]
HOW TO: Adhere felt flower with light adhesive. Run through sewing machine using red thread. Use a piercer to create a hole and attach the photo turn using a brad. Rub sentiment onto photo turn.


[ Basic Grey Elementary 12x12 Recess Paper; Creative Cafe Tickets; American Crafts Large Brads; Hero Arts Basic Uppercase Wood Mounted Stamps; American Crafts Precision Pen; Orange Staz On ]
HOW TO: Attach ticket with stapler. Press large brad through patterned paper and stamp on top using Staz On ink.


[ Creative Cafe Lucky Chocolate 12x12 Polka Dot Felt
; 7gypsies Keys; Maya Road Word Charms; Vintage Rulers from Random Arts; Papier Valise Bakers Twine (search for red + white twirling twine) ]
HOW TO: Adhere ruler to felt paper. Using the bakers twine, tie a knot and slip on the key and the charm. Tie another knot to hold the key and charm in place. Secure to back of felt paper with tape.

[ Hambly Brown on Kraft Brocade 12x12 Paper; Jenni Bowlin Studio Gold Felt Stars; Papier Valise Blue Border Labels; Ali Edwards Bits + Pieces for Technique Tuesday ]
HOW TO: Attach label. Stamp sentiment (use tape to mask beginning of sentiment). Lightly adhere felt star and machine stitch to complete.

[ Scenic Route Claudia Street 12x12 Sonoma Paper; Savvy Stamps Circle; Vintage Red Bingo Numbers (Papier Valise has some but I don't think you get the whole box so your numbers would not be guaranteed. Search her site for Red Bingo Markers under Misc. A google search will most likely located some as well.) ]
HOW TO: Each spread also includes an old bingo number that matches the date. Stamp on the patterned paper and slip into the pocket. The bingo number is adhered to the outside of the page protector.
Here's a look at the entire album:

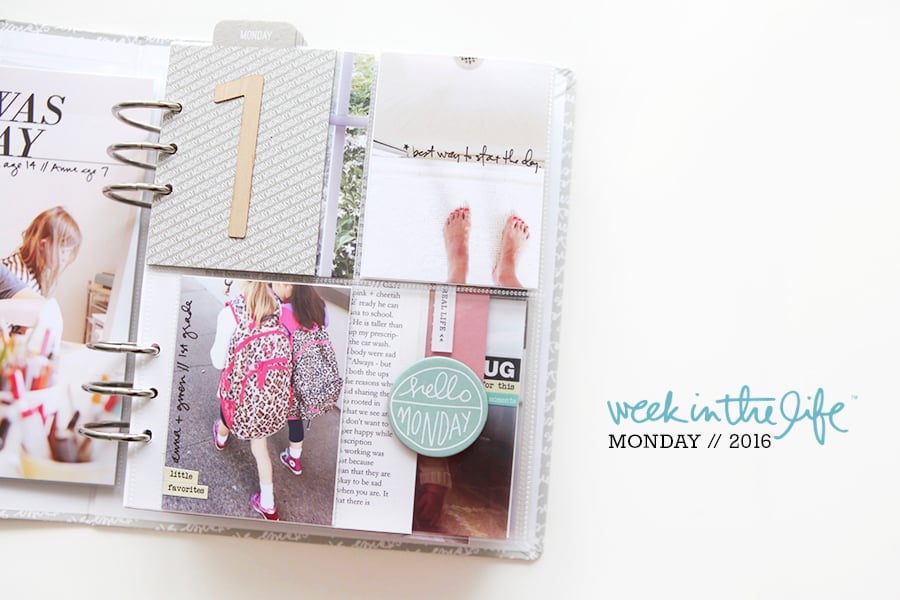
Monday (click the day-of-the-week link to read the journaling):


Machine stitching was added to the lines between photos on these photo pages (the right side).


Thursday also included one pocket that just holds a tea tag. I like the transparency of the rest of the pocket around the outside of the tag (held in place with a staple).


These Jenni Bowlin red mini bingo cards came in handy as they are just the right size for fitting into these pockets.


I included an additional page protector at the back to hold some newspapers and over-sized stuff from the week:

This was a project that I was excited to finish up and put on the shelf in the dining room. It is one that I will forget about for awhile and will pull it out in a few months and be so excited to look back at this specific time in our lives.
I want to send you a bunch of encouragement if you are anywhere in the process right now - from taking photos and documenting your days to figuring out how to pull it all together. You can do this. Keep at it, focus on what is most important to you, and get it done. Looking back you will be so happy that you took the time to create this very special look at your life and the lives of those you love.
I will definitely be doing this again next year (once a year is good enough for me).

A complete list of posts related to the week in the life project can be found here.


Love it. Simple, yet elegant.
I started this project later than most others who were going through it with you. last week was the week I documented. I am now editing photos, etc. You were right. It is a lot of work, but it will be so worth it in the end.
Thanks for encouraging us to do this project.
hugs!
Sign in or sign up to comment.
I want to thank you for encouraging us to do such a wonderful project.
Today, I was able to scan some of the finished pages. If you do see them, all the asterisks refer to our foster child.
I kept the design very simple because A) I wanted to finish the project quickly and B)to remind me of your style (half circle and hand drawn grids are so you)
Thank you again!
Nallely
Sign in or sign up to comment.
Ali, who makes those days of the week stickers? I love them!
Sign in or sign up to comment.
Way cool!!! Just love your little embellished inserts too... I took photos and did some journaling and this weekend is my time to put it together! I'm looking forward to it...
Sign in or sign up to comment.
My photos FINALLY arrived. So I'm making some progress at last you an see some shots of the picture pages on my blog.
Sign in or sign up to comment.
This is phenomenal! I am so bummed with myself because I set out to do this project with you a few weeks ago and only lasted through Day 1. But even that was great because I now have pictures of grocery shopping with my youngest. I guess I'll just be doing a layout of a Day in My Life instead of an entire book on a week. It's a start. Love the trading card pockets!
Sign in or sign up to comment.
I am so totally loving this! You rock it girl!! Shelley
Sign in or sign up to comment.
Darn my sister! I am now doing a Week +1 album so that I can include the birth of our niece, her first child. Love that we could keep track of the last crazy days of the pregnancy in this book because this is abig moment in life of our family.
Sign in or sign up to comment.
what a fabulous little project! at first i scrolled by thinking, "oh dear...too much work." but in reality, not so much and the final product is wonderful. thanks for the 'how to!'
Sign in or sign up to comment.
Thank you for this project ! Your mini is very beautiful !
Sign in or sign up to comment.
This is a great idea! The step-by-step instructions are extremely helpful. Even if someone can not do a day-by-day one, they could at least do a month by month. It is really good for the beginner scrapbookers out there that just do not know where to start! Thanks for your insight!
Sign in or sign up to comment.
Hi Ali!
I remembered someone asked about if the baseball card protectors were acid-free. I happen to pass by a hobby shop and purchased 5 pcs myself. And I asked the lady if it was some kind of special baseball card holder. When I saw the box where it came from, which holds 100 pcs, I saw that it was labeled acid-free! There were actually other 'special' make to it but I did not bother reading them anymore. It turns out, they are more archival safe than our good ol' scrapbook page protectors after all! Just look for the UltraPro brand though.
Sign in or sign up to comment.
I am an English teacher and I loved this project so much that I have chosen to adapt it to use in my English class. I created a "Day in the Life" album about my new baby girl. I showed it to my class and it generated so much interest that they are going to create one of their own to give as a holiday gift. Through the project, I was able to show my students that writing truly is important. It is a way to capture their feelings and their own individuality. I love the idea of giving them an assignment that will be meaningful both now and in the years to come. Thanks Ali for the inspiration!
Sign in or sign up to comment.
I really found this idea was too good not to try it for myself.
I just finish to create an album with the photos of "our week" and I love the way it turns.
Thank you for inspiring me, thank you for sharing this idea with us.
Sign in or sign up to comment.
I just want you to know, you're work is amazing!! Looking foward to see your next project! Thanks for sharing!!
Sign in or sign up to comment.
what stamps did you use for the orange dates on your daily journal pages?? Thanks
Sign in or sign up to comment.