Tuesday Tutorials : Katie Pertiet : Adding Emphasis With A Photo Mask

This week Tuesday Tutorials welcomes Katie Pertiet. Katie's digital tutorial walks you through the steps in Photoshop to add emphasis to a layout using a "photo mask."
New to digital scrapbooking? Check out these links to get started.

Adding Emphasis with a Photo Mask
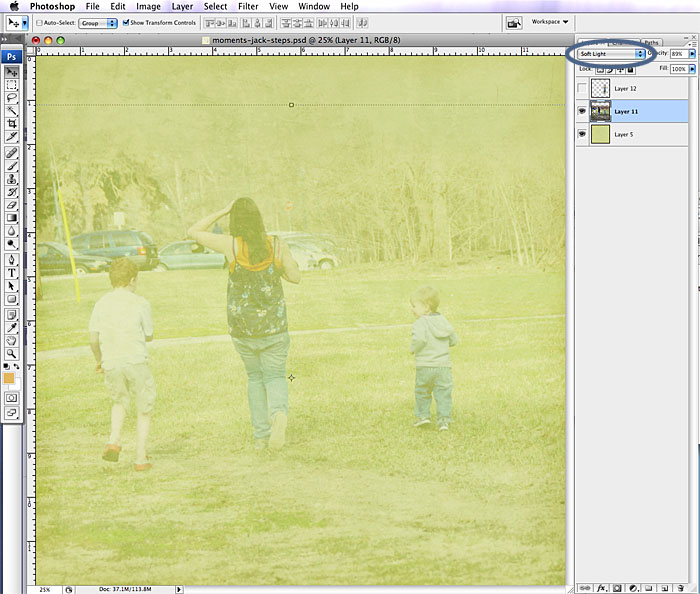
2. Add a light green background paper (Katie used Going Away Solids).
3. Open a photo and drag your photo onto the new document (Photoshop will create a new layer).
4. With the move tool selected, "show transform controls" checked, and the shift key held down, scale your photo to fill the entire page.
5. To achieve the blended affect simply change the blend mode to "Soft Light" in the layer palette and adjust the opacity until you like the way it looks (no right or wrong).
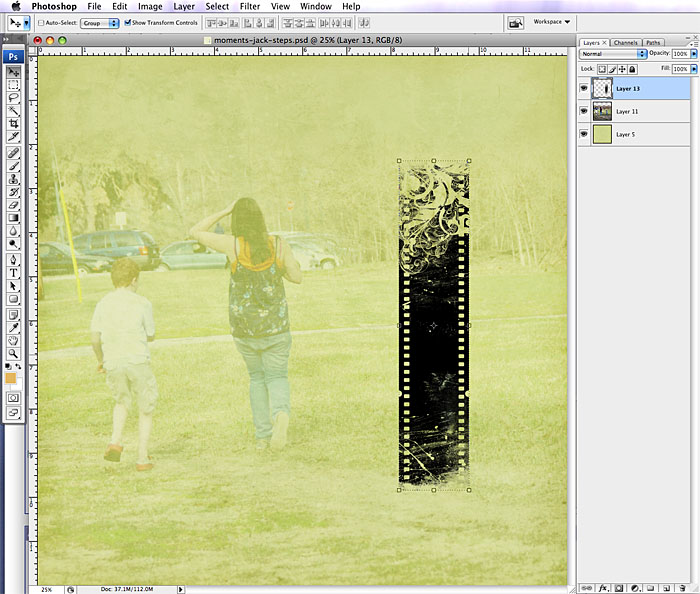
6. Since this page is for an album about Jack, the youngest in the picture, I wanted to draw more attention to him. I chose a filmstrip photo mask and positioned it over Jack in the photo:
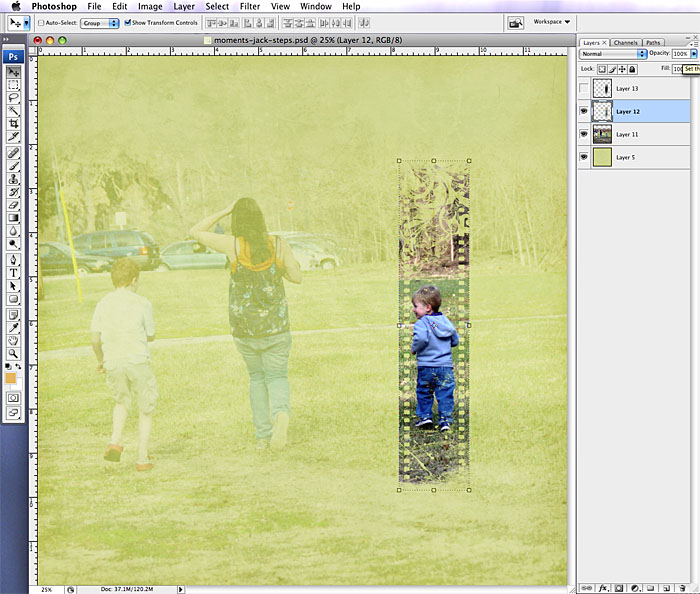
7. Turn off the visibility of the mask layer by clicking on the "eye" icon.
8. Click on your photo layer so that is your active layer.
9. Move your mouse over the mask layer in the layer palette and hold down the apple key on a mac [ctrl on a pc] and you'll see the cursor change. Click on the mask layer while holding that key down and you'll see 'marching ants' in the shape of the mask.
10. Making sure you're still on the photo layer, Edit > Copy
11. Create a new layer, Edit > Paste Into. It pastes the photo right in position:
12. Adjust the opacity to the strength you're happy with.
13. Add elements to round out your page and call it done. Simple as that!
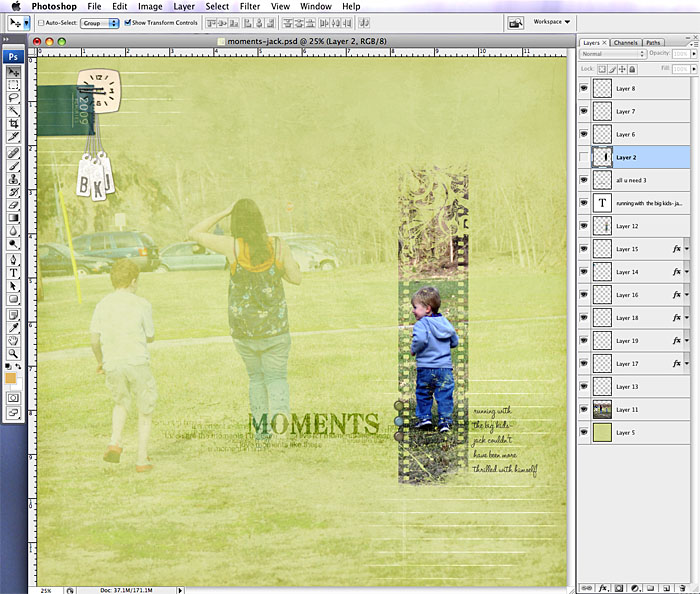
Try adapting this technique with other ideas, like pasting inside a letter or other shape!
Complete layout details available here.
 Katie Pertiet is the owner and founder of www.DesignerDigitals.com. She received her degree in graphic design nearly 25 years ago and has worked professionally as a graphic designer and art director before starting her own design firm in 1993. Her layouts have been published in Creating Keepsakes, Simple Scrapbooks, Memory Makers, Legacy, and BHG Scrapbooks Etc. Katie has also designed products for Autumn Leaves as well as licensing her designs for stationary, fabric, wall paper, prints and home decor. You can find her digital scrapbook products at designerdigitals.com and her prints at Art.com. For more inspiration check out her layout gallery.


I see Katie's stuff in CK all the time and have really enjoyed her work. Thanks for putting a face to the name and sharing her with us.
Sign in or sign up to comment.
Thank you, thank you, thank you...I have struggled a bit with masks! So helpful!
Sign in or sign up to comment.
Great tutorial.......I love it!! Thanks you!
Jessica Woodford
Sign in or sign up to comment.
Will this work in Photoshop Elements as well?
Sign in or sign up to comment.
great technique!!!!Thank you Katie!
Sign in or sign up to comment.
Thanks--glad you like it & yes, works in elements too! Edit > Paste Into Selection!
:)
Sign in or sign up to comment.
fabulous tutorial katie! I learn something new everyday : )
Sign in or sign up to comment.
Thanks!
Sign in or sign up to comment.
Love this tutorial. I so look forward to Tuesdays. Thanks for rotating between techniques.
Can't wait to try.
Sign in or sign up to comment.
Wonderful effect, Katie! Thank you so much for the tutorial!
Sign in or sign up to comment.
That is sooo good Katie. I finally Get It! two techniques in one tutorial.
Sign in or sign up to comment.
Is this done in photoshop Elements, or the full fledged photoshop? (I can't afford the one that costs $500+)
Sign in or sign up to comment.
You can do this in Elements too! Use Edit > Paste Into Selection.
Sign in or sign up to comment.
Wow Katie is so accomplished! What a great treat to see one of her tutorials! :-) TFS!
Sign in or sign up to comment.
Fantastic Katie! I use photo masks a lot but not in this way. I love your simple tutorials and would really enjoy more digi stuff in these tutorials---it's great!!
Sign in or sign up to comment.
Awesome tutorial. Thanks for sharing.
Sign in or sign up to comment.
Love this tutorial. Makes me realize I've gotta get back to my digital scrapping. Paper's been taking up way toooo much of my time lately!
Sign in or sign up to comment.
Yeah...I can't believe I did it the first try!
Yippee.
Thanks for the tutorial Ali and Katie.
Sign in or sign up to comment.
awesome tutorial - thanks!
Sign in or sign up to comment.
thanks for this great easy tutorial!!!!
Sign in or sign up to comment.
Hi there. I have given you an award on my blog if you'd like to come check it out! :) P.S. You share some of the coolest stuff on your blog! Thank you for that. Corinna
Sign in or sign up to comment.
Did you see the two peas warehouse walk video on youtube? I saw the Starwars stuff and immediately thought of Simon! My little guy isn't quite old enough yet, but some day... ;)
Sign in or sign up to comment.
Ali -- I wish to thank you for your latest great gift to your blog readers - tuesday tutorials. I have loved ALL of them so far. It is wonderful learning new techniques or a twist on a technique that I hadn't thought of yet. In addition, I love being introduced to new creative people for additional inspiration. What a great idea. THANKS. Tuesday Tutorials is much better than stumbleupon.com.
Sign in or sign up to comment.
Ok, this is totally awesome. Inspired me to make a page: http://www.flickr.com/photos/upload/done/?b=1246408746-1246408746-7652520@N05
And I am with you, the desire is there to scrap but the pages are just not being completed. Totally caught up in enjoying my girls + summer.
Sign in or sign up to comment.
Wow, love this and of course Designer Digitials is a fav place on the net. So many options in this one lesson :)
Sign in or sign up to comment.