Half-Circle Embellishment How-To Video
Half-Circle Embellishments from Ali Edwards on Vimeo.
Cathy got me all jazzed up earlier this week with her Tuesday Tutorial. She's been guiding me through the process with some tips and tricks as I get video tutorials and keynote presentation files ready for my Big Picture class later this year. Feeling really thankful for her help and assistance.
Today I decided to test it out with the program she uses called ScreenFlow. I've been "trial & erroring" all day and it's been fun to be learning something new again. There's a few things I definitely need to work on to improve (like not zooming the mouse all over the place, slowing down to be more methodical, and doing a better ending), but it's a solid start.
The Half-Circle Embellishments are available here through Designer Digitals.
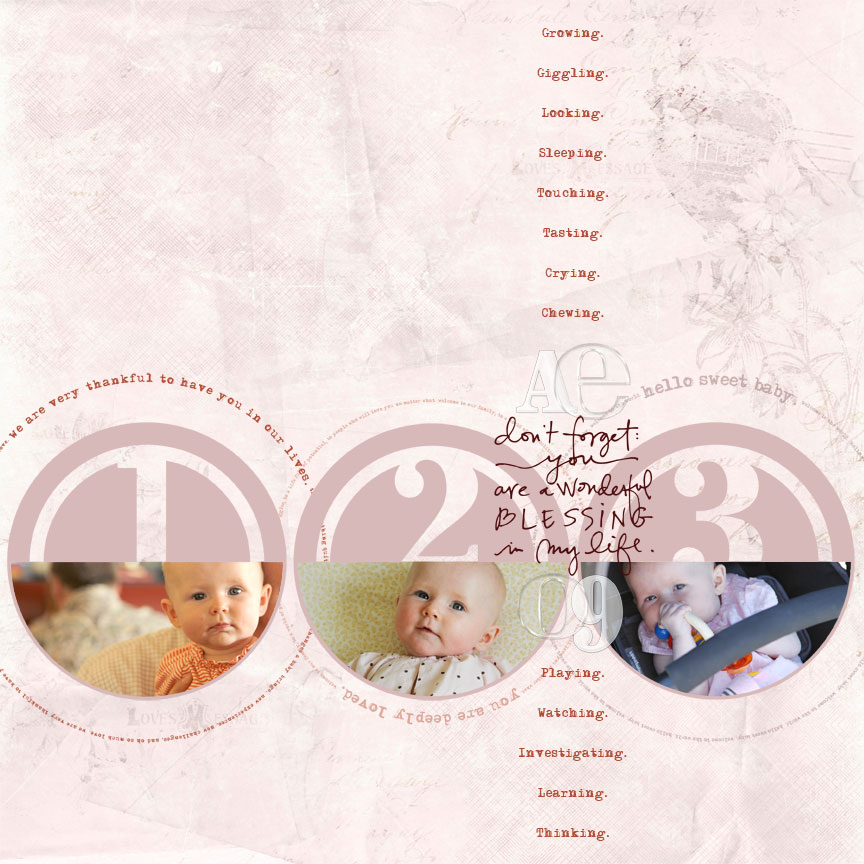
[ click on the image for a larger view ]
Here's a look at the finished layout I showed last week in the Pages In Progress post. I ended up adding some "ing" words describing things she has been doing lately, scaling down the one of the large text circles and adding a third one, and including her initials and the year with acrylic embellishments.
Supplies: Katie Pertiet Letterbox Love; AE Baby 12x12 Text Frames; AE Remember Sentiment Stacks; AE Half-Circle Number Embellishments; Katie Pertiet Acrylic Alphabet; Patti Knox DIY Acrylic Alphabet


Thanks for the tutorial Ali!, love that use for this half circle embellishments"
Sign in or sign up to comment.
Wow - you're too hard on yourself! I couldn't imagine anyone doing better! Thanks for generously sharing your knowledge.
Sign in or sign up to comment.
Nice job! :D
Sign in or sign up to comment.
So glad to see the finished layout! I love what you did (and that first shot of Anna is gorgeous, btw)!
Sign in or sign up to comment.
Nice work, Edwards.
Sign in or sign up to comment.
Good for you for venturing into this. I LOVE video tutorials. Love them!
My only suggestion is to do more zoom-ins onto the screen to show what you actually do - with those red circles that some designers use to highlight the actual drop down menu etc. The visual + the verbal really clarifies the process for most people. I'd also mention at the beginning that you are using CS4 as opposed to PE6 or 7.
Can't wait to see more!
Sign in or sign up to comment.
well done. I am looking forward to taking yours and Cathy's classes this fall!
Sign in or sign up to comment.
I'm having trouble hearing your tutorial Ali. It may be my computer but other things appear to be playing fine. I've got the volume cranked and I still can't hear you. Did anyone else have this problem or just me and my computer? Anyway, hope I get it figure out! Thanks so much for sharing it!
Sign in or sign up to comment.
Great video, Ali!
Sign in or sign up to comment.
nice video ali!
Sign in or sign up to comment.
Good job, Ali. Nice to hear your voice again. CKU Stamford was a long time ago! And, Anna is getting cuter every day. My suggestion ... can you change your mouse pointer to make it more visible?
Sign in or sign up to comment.
coolio...can't wait to try it!
Sign in or sign up to comment.
Very nice job. It will only get easier and better with more practice. Thanks for sharing.
Sign in or sign up to comment.
It is so funny(cute) to hear your accent as you talk, I guess when I read your blog I don't put an American accent in my head I guess I give you an Australian one - sorry! You did a great job. One thing I would like to know is how to move your image after you hae placed in in the mask if it is not quite in the right spot. From a very basic PS CS3 PC user. This idea helps so much, I am just a keep trying till it works type which can be frustrating. Thanks for sharing.
Sign in or sign up to comment.
Great video! You did a good job for your first time. I'm very new to PSE and I understood what to do.
Sign in or sign up to comment.
I think I answered myself, after rewatching did you say you just use the arrow keys to move the photo around afterwards? Thanks so much for the recolouring too, I finally worked out I need to select keep opacity - little things make a big difference!
Sign in or sign up to comment.
It's so great to hear you voice Ali!
The video is great. I love the screen/voice combo. It definitely makes me want to learn something new as well. Hmmm, I wonder if I could start making DIY videos for work... : )
Sign in or sign up to comment.
What a great pair you two are! Really enjoying the collaboration.
Sign in or sign up to comment.
Great job! Also neat to hear your voice after reading your columns and blog for so long! I must rush right out and download these from Desinger Digitals.
Sign in or sign up to comment.
thanks for the video.... i too didnt expect your accent (kiwi girl from new zealand here).... so NOT what I expected... how silly is that... we are so used to our accents... hahahaha
love your products!!! and cant believe anna is 5months
Sign in or sign up to comment.
I love the video. It was a great explanation of how to do the masking with your cute 1/2 circles. I wish I could see the screen a little larger so I could see exactly what you are clicking. I am such a visual girl that this is the best way for me to learn a program. You rock girl!!
Sign in or sign up to comment.
Great video, Ali. We all know you're gonna produce great videos if Cathy's guiding you through the process. Looking forward to taking both yours' and Cathy's classes in the coming months.
My only suggestion... I would have liked to see you! Even just for a quick hello/intro, makes it a bit more personal, you know? Don't worry, we won't be expecting Cathy's humour. No pressure.
Sign in or sign up to comment.
Great job on the tutorial Ali - she is such a button, it is hard to believe that she is already 5 months old. Wow
Sign in or sign up to comment.
Love it...great job!
Sign in or sign up to comment.
NICE Ali!
Sign in or sign up to comment.