Tuesday Tutorial : Jenn Shurkus : Handmade MiniBook

This week Tuesday Tutorials welcomes Jenn Shurkus.
UPDATE: Jen did a great update post on her blog including info on the stamps in the photo below and more information on the binding. Click here for more info.
Here's Jen:

This handmade mini book is a great base for so many projects. This can be an inspiration journal, an artist journal where you can test out different techniques or you can add photos make it a mini scrapbook.
Materials Used:
Claudine Hellmuth 12x12 Sticky Back Canvas
Gesso
Gel Medium in matte
acrylic paints
brushes
Chipboard sheets
UHU glue stick
scissors
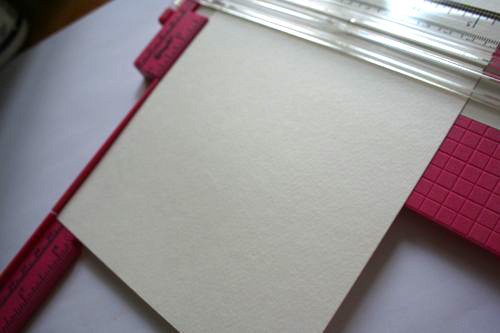
paper trimmer
stylus and bone folder
an anywhere punch or japenese screw punch
ribbon
variety of artist papers (i used watercolor, acrylic, mixed media, drawing, and canvas paper)
variety of scrapbooking patterned papers, single & double sided


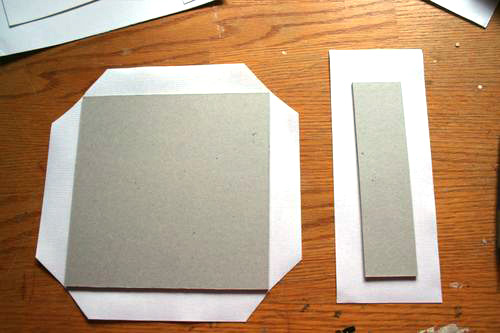
1. Start off by cutting your chipboard and sticky back canvas.
For chipboard you will need:
(4) 6x6 pieces(2) 6x1.5 pieces
For sticky back canvas you will need:
(2) 8x8 pieces
(1) 8x3 piece
(2) 5.75x5.75 pieces
(1) 5.75x1.5 pieces
(4) 6x2 pieces
2. Using your UHU glue stick, glue two pieces of 6x6 chipboard together for your front cover, the other two pieces of 6x6 chipboard for your back cover, and your two pieces of 6 x 1.5 chipboard for your spine. This will make it stronger. I don’t use glue sticks often, but when i do I love the UHU glue stick.
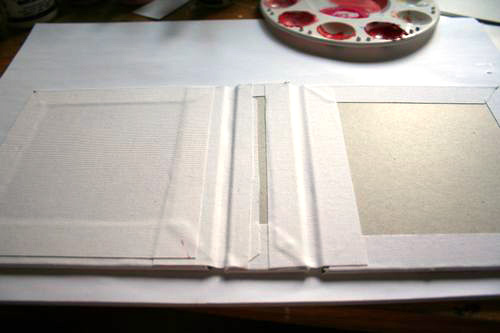
3. I love Claudine Hellmuth's Sticky Back Canvas, the possibilities are endless!! Cover the chipboard with the canvas pieces. Use the 8x8 pieces for the covers and the 8x3 piece for the spine. Miter your edges (cutting the corners off of the sticky back canvasas shown in picture) and then wrap the edges around the chipboard. Use the 4 pieces of sticky back canvas that are 6x2 for “hinges” between the covers and the spine.
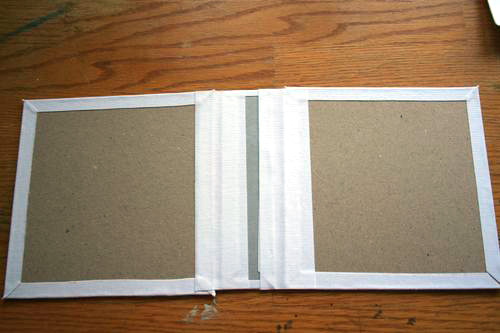
4. Use the remainder pieces of sticky back canvas to finish off the inside of the book cover so that there are no naked pieces of chipboard showing.
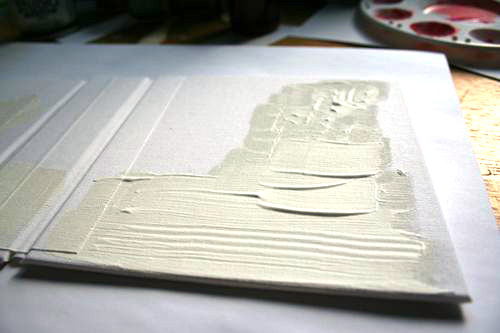
5. To decorate the cover I like to use gesso in thick layers to add texture. As you can see in my picture here I only added gesso in some areas. Play with different texture tools to “draw” into the gesso as well.
6. While waiting for this to dry, begin preparing the inner pages. Cut all the pages cut 5.5x11. You will want 3 signatures (groups of pages). This is explained more below.
7. To score all of your 5.5 x 11 papers you don’t need a fancy scoring blade. I find that those often rip the paper. I simply use my paper trimmer to measure over to where I am going to score. Then I drag my stylus along the track where the trimmer blade would normally go. This will give you a nice straight score. Use a bone folder after you have scored your papers to get a nice flat fold.
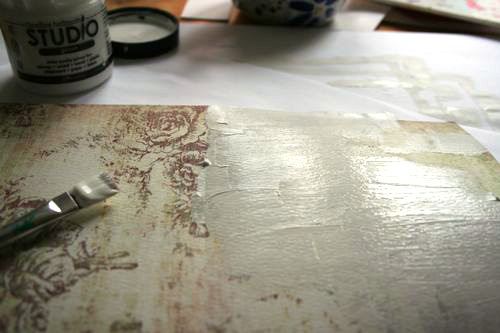
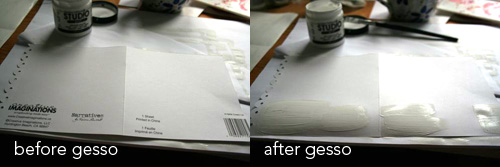
8. I like to start off by using gesso to cover the areas of my patterned paper that I don’t want to see. I might have a double sided paper I want to use but I don’t like one of the sides or there is a barcode I need to cover up. Once the gesso is dry I then go over it with different acrylic paints. This is when you get to play!

TIP: When using Claudine Hellmuth’s paints I like to scoop out the color with an ice cream stick. I keep one for each color so I don’t contaminate the paint.
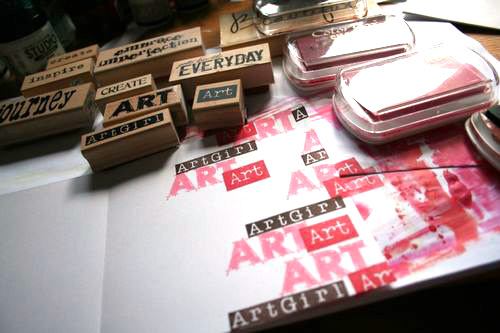

9. Play with all kinds of different papers. I like to flip through the book and have different textures and weights. On some of the smoother pages you might want to add some stamped designs or words that reflect the theme of your book. Remember ANYTHING goes!
10. Once the inner pages are all decorated it’s time to get back to the cover.

11. I tore out the definition for “inspiration” from an old dictionary and used matte gel medium to adhere it to the front. I then used acrylic paints again and played with coloring the whole cover, spine, back cover and inside as well.
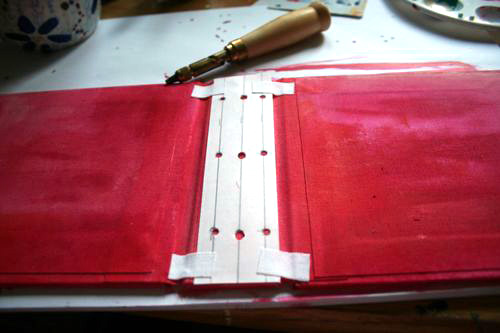
12. Now it’s time to put our holes in our spine. I drew up a template to use for putting the holes in my cover and my signatures. Download Spine template.
13. I used some scrap pieces of sticky back canvas to attach the template so it won’t move when you go to punch the holes. I used a Japenese Screw punch to put holes in the spine. I like this tool because it can go through so many layers with ease and no hammering!

14.Sort your pages into 3 signatures. Then using the sample template you used to punch holes in the spine, punch holes into each signature. I do one whole signature at a time.

15. Your ribbon will be threaded through each signature from the inside to the outside then through the cover. You should put your middle signature in first, then the outside signatures. This makes it easier for your hand to get in there. The middle hole is shared by the top “stitch” and the bottom “stitch.” Once you have all the ribbons fed through tie them into a double knot and trim excess ribbon.
I created my project with a pink/artsy theme. I donated this journal to the scrapbook store I manage (Colorful Creations in Cape Cod) for our Scrap Pink raffle last weekend. All proceeds were donated to the Susan G Komen Fund.
Now its time for you to go get messy and have fun playing! I would love to see what books you create!


She has been stamping for over 10 years, and when she isn't busy running Colorful Creations, a scrapbook and rubberstamping studio on Cape Cod, she can be found teaching a wide array of classes weekly at Colorful Creations or for A Muse classes around New England! Jenn is also copic certified and a Ranger certified educator. You can see more of her craftiness, and adventures in life at: {creative chick}


I love the mini album Jenn! It's awesome and something on my 'to do' list. Thanks.
Sign in or sign up to comment.
sticky back canvas!!!! Genius!!! Love this mini!
Sign in or sign up to comment.
simply awesome!!!! thanks for this fantastic tutorial!! =)
Sign in or sign up to comment.
Awesome, Jenn! You're a rockstar.
Sign in or sign up to comment.
SO ridiculously fabulous and inspiring!!! :)
Sign in or sign up to comment.
Great tutorial, Jenn! I feel like even I could make this. Beautiful!
Sign in or sign up to comment.
LOVE IT!!!! I think I might need to craft one of these up for myself soon :) Great job Jenn!!!
Sign in or sign up to comment.
So amazing ... sticky back canvas - what a wonder!! Great tutorial!
Sign in or sign up to comment.
I love all those stamps you used on the inside pages. Could you tell me which manufacturer makes them? I would love to add them to my collection.
Sign in or sign up to comment.
Really nice job, Jenn! WTG!
Sign in or sign up to comment.
Awesome tutorial, Jenn!
Sign in or sign up to comment.
This is awesome Jenn!!! Such a cool project!
Sign in or sign up to comment.
Wonderful Tutorial!! LOVE all the ideas Jenn. YOU ROCK!!!
Sign in or sign up to comment.
Oh my goodness, I'm so happy to see Jenn featured. She is so amazing. She has such an exuberance for life and her craft. One of the highlights of my trip from Canada to Cape Cod is going into Colorful Creations and just listening to her! LOVE her talent. Thanks Ali, so much for sharing her and her project with all of us :)
Sign in or sign up to comment.
I am kinda confused on how to put the book together with the ribbon. Sorry, I am more of a visual kinda gal. Love the mini book and want to try it but I just need some help on putting the book together.
Sign in or sign up to comment.
This is beautiful!! Lovin the gesso!
Sign in or sign up to comment.
This is so cute! I hope to try it soon!
Sign in or sign up to comment.
Thanks Jenn!
Sign in or sign up to comment.
I am not sure what this meant ...
'The middle hole is shared by the top “stitch” and the bottom “stitch.” Once you have all the ribbons fed through tie them into a double knot and trim excess ribbon.'
I have done one like this (I think) ... don't you line up say the middle signature with the middle set of holes, and then the other signatures go with the other set of holes?
Oh, I think I get what it means now! Duh!
Sign in or sign up to comment.
This is absolutely fabulous! SO inspiring!
Sign in or sign up to comment.
ABSOLUTELY LOVE IT!
Sign in or sign up to comment.
Woo Hoo! This was fabulous! thanks for sharing Jenn's talent with the world Ali!
Sign in or sign up to comment.
This looks like lots of fun. I love mini-albums.
Sign in or sign up to comment.
I love this! Its perfect how it can be customized for each individual taste and style. I love things like this that are frugal, creative, and unique. Well done!
I featured this entry on the Facebook Fan page for Reclaiming The Home
http://www.facebook.com/pages/Reclaiming-The-Home/142292014328?ref=nf
Sign in or sign up to comment.
Wow! Seriously . . . wow! This is just fantastic!
Sign in or sign up to comment.