Scrapbooking With Your Computer : Opening, Recoloring, Adding To A Photo, Loading Brushes
Welcome to Day Three of my week-long series on Scrapbooking With Your Computer.
I had initially planned to write about hybrid elements today but ended up going in a bit of a different direction based on what I have covered so far. Today I am going to walk you through four processes: opening, recoloring, adding a .png to a photo, and loading brushes in Photoshop Elements.
To help all those visual learners out there I have recorded a video tutorial that walks you through each of these steps. I have also included written instructions below. To view this almost-20 minute video tutorial much larger click here.
AE Digital Scrapbooking Tutorial : Opening, Recoloring, Adding To A Photo, Loading Brushes from Ali Edwards on Vimeo.
OPENING DIGITAL PRODUCTS IN ELEMENTS & WORD
After downloading and unzipping your digital products you are ready to start using them in your photo-editing program. Here's how to open .png files in Elements and Word:
ELEMENTS
1. Open Elements.
2. Go to File/Open. (The use of "/" means that the Open option is listed under the File menu). From there you will navigate to wherever you chose to store your digital elements. Select the element you would like to open.
WORD
1. Open Word.
2. Go to Insert/Picture/From File. From there you will navigate to wherever you chose to store your digital elements. Select the element you would like to open.
RECOLORING .PNG FILES
Two of my favorite products to create and work with are brushes/stamps and overlays. When you purchase these products they come in the default color black. Here's how to recolor single-color .png files:
ELEMENTS
1. Go to File/Open to select the .png file.
2. Go to Edit/Fill Layer. Choose a color (a drop-down menu gives you options for color, foreground color, background color, etc). Make sure that Preserve Transparency is checked to recolor just the element rather than the entire layer.
WORD
1. Go to Insert/Picture/From File to open the .png file.
2. With the element selected go to Format/Picture. From the menu on the left select Picture. Find the drop-down menu called Recolor under Image Control. Select the color you want and click ok.
If you are interested in learning other ways to recolor elements go here.
ADDING WORD ART TO YOUR PHOTO IN ELEMENTS
One of the simplest ways to start using digital elements is to add them to your photos before uploading to your photo developer or printing at home. Here's the basic steps for adding a .png file to your photos:
1. Open the .png word art file in Elements (the free element available in yesterday's post will work great for this).
2. Go to File/Open and navigate to your photos. Select a photo to open.
3. With the .png window active (click on it to make it active), select the Move Tool (the black arrow). Click & hold on the .png image and drag onto your photo. This will create a new layer on top of your photo layer.
4. To resize the word art click on the bottom corner (make sure the word art layer is selected in the layers palette) and drag. In Elements (at least in Elements 6) you do not need to hold down the shift key while resizing to keep the proportions correct.
5. If you want to recolor the word art follow the instructions listed above regarding recoloring .png files.
LOADING BRUSHES INTO ELEMENTS
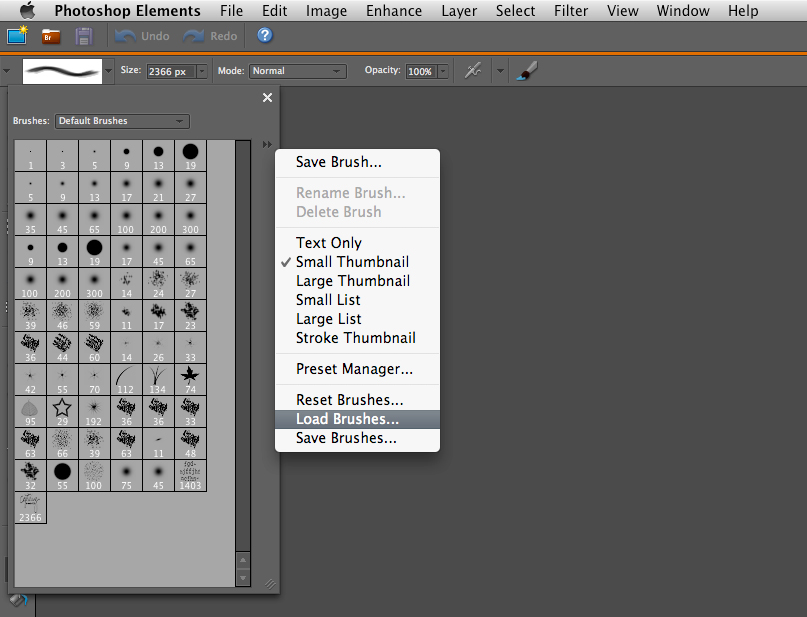
1. Open Elements.
2. Select the Brush Tool from the tool palette. Look towards the top of the window and you will see a few different drop down options related to brushes.
3. From the drop down menu of brushes click on the small double arrows on the right. When you click on these arrows a new drop down menu (also called a flyout) will appear.
4. From the flyout menu select Load Brushes. Navigate to your downloaded .abr file to load. When you re-open your brush window the new brushes will be at the bottom of the list.

MORE COMING LATER TODAY
Check back later today (or subscribe here to get my posts sent to your email or other reader) for a second post focused on basic product definitions and suggestions for choosing digital products to help you get your stories told.


thanks, these tips are very helpful! can you add one for adding a touch of color to a black-and-white photograph? this would mean not starting with one in color and desaturating it...thanks!
Sign in or sign up to comment.
Yahoo, downloading my free trial of Elements now...wish it would go a bit faster, can't wait to give something a try! Thanks Ali...for doing this! Rayan
Sign in or sign up to comment.
wow, I can't believe how easy it is. Almost embarrassing. Thanks for the great tutorial.
Sign in or sign up to comment.
Ali, thank you so much for sharing your time and talent with everyone. Wishing you well.
Sign in or sign up to comment.
I got PSE 7 last year but haven't explored it... partly because it is intimidating and partly because chasing free information/tutorials on how to use it in the internet takes time and some of them get really technical.
That being said, THANK YOU very much for these series of valuable lessons. I know I still have a lot to learn but I love that your approach to this tutorial is simple and straight-forward. Thanks so much! Now off to read Day 3's lesson. :-)
Sign in or sign up to comment.
Great tutorial. Thank you so much.
Sign in or sign up to comment.
Do you think you could explain how to load actions into PSE? I'm having a hard time figuring it out.
And, thanks for all these great tips.
Sign in or sign up to comment.
Ali, thank you so much! My first success with photoshop! The caption is so great, I used it over a picture of my son I took this morning. I'm so excited, I feel like I might actually be able to learn how to use PSE!
Sign in or sign up to comment.
Hi Colleen - here's a link for you that tells you how to add actions in Elements 7: http://graphicssoft.about.com/od/pselements/ss/10tipspse7_5.htm
Sign in or sign up to comment.
Hi Honey Lazar - this link might be just what you are looking for: http://graphicssoft.about.com/od/pselements/ss/10tipspse7_6.htm
Sign in or sign up to comment.
Ali.....thanks for this tutorial! I use text on my pages but forget how great they can look on the picture. So happy to get all this new info......
Sign in or sign up to comment.
this info this week in invaluable. thanks so much for your selfless posting!!!
:)
Sign in or sign up to comment.
Great informative post-I am always learning something new about digi scrapping-thank you! I know you have listed some links to your fav products/stores and hopefully at the end of this week, you'll list some great sources for us...if you do, this is a great blog that everyday lists so many links to free digital products including templates, whole kits, quick pages, alphabets, etc.. I try and skim through everyday and download my favorites-in return, all the blogs/stores you are linked to ask that a thank you be left. (I visit this site, I am not affiliated with it or any blogs/stores it links to.)
http://cbhscrapbookfreebiessearch.blogspot.com/
Thank you so much for this week!
Sign in or sign up to comment.
Hi Ali, thanks for doing these tutorials. I have just started using PSE and have a question about Brush organisation. Whenever I want to browse through my brushes, I have to load each set in Elements, and click on each one to see what it is. Do you have a system for organising your brushes so that it is easy to find what you are looking for? Thanks very much for your help.
Sign in or sign up to comment.
Come join us at MGR. A forum for moms/women who love to talk about projects, sewing, scrapbooking, photography, blogging, and being a WAHM. www.mygreatretreat.com
Sign in or sign up to comment.
Ali, thank you so much for this series. I got PSE 8 for Xmas, and I have a very low level of photoshop knowledge....this has been so awesome...I'm looking forward to the rest of the week. Thanks!!!
Sign in or sign up to comment.
Thank you for the great video today. So very helpful.
Sign in or sign up to comment.
Hi Ali, this is series is super thanks so much. I'm having trouble loading the brushes tho. I have PS 7 (not elements) and when I click load on your & Katie Pertiet's goodies, it gives me this msg: Could not load the file because it is not compatible with this version of photoshop. Am i being dim and doing something wrong? Thanks so much.
Sign in or sign up to comment.
Ali is there a way that I can download these sessions for print?
Sign in or sign up to comment.
Hi Shayne - here's a link that addresses your issue: http://www.designerdigitals.com/digital-scrapbooking/tips/questions/50/Can+I+use+your+brushes+in+Photoshop+7.0%3F++I+get+an+error+message+when+I+try+to+load+the+brush+file.
Sign in or sign up to comment.
Hi Ali ~ I randomly opened a picture of my son I haven't looked at in a very long time. Just a basic picture of when he was about 14 months...nothing special. But everything changed when I added your element. So many ideas came flooding in. I have to make a page now with that image and element.
You do inspire me! Looking forward to rest of this series.
Sign in or sign up to comment.
Hi Ali, I am loving this series!
When I select a photo in elements from iphoto, does it automatically copy it so I don't have to worry about messing up an original?
Hope you can help :)
Sign in or sign up to comment.
Thank you so much for the lessons this week! I just downloaded the trial version of PSE8 to try it out & it's so much simpler to learn it if you have a great teacher! :)
One question, when uploading photos into the PS Organizer, is there a way to upload a whole folder at once or do I need to upload each picture individually?
Sign in or sign up to comment.
Hi - I always do a save-as after making adjustments to a photo. I think if you just hit save it will save whatever changes you made to the original...I could be wrong but I *think* that is right :).
Sign in or sign up to comment.
I am really enjoying this series, great info. Will let you know how I do with adding the element to a photo for the first time, but with your instructions I think I will do fine. Many thanks.
Sign in or sign up to comment.