December Daily : Foundation Pages : Cover & Days 1-12
Today I am going to introduce you to the first half of my album and talk about what I did for the cover. Tomorrow I will post the second half of the images and a bit more explanation.
Something I stated last year should definitely be repeated again:
For me, this book is less about decoration and more about documentation. What that means is that when the time comes in December to add my words and photos I will not spend a lot of time trying to figure out what I want to add product-wise. I don't have any plans to spend more time each day than it takes to upload and print a photo (here at home), write up some journaling, and adhere it into my book (and maybe add one embellishment or a couple word stickers). I don't want this album to take up more time than necessary during the holiday season. Again, I want to be present and experience the season and do a bit of documentation as we go along.
I like to do documentation as we go along, rather than after the holidays, because I find that I have a tough time remembering what were the specific important or poignant or endearing or special parts of the day months after the fact (sometimes they are comments in passing or very simple things that end up meaning the most). Instead of "we went to see Santa today" I want the journaling to be more personal and real: how did Simon react, what was special about the moment, did he say anything silly or wonderful, what made it unique from last year, etc.
Those are the things I want to capture in this album.
As you will see below this is all about keeping it simple. Don't spend too much time deciding where to put the numbers or journaling blocks. Get it done. When December rolls around you will be working with what you have in front of you rather than starting from scratch. Making it work is a creative task in and of itself.
One of the questions I receive each year is how can you set this up in advance when you don't know what you will be doing on each day? This, for me, is part of the creative adventure. I create the album first and then format my content around the pages during December. If you look back through my pages from 2008 (see the full list here) you can see the before and the after to get an idea of some of the things I did with my foundation.
DECEMBER DAILY 2009
Let's begin with the Prima canvas album.
WHY THIS ALBUM? One of the main reasons I went with this album was that I wanted to do something different from the last two years. I still wanted the flexibility of having a variety of different pages (textures, sizes, etc - and this includes some page protectors and canvas pages) and I was looking forward to the creative challenge of seeing what I would do with it.
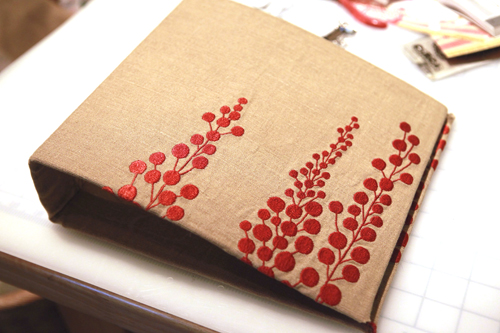
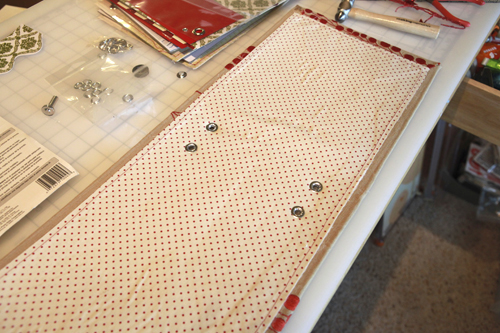
After lots of thinking about what I was going to do, I decided to cover the album with fabric.
In my stash I had this cool linen/cotton blend piece with red berries that I ordered last year from Purl Soho. In looking at their site it looks like these are embroidered fabrics come from India and this color is available here (it's called Natural/Rust Branches).
To cover the album I used a product called Wonder Under 
Before covering the album I removed the grommets (the little metal circle pieces that held the ribbon) with small pliers.
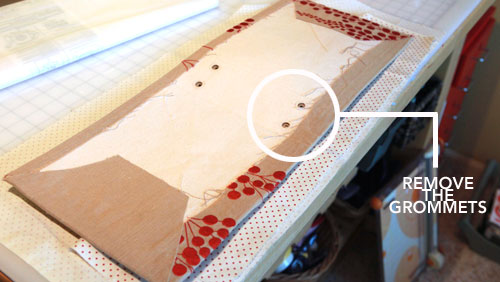
Before covering the interior with fabric I made sure to punch holes where the new grommets would be placed (in the same original location). If you don't punch the holes when you can still see them it is a bit challenging to get them in the right spot.
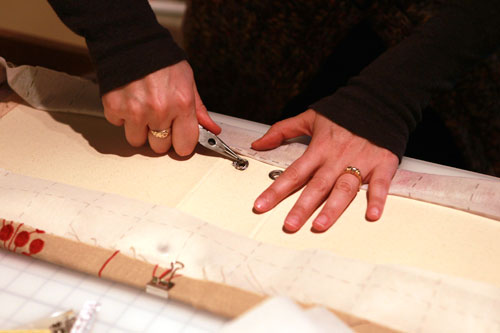
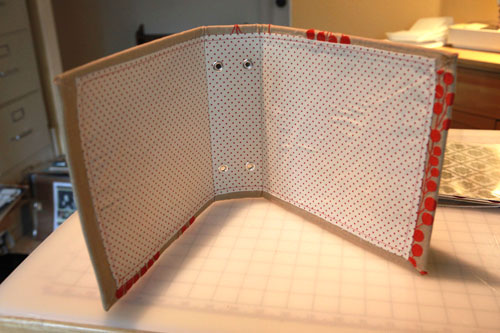
For the inside of the cover I stitched two pieces of fabric together (just one was too thin and you could see through) and used the Wonder Under again to adhere it to the inside of the album.
New grommets were set after the album was covered inside and out.
If you are interested in working with the canvas album but not interested in covering it with fabric I saw a cool version that Amanda created using stars and Scarlet Glimmer Mist.
Once I had the cover done I was ready to tackle the inside.

One big difference from year's past is the inclusion of more page protectors. Last year I did a couple pages with divided page protectors - this year there are more. In addition to the pages that come with the album I also found that some old KI Memories 8x8 post bound page protectors fit just right.
THE RINGS : One thing I really wanted to try with this Prima album was to see if I could use rings instead of the ribbon that comes with the album. I was able to use 2.5 inch metal rings (in some of the photos below you will see where one of them is open - need to replace that with a new one) through the grommets.
After figuring out that the rings were going to work I decided to put eyelets in the holes of the pages I was creating (the ones that come with the album already have them in place). The Crop-A-Dile worked like a charm for setting all those eyelets.
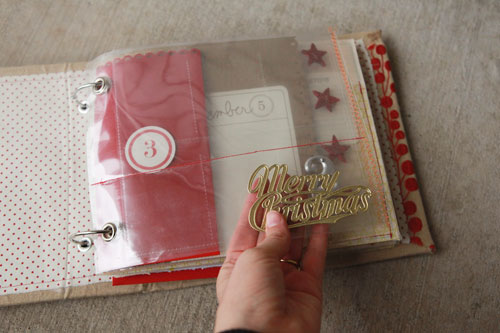
DAY ONE : Merry Christmas foil from Papier Valise (you can find it on page 3 of her paper section - you get a bunch of them that you can share with friends or use on other projects) is placed inside a page protector. To keep it in place I ran it through the sewing machine with red stitching (I did red stitching for the entire project to keep it simple). The content for the day will go above, leaving the part with the Merry Christmas foil see-through into the rest of the album.
I will add a number one to the photo when I document the day.
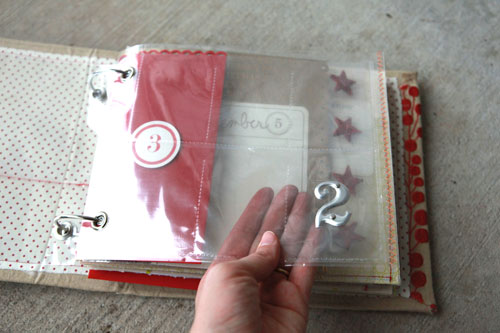
DAY TWO : Metal 2 from Tim Holtz. This page is an 8x8 page protector that came with the album with part of an 8.5x11 baseball card page protector trimmed down and slipped inside (when trimmed there are 6 pockets). Basically I cut off the top row of pockets and the part along the side where the holes are located. There is an example of a page like this in the December Creating Keepsakes magazine.

DAY THREE : Red envelope from Paper Source. Red Circle Number from Every Jot & Tittle. Scalloped edge along the top of the envelope created with the Fiskars Apron Lace border punch.
I like that there are some things I have used every year like these red circle numbers.
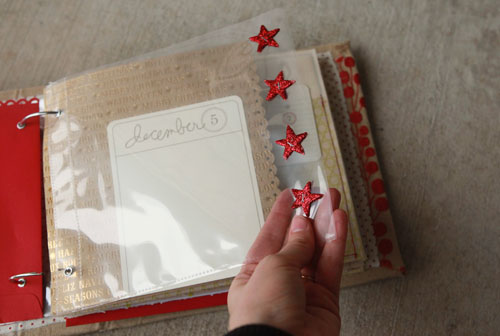
DAY FOUR : Red Galaxy Stars from Prima. I stapled four on the front and four more in the same location on the back side of the page protector. The photo or journaling will slip into the pocket alongside the stars. I may end up stitching a vertical line alongside the stars once I have the rest of the content in place.
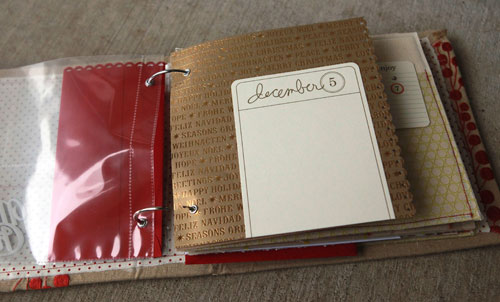
DAY FIVE : 25 Days of December Overlay from Designer Digitals printed on cream cardstock with corners rounded on the top. Gold embossed patterned paper from K&Company.
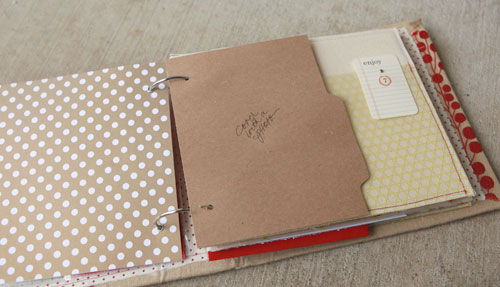
DAY SIX : I cut down a file folder and wrote the words "cover with a photo." I tried to leave myself a few pages that will be entirely photos with journaling on top since I ended up wanting more of those sorts of pages last year. Gold with white dots paper is American Crafts.
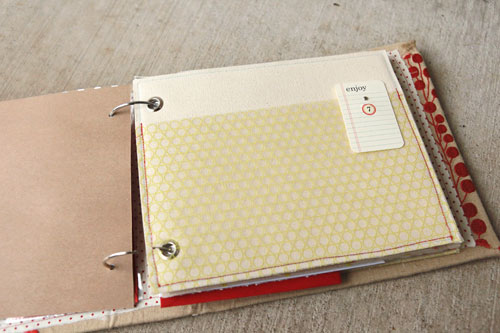
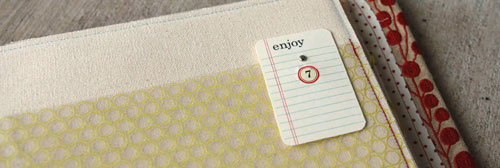
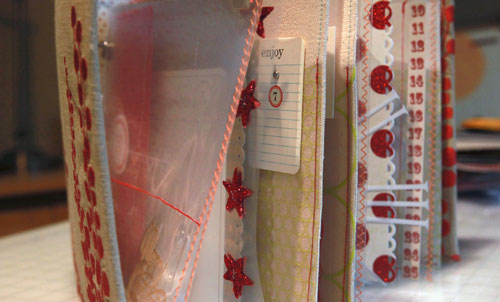
DAY SEVEN : For the canvas pages that come with the album I decided to create pocket pages by sewing pieces of Hambly overlays on top. Small Enjoy card is from Banana Fish Studio. Circle 7 is a rub on from October Afternoon. I stitched transparency overlays to both sides at the same time with my machine (creating a pocket on the front and the back).
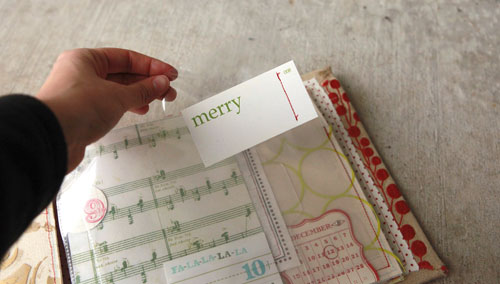
DAY EIGHT : A small "merry" card from Elles Studio was stitched to the outside of a page protector. The number "008" was already on the card.
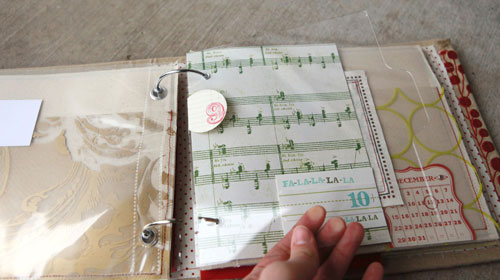
DAY NINE : Pages from other minibooks make great pages for your December Daily. In looking though my stash of minibooks I grabbed one of the clear acrylic ones from Clear Scraps (8x8). I used my trimmer to cut a bit off the edge (removing the holes) and then used the Crop-A-Dile to punch the holes.
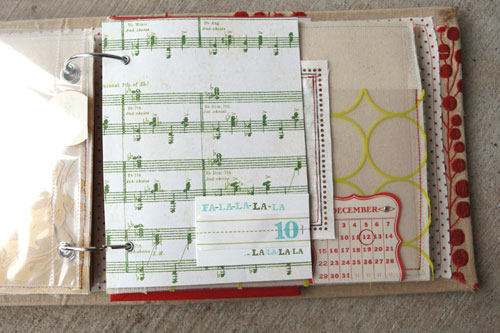
DAY TEN : Green glitter music pattern paper from Making Memories. Fa La La letterpress card from Paper Source. Small blue rub-ons from Jenni Bowlin. This is one of the easiest ways to create pages - adhere pattern papers back to back and punch holes for the binding.
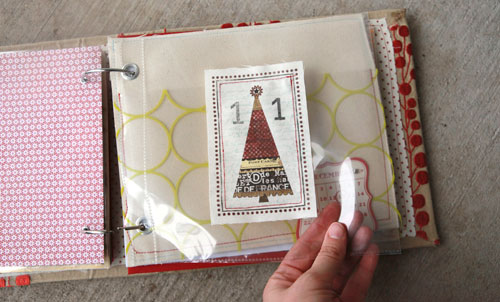
DAY ELEVEN : Pink Paislee canvas tag machine stitched on top of a page protector. "11" stamped with Studio Calico Noah alphabet stamps and black Staz-On ink. The content for this page will likely be a new page behind the page protector (like a full page photo).
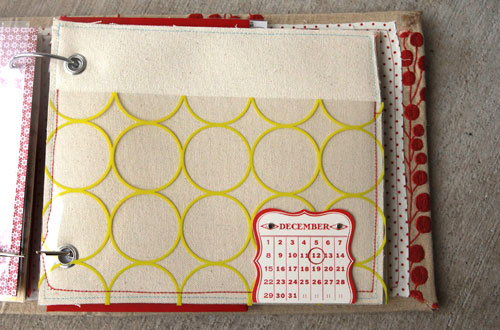
DAY TWELVE : Another canvas page where I created a pocket by machine stitching a Hambly overlay right onto the canvas. Red calendar is from Jenni Bowlin.
TOMORROW : Days 13 through 25.

This is part of a series of posts on creating a December Daily album. All posts for 2009 can be found here.


Last year I adapted this for me. No photos (since I can't print at home and live an hour away from a photo developer). I used a mish mash of present tags and journaling cards.
Just wrote a few sentences about the Christmas-y thing we did that day. I started it in mid-November and only did a page on the days we actual did something.
I could have taken a picture and added them in when I got them, but I did that with Stacy J in a September album and it was kinda a pain. Plus it increases the odds of not finishing the album.
Sign in or sign up to comment.
It's all about making it work for you :).
Sign in or sign up to comment.
So beautiful and it isn't even filled with all the memories yet! Your DD albums are such an inspiration! Over the week I looked through your post from previous years and love what you have created. Last year I watched from the sidelines as you and others completed and filled this album. I'm happy to say that this year I'm jumping in and creating my own DD album. I'm so excited! Thanks for taking the time to share and explain, it really makes all the difference in the world.
Sign in or sign up to comment.
I use my fave cards from the previous year in the daily album. Many cards are just the right size and a great weight for a page. I also display some colorful holiday postage stamps one day as well.
Sign in or sign up to comment.
Ali, this is amazing!! I wish you sold these! I would do one myself if I had the time..
Totally creative. I even tweeted about it I was so excited!
Sign in or sign up to comment.
very classy! thanks for sharing this fantastic idea
Sign in or sign up to comment.
Amazing! I love the fabric you used for the cover! This is the first year I am doing an album and I am exctied. I am really trying to decide when to start my album as we always get our tree the weekend after Thanksgiving and would like that to be part of the album. The numbering from one to 25 seems so much more pleasing though....choices, choices...:) Thanks for taking all the time in your posts. I love them and look forward each day to what new things you have to say!
Staci
Sign in or sign up to comment.
love your dd books. they are so great and creative. could you just make them and sell them. :)
Sign in or sign up to comment.
OMG Ali! I'm so honored you would link to my album. I love yours, it's absolutely gorgeous! inside and out.
Sign in or sign up to comment.
Your album is so great Ali and it will be even greater when it really comes to life with all the pictures and stories in it. In out forum I try motivating people also to create December Dailies - it's such a wonderful project. Thank you for being such an inspiration.
Sandy
Sign in or sign up to comment.
So inspiring! Beautiful album, Ali! Can't wait to see the rest tomorrow, and then get a head start on mine!
Sign in or sign up to comment.
I started doing seasonal minis a few years ago, love the idea of celebrating the seasons in a quick way. Last year I was inspired to get the foundation put together so I could just print photos and add a journaling and other little bits. Will you be making your advent boxes like you've displayed in the past? I have a matchbox die that I thought I would make a great base, but can't decide how to display/use them. Or if I should just have them in a basket with numbers and let my three year olds pick out the date?
Sign in or sign up to comment.
Breathe in! Breathe out! Breathe in! Breathe out! Keep it simple. Keep it simple. That is my mantra..and then I see all the WOW albums and feel performance anxiety. Yikes. Looking forward to this. Got some cool stuff from Elle's Studio and the basic album is on it's way from Scrapbook.com.....and then I will....Breathe in! Breathe out! Relax and keep it simple! AGGGGGhhhhhh!
Sign in or sign up to comment.
I agree with Ali...check out the sewing machine shops for refurbs. It doesn't take anything fancy, especially for a regular ol' straight or zig zag stitch. I also have a 1970 Sears Kenmore model handed down from my great aunt!
Sign in or sign up to comment.
Hi Ali,
I love that you can achieve this every year! I started one last year but did not finish, so I have decided I will use your posts as inspiration to get it done! Thanks for always providing inspiring ideas.
Judith (Adelaide)
Sign in or sign up to comment.
Hi Emily - the ones I made previously are all nice and packed in a box and will be hung up again for the holiday season. Last year I was too tired + pregnant to get them out. Looking forward to it this year.
Sign in or sign up to comment.
beautiful ali-your creativity never fails to amaze me. thank you so much for sharing this special project with us-it is my favorite each and every year.
Sign in or sign up to comment.
awesome!!!
Sign in or sign up to comment.
this is absolutely gorgeous! I just love the fabric you chose :) I can't wait to get mine started...just slowly collecting all of my goodies. Thanks for the inspiration. I can't wait to see the rest tomorrow!
Sign in or sign up to comment.
love your album Ali, i have done all mine and might even make one up for my friend to use....man monday took ages to come as when you live in little old new zealand its not till tuesday that we see it hehe....looking forward to seeing the second half of your album, im going to do mine till the end of the month so i can do the unwinding of xmas as well with the kids playing with new toys and taking the tree down as well.....so love this idea thank you for being so inspiring
Sign in or sign up to comment.
Thanks so much Ali! You're so inspiring! I can't wait to see the rest...
Sign in or sign up to comment.
I love the sewing on the pages. I will somehow find a way to make that happen in my December Daily! You see, I have a spinal cord injury and use a wheelchair and I am unable to use my legs. I know that sewing machines have 'feet.' LOL I have use a hand held machine, but they absolutely do not work. Anyways, I totally am in love with the start! You are a great inspiration! Go Ali!
Sign in or sign up to comment.
Once again, this album really looks so great already! I love love love the idea of stiching overlays on top of the canvas pages.
I haven't been able to complete last year's album (my son was born December 12th!) but I already have a few ideas regarding what sort of pages worked for me.
I also love the fact that you're trying new things AND keeping old ones (like the red circle numbers). Will try to do that as well.
Are you going to put a title on the front cover and/or spine?
Sign in or sign up to comment.
I love this its so inspiring and such a fantastic idea.
The fabric is just gorgeous.
Here in NZ Christmas is our summer and we go away from the 29th for 3 weeks ,I would like to do a similar daily from the 25th of Dec I finish work on the 24th for 3weeks R&R.
ALISON THANKS FOR SHARING..
Sign in or sign up to comment.
LOVE the first half of your album. I am still on the search for an album and can't wait to get started. Your inspiration today will definitely spur me on.
Sign in or sign up to comment.