Heart This Photo | Scrapbook Layout

LAYOUT IDEA | Take an everyday photo and tell a story about your life. Don't talk about what's happening in the photo - talk to the person in the photo. What do you want to say to them right now? What love can you spread? What joy can you bring? How can you build them up through your words?

Here's the photo that inspired this page and the prompt:

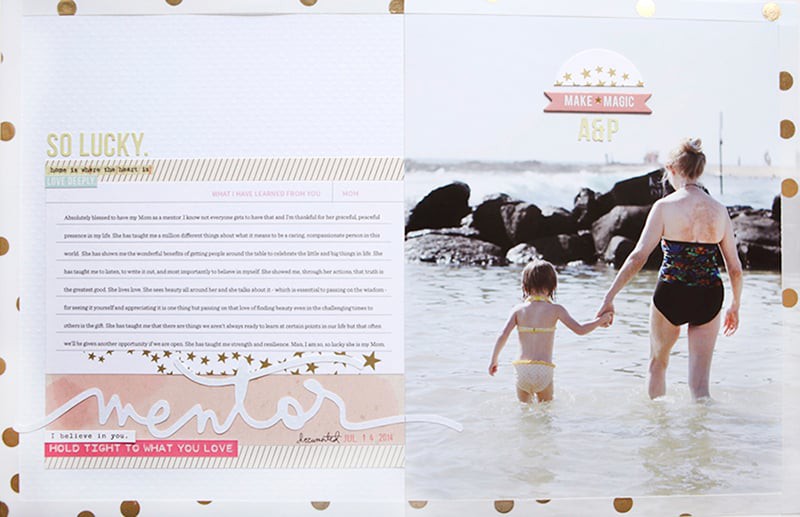
JOURNALING | I see you Simon. That's what I want you to know today. I see you and you are wonderful. I see your heart. I see your love of life. I see your passion for movies and fun. I see your love for your sister, your grandparents, your cousins - all our family. I see how hard you try. I see your joy. I see your frustrations. I see you. I see you learning. I see you - all the amazing parts of you. Thank you for just being you. We see you and we love you.
In Photoshop I added my journaling and used my Life In Pictures Brushes & Stamps as a title/word art on top of the photo.
After printing I got down to the business of creating a home for my photo and journaling. I knew I wanted to do something a little artsy with the background.

I started with a sheet of 12x12 kraft cardstock.
7gypsies recently released this awesome kraft tissue paper with my favorite pattern called Life Collage (they used to offer pattern paper with this pattern - I love it). I was excited to try it out as a background for this layout.

To adhere it I used a glue stick on top of the kraft cardstock, laid the tissue paper on top, used a brayer to flatten it out, and trimmed the excess from around the edges. I ran it through my sewing machine to add a cream stitched border.
Next I applied green spay ink (Mister Huey Pickle). Just a couple sprays here and there and then I used a paper towel to rub it around a bit.

This is a strange photo but what I wanted to show you here is how I added a painted border around the edges of the background. I grabbed a large sheet of scrap paper (this one is packaging from my over-sized photo printer paper) and placed a line of paint right onto the paper. I love using this technique to add paint to any edges - just place your edge in the paint and slide.

This is what the paint looks like after it's dried.

To allow the paint to dry I just laid it on top of a few punches.

Once the painted edges were dry I was ready to adhere my photo + journaling and get down to business with a few hearts.
To adhere my photo I used foam dots from Scrapbook Adhesives.
In the photo above you can also see where I started to lay out the hearts (large pink Marvy punch was used for those hearts). Pattern papers include We Are Memory Keepers Debonair and Fancy Pants Design Its The Little Things 6X6 Paper Pad. On the other heart I used a set of stamps from Technique Tuesday called Life In Photos.

Instead of going with four punched hearts I decided to make one of the hearts with the negative space and embossing ink + powder. I laid the sheet of paper right where I wanted to place the heart, applied the ink by turning the pad over and stamping directly onto the paper and then I dumped UTEE on top.

I love UTEE.

This is what it looks like before using the heat gun and after the excess UTEE has been removed.

This is what it looks like after melting the UTEE.

I also ended up adding UTEE on top of the stamped heart.
Here's one more look at the full page:
SUPPLIES
Kraft Cardstock | Bazzill Basics
Pattern Tissue Paper | 7gypsies Life Collage Tissue
Pattern Paper | We Are Memory Keepers Debonair, Fancy Pants Design Its The Little Things 6X6 Paper Pad
"Heart This Photo" Digital Element | Ali Edwards Life In Pictures Brushes & Stamps
Stamps | Technique Tuesday
Embossing Powder | UTEE
Embossing Ink | Versamark
Letter Sticker | American Crafts Black Doll Fabric Chipboard Peachy Keen Thickers
#9 Flag | Jenni Bowlin Numbers Flag Banner Stickers
Spay Ink | Studio Calico Mister Huey Pickle
Cream Paint | Delta
Heart Punch | Marvy Uchida


Love, love, love this! Gotta get my hands on some of that patterned tissue paper. I love the way it wrinkles up! Fabulous!
Sign in or sign up to comment.
This layout is "classic Ali" and I am in love with it! Thanks so much for showing your process and inspiring me to look up some of that tissue paper and play!
Sign in or sign up to comment.
Reading your journaling always makes me wish I had started scrapping when my kids were young. So many things I wish I could remember and have surely forgotten. I love this layout. Beautiful.
Sign in or sign up to comment.
You know, Ali..I get so much inspiration from your blog and your layouts because you really get me to treasure and record those little little moments. Everyday seems so ordinary really until someone reminds you that everyday is special because of the people around you.
Now, I have tons of stuff about my sons to scrapbook..thanks Ali.
Sign in or sign up to comment.
Love, love, love it!!!!!! I have always described the photo, never talked to it. I love this idea. Thank you Ali.
Sign in or sign up to comment.
I am in love with this layout. I love the mixed media that you use. After seeing this layout this morning I stopped by my favorite craft store and they had the tissue that you used in your layout. I am excited to try it out. The journaling is very special. I understand how important it is to capture thoughts in the moment because life moves quickly and you forget more than you realize. For me it used to be all about the photos and decorations ....now its all about recording the words.
Sign in or sign up to comment.
Awesome layout! Thanks for the inspiration!
Sign in or sign up to comment.
Such a beautiful, heartfelt message to Simon.
I've written to my children instead of about them on some layouts as well, but I will have to create some in this context also. Thanks for sharing this amazing layout.
Sign in or sign up to comment.
Wow! Totally love this. Thank you for the reminder to spread the love. :)
Sign in or sign up to comment.
If I had just 1% of your creativity I would be happy :) - Love the layout and the hearts and the paint strip and just about everything but love the journalling the most - your children must feel very special, you have a wonderful way with words that express the sentiment without being too mushy :)
Sign in or sign up to comment.
I love all the details of this layout!
Sign in or sign up to comment.
Love your layout and all the directions of how you arrived at the finished product. I love the look of UTEE, think I'm going to have to give that a try.
Sign in or sign up to comment.
This layout is filled with delicious text. Yum. You also have a way of making me like hearts and on other layouts-butterflies. You have a gift to make things look classy instead of corny.
Sign in or sign up to comment.
Thanks for the step-by-step directions to a FAB layout! I MUST try it myself!
Totally impressive row of hearts :-) Wonderfully creative ideas.
Sign in or sign up to comment.
very inventive page Ali!keep 'em coming!
Sign in or sign up to comment.
May I use this idea to create a message for each of my children this coming Easter? (It always feels a bit like plagiarism to so deliberately lift an idea.)
Sign in or sign up to comment.
I love this layout! So meaningful and artful!!!
Sign in or sign up to comment.
I love this, Ali....course I love all that you do but I'm such an event scrapper that it's good to be reminded of other options. I'm going to print a copy of this idea and make some pages like this...such a great idea and thanks so much for sharing.
Sign in or sign up to comment.
WOW! LOVE this! Ali, you inspire me so...
I'm seeing your layout today for the first time because I just got my laptop back - it's been at the geek's hospital for a week getting a nasty virus removed, one that my anti-virus program did not detect.
I thought my computer was protected and, therefore, did not back up my photos as frequently as I should have. :-(
I WILL be more careful in the future. I WILL be more careful in the future. I WILL be.........
Sign in or sign up to comment.
HI! lovely blog :D, i just made use of one of your downloadable fonts for a small card and i love it! thank you!
Sign in or sign up to comment.
Fabulous, Ali! Love what you did here!
Sign in or sign up to comment.
I love this layout and I thank you for helping me find similar words to express to my son.
Sign in or sign up to comment.
[...] Bem explicadinho e cheio de detalhes {via Ali Edwards} [...]
Sign in or sign up to comment.