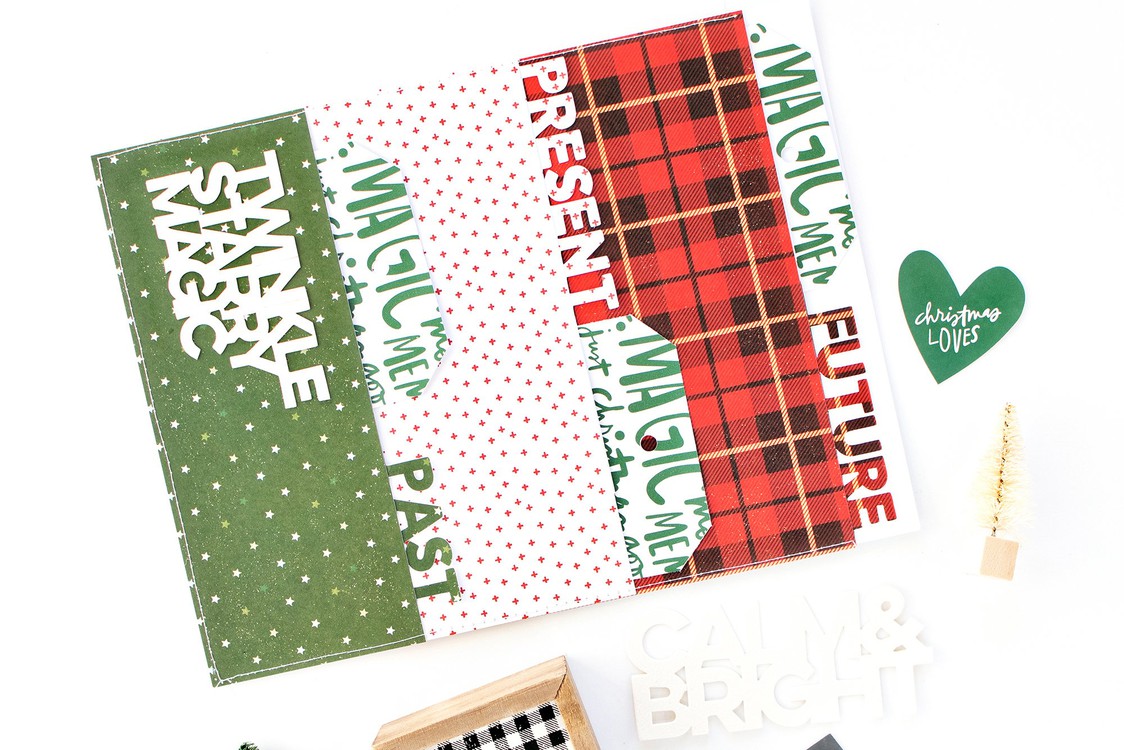
December Daily™ 2011 | The Album Cover
And here we go again!
I'm excited to be getting my December Daily™ album underway for 2011. It's been fun getting messy and playing with my holiday supplies as I begin the process of putting my cover and foundation pages together. As many of you know, what I try to do each year is get the basics of my album all put together before December so that I minimize the amount of time I'm actually working on it during that busy time of year. To read a ton more about this project and see past examples check out my December Daily™ compilation page.
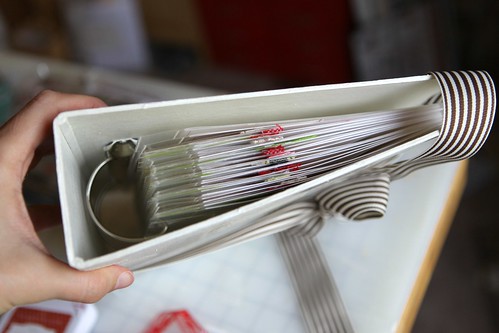
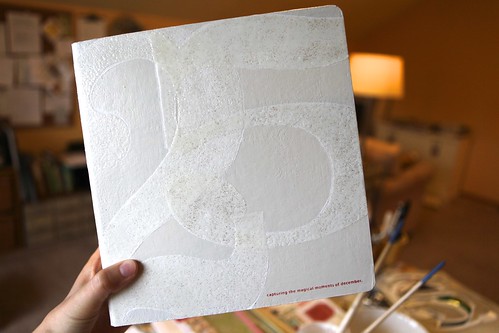
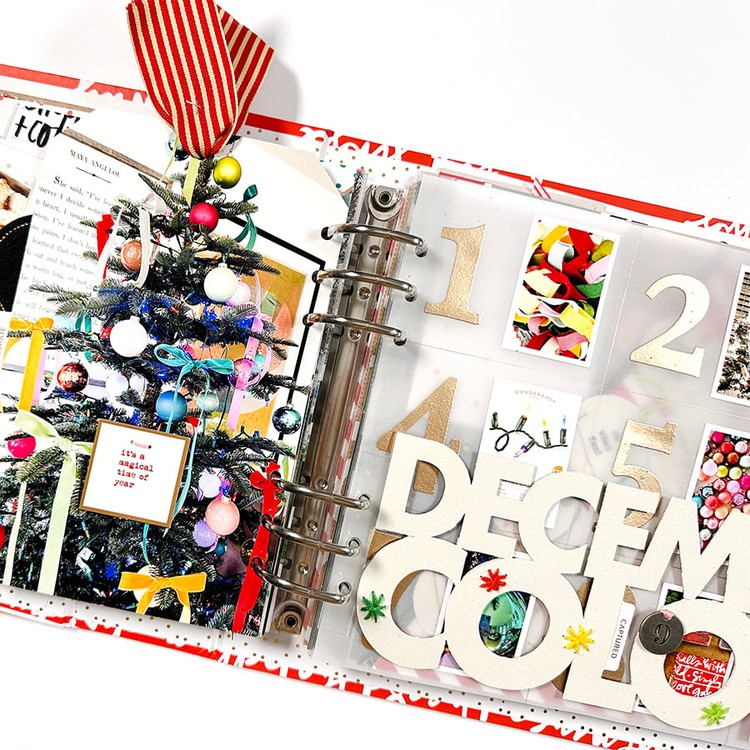
Today I'm going to just share the exterior and interior of the album itself. The actual daily interior pages will be coming most likely on Monday as I'm waiting for a couple more supplies to come in the mail (you can see how it's currently progressing in the image above - it's already pretty thick).
For my cover this year I decided to go with white/cream (love the softness of it) and two really enlarged numbers. Last year I also ended up with white. What can I say, I like it. Because it's basically white on white it's a bit of a challenge to photograph, but you'll get the idea. The chipboard album I'm using is available as part of a December Daily™ kit through Studio Calico. Kits go on sale October 27th/28th.
In addition to the white/cream I also wanted to add some sparkle/gloss and one of my favorite ways to do that is to use UTEE. My full process is listed below.
HOW TO
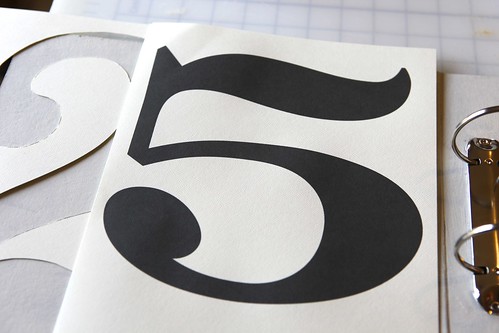
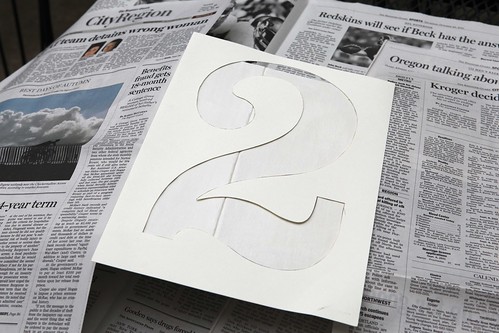
1. Print and cut out a "2" and the "5" to make your own stencils (you can do this in any program like Word or Photoshop). I printed these numbers on cardstock so that they would be sturdy enough to use as a stencil. I used a craft knife to cut out the numbers from cardstock. Depending on the size of your album you'll want to adjust the size of the numbers accordingly. I made my #2 larger than my album so it would go off the top and the bottom edge. My #5 is not as tall as the album but it's nice and wide. I used the font Numbers Depot for my #5 and Rosewood for the #2.
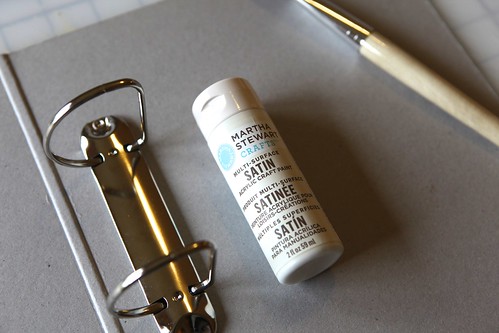
2. Paint two base coats with gesso (essentially white paint) inside and out. After the gesso dried I did two coats of the cream paint from Martha Stewart.
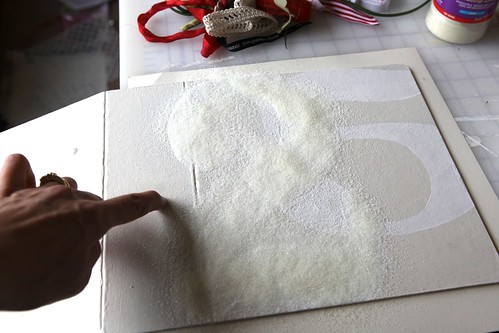
3. Lay the #2 stencil down on the cover. Open your album flat so you can have the #2 wrap around the spine. Using the stencil, paint the #2 with gesso. I did this as a base under my embossing. You could just emboss right onto the painted cover as well. Let Dry.
4. Follow the same steps for the #5. I chose to position the #5 to the top right of the album. Let dry.
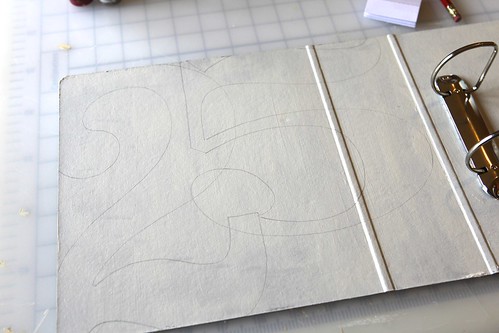
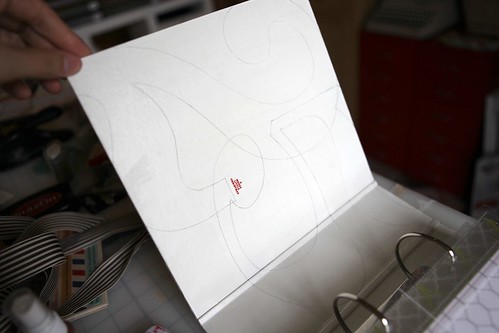
5. Using the stencils and a pencil, create a line drawing of the number 25 on the back cover and on the inside front cover. I chose to use a pencil because i wanted a fairly faint line drawing. You could use a colored pen, pencil, etc or paint inside the stencils rather than tracing. Lots of options.
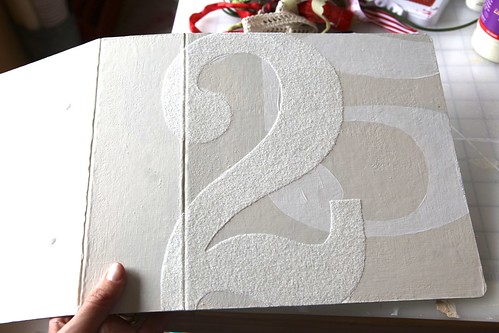
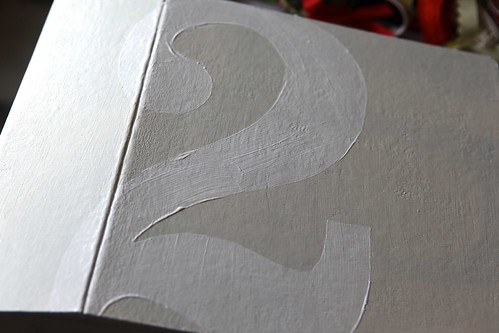
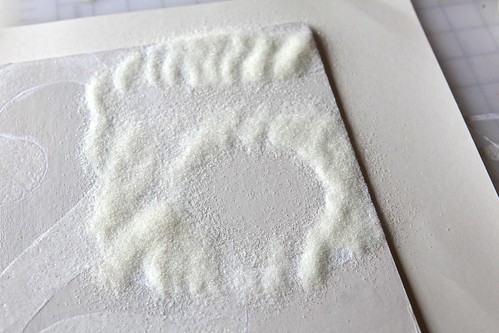
6. Using the #2 stencil (lay it right on top of the painted #2), turn your embossing inkpad (I use Versamark) upside down and stamp (using the whole pad) all over the stencil. Lift up the stencil and pour UTEE over top. Use a heat gun to set the embossing ink. The above image is what it looks like before melting the UTEE with the heat gun.
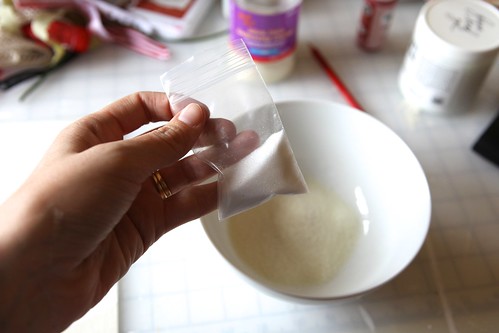
NOTE: I tried something a little different with the UTEE for the #2 - I poured some glitter into my powder before putting it on top of the embossing ink (the glitter was in a little bag - I think it came from a past Jenni Bowlin kit). The end result was to make the #2 have a different texture than the #5 (which was just UTEE). It's rougher and not as smooth. This whole idea came about when I noticed that my UTEE had pretty much already been contaminated with some glitter somewhere along the line. Anything I emboss with that bottle of UTEE ends up with some bits of sparkle.
7. Repeat the same process for embossing the #5.
8. Choose a couple of holiday sentiment stamps for the front and inside cover. I used two stamps from my November 2011 Studio AE set (will be available for purchase on November 1). Stamp using Staz On ink (Cherry) to avoid smudging.
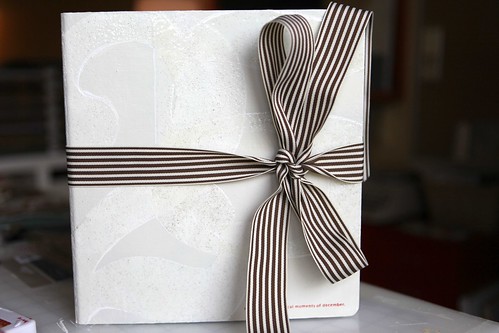
9. After stamping the sentiments I covered/sealed the entire album with Mod Podge. I left the embossed part alone and just painted the Mod Podge around it.
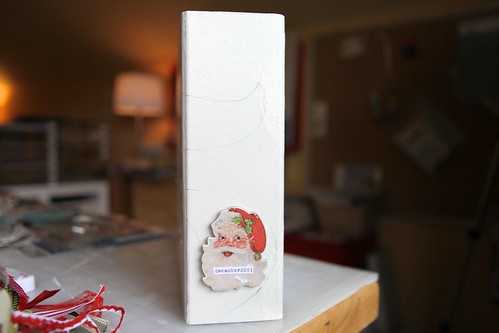
10. For the spine I used the Santa from this Echo Park chipboard package (included in the Studio Calico kit). I covered the Santa with Glossy Accents to give it a nice finish on top of the chipboard and to keep the small typed piece (December 2011) in place.
OUT-TAKES | WHAT I TRIED FIRST
My first attempt at getting the numbers on my album involved silver spray paint.

I took the album (painted with the gesso + cream paint) outside and laid down some newspaper.
Laid the stencil on top.
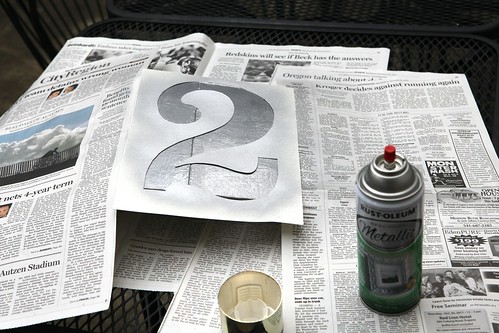
With silver metallic spray paint I used the stencils to spray on the #2 and #5.
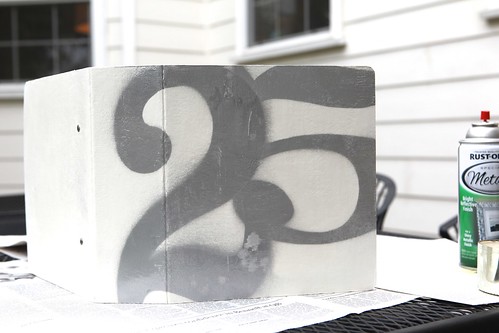
I think I need to practice a bit more with the spray paint. I ended up painting over the top of the silver spray paint as it wasn't really the overall look I wanted. It's a nice reminder that you can always paint over the top (just wait until it dries completely).
I'm so excited to see all the different covers and album interiors that I'm sure will be popping up over the next few weeks! It's always so cool to see the results. I've created a Flickr group for anyone interested in sharing their album along the way: December Daily™ 2011 Flickr Group.
SUPPLIES
PAINT | Martha Stewart Craft Paint Satin - Summer Linen, Gesso
ALBUM | Studio Calico December Daily™ Kit
EMBOSSING POWDER | UTEE
INK | StazOn Cherry, Versamark (for embossing)
SEALER/ADHESIVE | Mod Podge, Glossy Accents
STAMP | Studio AE November 2011 (will be available on November 1) - you don't have to be a member to purchase
HEAT GUN | Ranger
SANTA | Echo Park Chipboard
|
|
|
|
|
|
|
|
|
|
|
|

TODAY'S POST SPONSORED BY | Chic Tags
Chic Tags, formerly known as Shabby Chic Crafts, has delightful vintage inspired paper tags to fit all your crafting needs! If you plan on working on a December daily Album too, you don’t want to miss out on their NEW December Daily Album Kit III. Please don’t forget to check out the CT blog for tips and ideas!


GENIUS!
Sign in or sign up to comment.
I just ordered my Studio Calico kit! So excited for December Daily this year!!!
Sign in or sign up to comment.
Help please
Can't seem to find the kit at SC
Am not a subscriber
Any guidance
Thanks
Catherine
Morning Catherine - here's the direct link: http://www.studiocalico.com/kits/add_ons/486
Sign in or sign up to comment.
I am SO excited to do this project - I already know that staying on track, not staying on track - whatever ends up happening it will be OK!! I just bought the Dec Daily SC kit and what I know for sure is this fellowship right here on this blog is going to help my Christmas spirits soar! I am just really excited!!
Sign in or sign up to comment.
[...] The Album | Exterior and Interior [...]
Sign in or sign up to comment.
Ali Help. I just downloaded the over lays from DD for my album and cannot get them to open. Adobe is saying it is the wrong kind of file
Help please
Hi again - can you tell me the *exact* name of one of the files you are trying to open? Are you wanting to use the PDF (open in Adobe Reader) or the PNG files (open in Photoshop)?
Ali thank you for all the help, just talked to my son and he helped me fix it, seems the zip program that comes with Windows7 was defaulting to Adobe so we switched it back to where it was so I am back to where I should be.
I really wish I could give you a big hug for all the help you have been
OH and my DD pages with your overlays are all printed and cut. :)
Ali I have a desk top and use Google Chrome. I got the file to open with the winzip program, thank you for the link, but I never needed that before so I think it is something with my computer. I downloaded the over lays from Designer Digital for my DD pages. They all saved as a Photo Shop file and when I click on them PS opens and then a box pops up and says PS cannot open the file
Thank you for all the help Ali
Have a wonderful weekend
Ali when I double click on it it opens Photoshop and a box pops up that says the file cannot be opened, I can't get the shot to unzip it. Could this be some kind of setting on my computer that needs to be changed. I never had this problem before, don't know if somthing got messed up on my computer
Really hate being a pain :(
Ali I can't unzip it, when I click on it a box from adobe pops up and says it can't be opened
Have you "unzipped" the file?
Sign in or sign up to comment.
Can't wait until Monday!!! I'm so excited with this project.
Sign in or sign up to comment.
Please help us, Ali!! I know I'm not the only one who would love to have that binder in the Studio Calico December Daily kit. It would be perfect for so many other projects (great small size, but with large rings), previous December Daily's and those of us who like to do it digitally. Maybe American Crafts and Studio Calico would oblige us if you put in a good word?!
I would love one too
Thanks for the comments. I'm hoping that with the demand this size has generated it will be fairly clear that they should make some more to be sold outside of a kit. This time it was made specifically for the kit - with Studio Calico arranging it and having the exclusive.
Sign in or sign up to comment.
This (my 2nd year joining you for DD) year I too decided to go with a ready made album. Last year I followed your design and just LOVED how the album turned out - just beautiful memories! My album was 3 inches thick and binding it was my only problem. Can't wait to see what you have in mind for this year. Thanks so much for your inspiration!
Sign in or sign up to comment.
Fabulous technique. I love the utee over the paint. WOW!
Sign in or sign up to comment.
Hi Ali. I'm just wondering if you embossed the back cover and inside cover like you did the front cover? Thanks!!
Sign in or sign up to comment.
Wow. Came across this site by chance. WOuld love to join in this project!
Sign in or sign up to comment.
Great, I started putting my supplies together just today. Will be taking a slightly different approach (lists for December rather than Daily) but will still be taking pictures everyday and love seeing what everyone will be making
Sign in or sign up to comment.
[...] You can see the exterior and interior of my album cover here. [...]
Sign in or sign up to comment.
Hi Ali, absolutely gorgeous!
Could you please advise me, I want to purchase Numbers Depot when I click on t he link there are 15 fonts for sale, did you have to purchase all the fonts?
Also My Fonts don't have Rosewood for sale, could you tell me where you got yours from?
Thanks so much
Sign in or sign up to comment.
I love that you are able to show out-takes of your previous attempt at making the album cover. It's good to know even amazingly talented scrapbookers such as yourself can 'practice' until the project is perfect. Thanks for sharing & can't wait to start on mine Dec Daily! `=]
Sign in or sign up to comment.
Hi Ali! As always I'm late getting started on my DD this year. I have lots of supplies I'd like to use, and I understand this album is part of a kit (which is sold out also). Do you by chance have suggestions on other 3 ring albums i can alter the cover to??
Sign in or sign up to comment.
Ali, since the kit was sold out when I went to purchase it for my December Daily do you know if they will be offering just the chipboard album for sale for those of us that want to create our own book?
Hi Sherry - I'm pretty sure the answer is no (at least not this season). It's possible it will be available in the future since the demand was pretty high.
Sign in or sign up to comment.
Hey Ali, is there a flickr group for this yet? I have been searching but unable to find it.
Yes - here you go: http://www.flickr.com/groups/decemberdaily2011/
Sign in or sign up to comment.
Ali,
I tried to duplicate your cover and so far have painted 2 coats of gesso and two coats of the Martha Stewart cream. I have found the the folds on the chipboard are becoming very weak and tearing. I'm afraid it's not going to hold up. Any advice on how to strengthen it, as I've never worked with chipboard albums before.
Wendy
Sign in or sign up to comment.
I can only repeat the other comments above this one. Great content and i think im not alone when i ask: do you plan to add some more pictures on this topic by any chance? It would make this page more enjoyable. Just a thought, i hope you dont mind :) Thanks for the great post, Michelle
Sign in or sign up to comment.
I realy liked this angle that you have on the topic. Certainly wasn't thinking on this at the time I started browsing for tips. Your ideas was totally simple to get. Im glad to find out that there’s an individual online that gets it precise what its is talking about.
Sign in or sign up to comment.