Balzer Designs Stencil Hop | Triangles
Welcome to Balzer Designs Stencil Hop!
If you are brand new here, welcome! You can read a bit about me and what I do on my welcome page.
I recently discovered, and am loving, Julie Fei-Fan Balzer's stencils for The Crafter's Workshop. She's got a great collection of images and text based stencils including chevron (that I used in this layout), herringbone, wonky circles, and clouds.
This month the featured stencil is the Triangle.

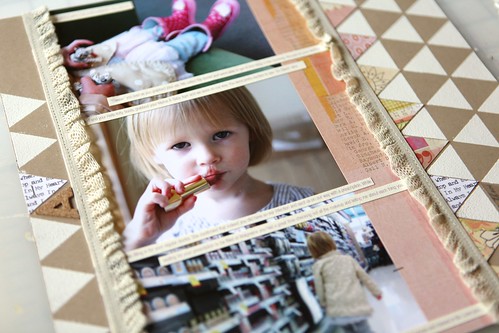
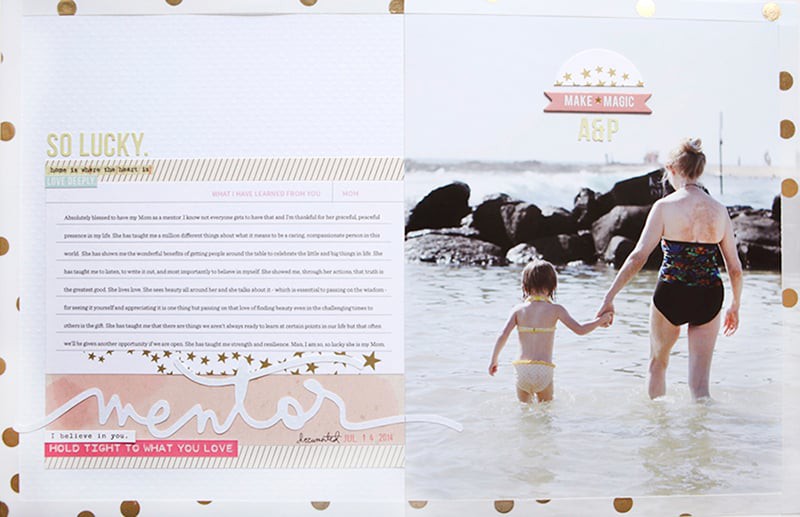
Here's a look at the layout I put together:

As many of you know, I'm a fan of basic geometric shapes.
I'm also a fan of repetition.
Put the two of them together and well, I'm happy.
Here's a look at my process for this layout:
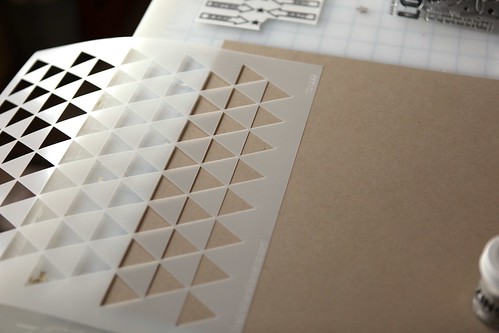
I started with a 12x12 background of kraft cardstock.
As you can see, the triangle stencil is also 12x12. Rather than placing the entire thing on top of my cardstock I decided to do three rows on one side of the page and one row on the other. I wanted my main content (the photos + the words) to be off to one side or the other vs. right in the middle.
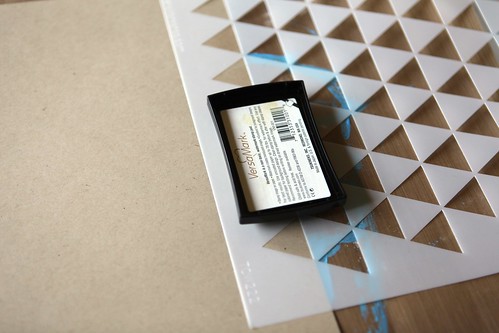
Something new I tried with this layout was American Crafts Zing embossing powder. Before this I almost always used good-old UTEE (clear). I'll definitely be using this again. Love that they are non-sparkly versions.
Above you can see that I laid the stencil down on the edge of the page and used Versamark as my embossing ink. Then I dumped some of the Zing white opaque powder on top of the inked triangles (remove the stencil first) and heated with a heat gun.
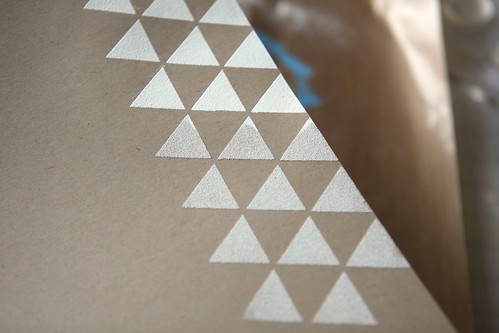
In the shot above you can see where I've used the heat gun to set some of the powder (the portion towards the top).
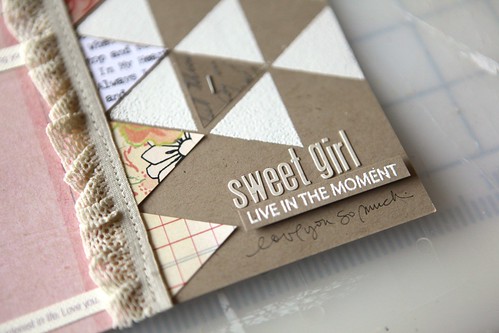
I love that opaque white texture. Here's a closer look:
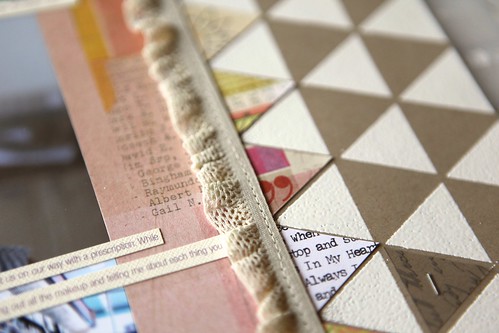
After getting the triangles in place I added content in between: three 4x6 photos, a strip of pattern paper, ribbon/trim along each edge, journaling cut in strips.
The Crate Paper ribbon/trim (loved this one - it's more like elastic) was first adhered with red line tape and then I ran it through my sewing machine.
Another way I used the stencil was to cut small triangles from pattern paper. Those triangles got adhered right along the right edge.
In the bottom corner I stamped and embossed Live In The Moment (a sentiment from this set) and added "sweet girl" using Lily Bee letter stickers.
On the left edge I covered one embossed triangle with a pattern paper triangle and added a cork A.
The journaling was printed out onto cream cardstock, cut into strips, and adhered on the photos.
JOURNALING | “Owww.” you said as you grabbed your ear. We called the doctor and were able to get in first thing in the morning. You put on your twirling skirt and your Hello Kitty boots, grabbed your Mama & Baby tiger and we were on our way. You were pretty excited to see “Dr. Black” who was filling in for your regular doctor. She confirmed that indeed you did have an ear infection and sent us on our way with a prescription. While waiting for your prescription to be filled at Walgreens you had a great time checking out all the makeup and telling me about each thing you saw. You are so fun Anna. Such a wonderful little bundle of happiness and interest in life. Love you.
SUPPLIES
Click on the images below to link to the supplies used in this project.
|
|
|
|
|
|
|
|
|
|
|
|
|
|
|
|
|
|
|
|
|
|
|
|
Here are links to other people participating in today's blog hop:
- Dina Wakley
- Suze Weinberg
- Bianca Mandity
- Vicki Boutin
- Christy Tomlinson
-
Julie Fei-Fan Balzer (she's giving away a 12x12 and 6x6 version of this stencil)
You can view past links to other featured stencil hops here.
Big thanks to Julie for inviting me to play along this month!


A beautiful layout, and yet another wonderful way to use the stencil. You ladies have rocked this project!
Sign in or sign up to comment.
wow...I knew when I saw Ali Edwards on the blog hop I would see something great! I love how you used the triangle stencil. This blog hop has had so many creative ways to use just one stencil!
Sign in or sign up to comment.
Great idea!
Sign in or sign up to comment.
jennifer olson
are you going to get all for binder from becky higgins
i'm going to get two then get they black and white
Sign in or sign up to comment.
This layout is so beautiful! I love all the details and the pics are great too! <3 it!!
Sign in or sign up to comment.
jennifer olson
are you going to get the cobalt and the clementine
i'm going to get those
Sign in or sign up to comment.
alli
are you getting all 4 binder
i'm getting all 4 and the core kits for the cobalt and thr clementine to
Just the black one for me.
Sign in or sign up to comment.
what a beautiful layout, and I love your triangular snipets of paper added after stencilling :)
Sign in or sign up to comment.
Hi Ali, I have found your blog via Julie's blog hop. I just love this page and the way you have used the stencil, very creative and a great effect. Inspirational
Lee:)
Sign in or sign up to comment.
Love this layout, Ali!
Really, really dig the design.
Sign in or sign up to comment.
[...] you want to see the step-by-step instructions for this layout, please visit Ali’s blog. Have you combined ink or embossing powders with your templates? If so, please share in the [...]
Sign in or sign up to comment.