December Daily 2010 | Ideas For Using The 6x8 Layered Templates (+ Video Walk-Through & Tutorial)
Tags: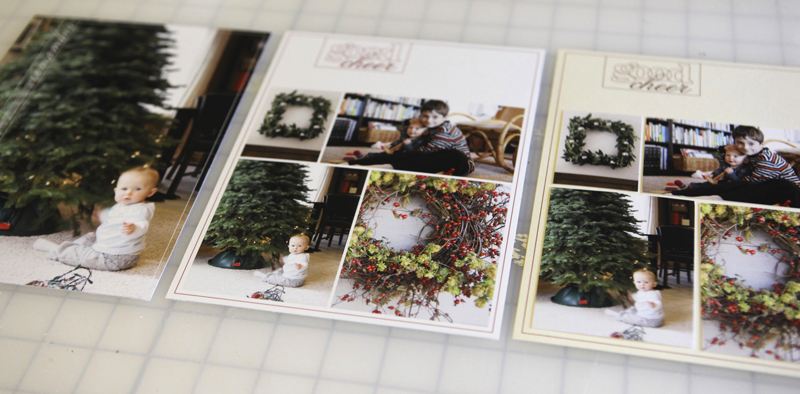
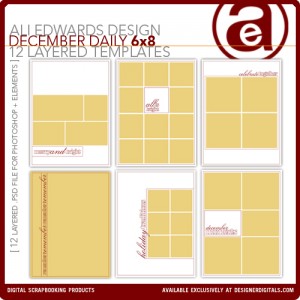
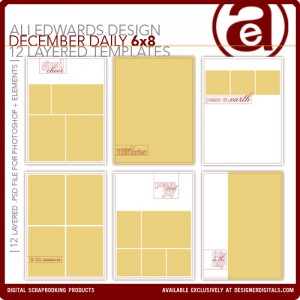
First off I wanted to say thank you to those of you that requested these 6x8 layered templates. After playing with them today in preparation for this post I can definitely see them coming in very-handy for my album.
Today's post includes two videos. This first is a walk-through of the ways I plan to use these 6x8 layered templates and the second is step-by-step instruction in Photoshop Elements.
Let's start with a little walk-through video:
Ali Edwards | December Daily 6x8 Template Walk-Through from Ali Edwards on Vimeo.
And here's a video that walks you through using the templates in Photoshop Elements:
Ali Edwards | 6x8 December Daily Layered Template Tutorial from Ali Edwards on Vimeo.
Here's a look at the ideas I covered in the above videos:
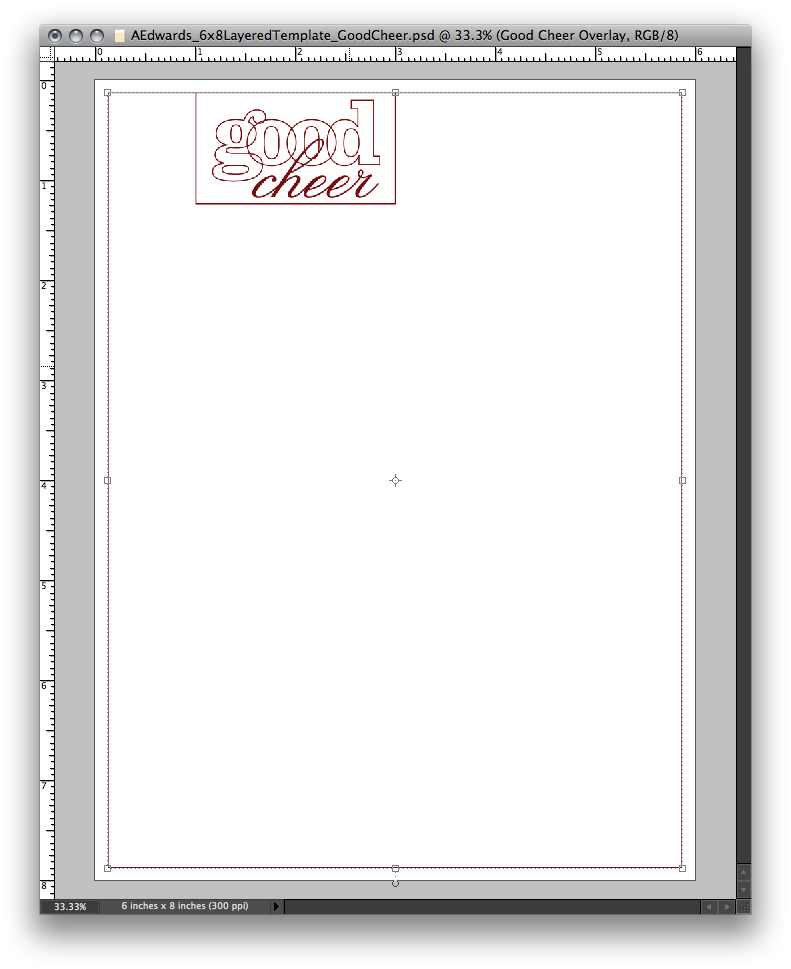
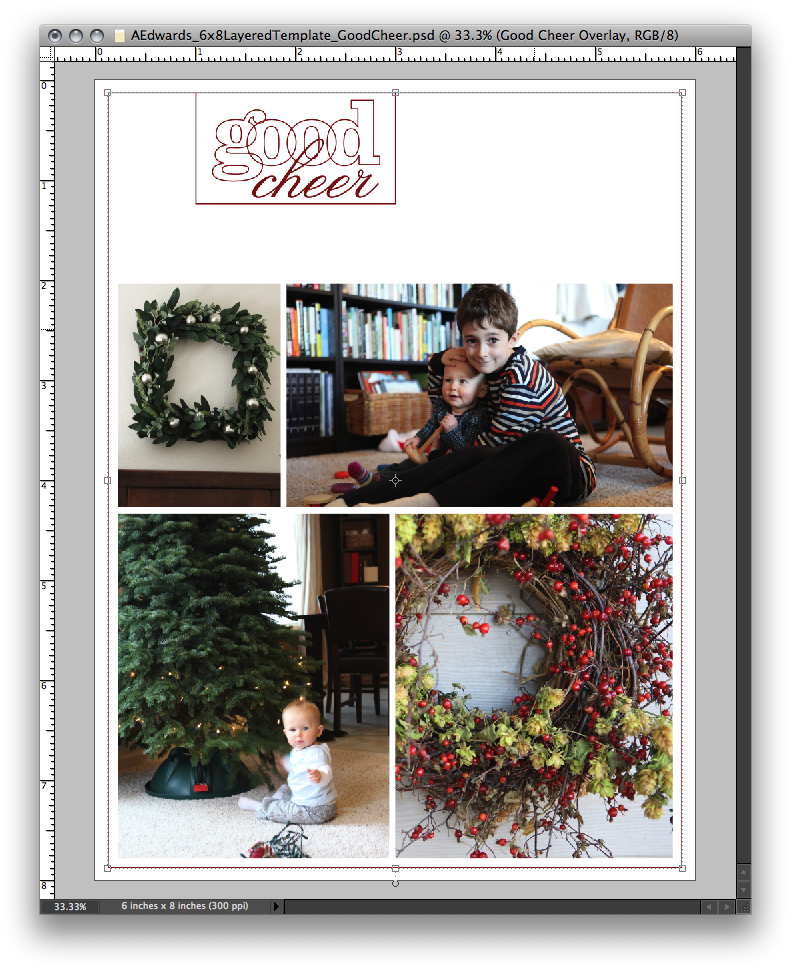
IDEA #1. Use as an overlay on a full page photo.

Inside the layered template package there are two pages that are designed specifically to use for full-page photos. Any of the others could also be used by hiding/removing the image boxes (the yellow photo boxes).
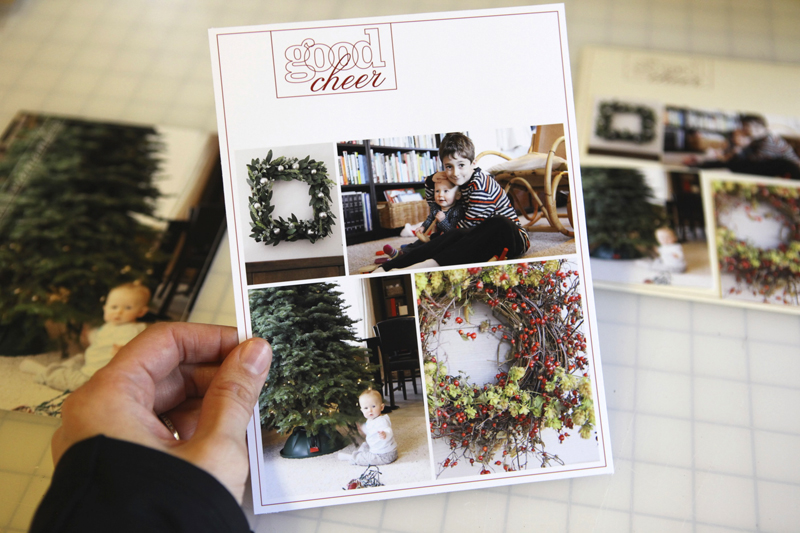
Here's what this one looks like after printing and cropping from the 8.5x11 sheet of photo paper:
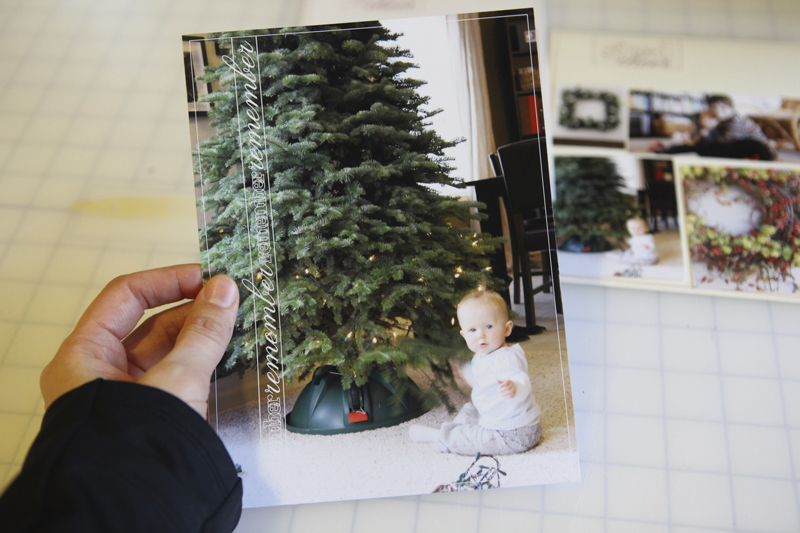
And as a spread with the 2010 date overlays:

The page with the #2/right-hand side of the spread might include:
another photo or more than one photo
handwritten journaling
journaling from my typewriter
something that came in the mail or other little pieces of paper from the day
a photo with journaling
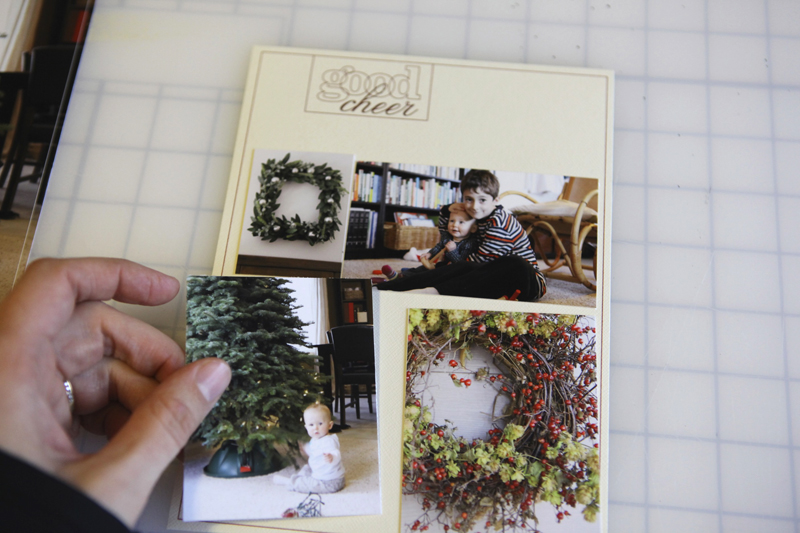
IDEA #2. Print the photos on photo paper + print the frame on cardstock.

Use the layered template to just print photos. Mask your photos (command G on a Mac or control G on a PC) into each of the squares and print on photo-paper (turn off the overlay layer before printing by clicking on the "eye" next to the layer in the layers palette).
Turn the overlay layer back on (and turn off your photo layers) and print on cardstock. Crop images from photo paper and adhere onto cardstock background.
Here's what this one looks like after cropping and before adhering the photos on the cardstock:
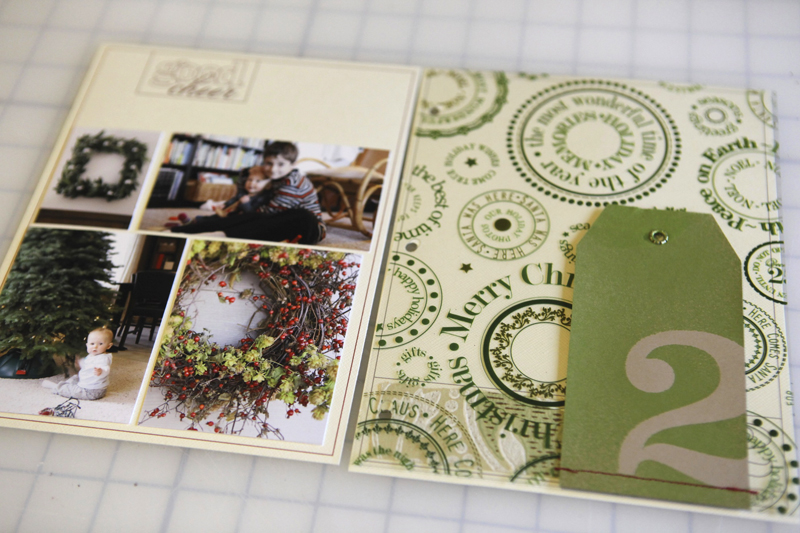
This is a really great option if you want to add more dimension to your album. Use foam dots under the photos to have them stick up off the page. There's lots of possibilities with this option. The best part is that the basic design is already decided allowing you to focus more on the images and the story.
Here's what it looks like as part of a spread with the transparent page in-between:
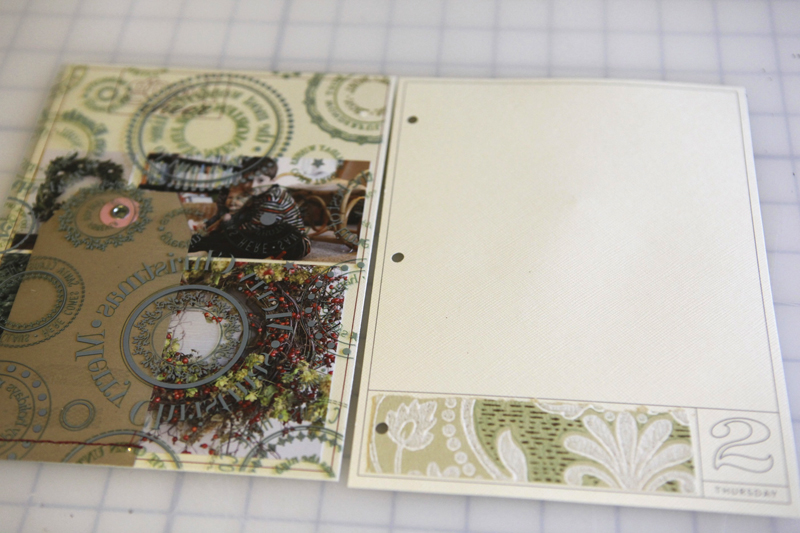
IDEA #3. Print the frame and photos on photo paper.
The super quick and simple option is to just mask your photos and print on photo paper. Add other digital elements or not. Add traditional embellishments after printing or not.
Here's what it looks like after being cropped from the 8.5x11 photo paper:
And a look at this one in the spread:

Want more information or additional video tutorials on digital and hybrid scrapbooking? Click here to access my Getting Started With Digital Scrapbooking tutorials.
ADDITIONAL SUPPLY INFORMATION
Photo Paper | Ilford Galerie Smooth Pearl 8 1/2 x 11
Printer is a | HP Photosmart B8550
Trimmer | Fiskars Desktop Rotary Trimmer
If you've got any questions about this process let me know in the comments. I hope you're getting excited!
For more on December Daily go here.


Comments
Sign in or sign up to comment.
107 comments
Totally loving the videos (DD and Halloween)....I'm a visual learner, no doubt! :) Happy Thanksgiving to you and your family!!
Replies
Sign in or sign up to reply.
i too am a visual learner. need step by step all the way.
these are so helpful.
thank you ali.
Replies
Sign in or sign up to reply.
thank you so much! so great to see these and love the step by step, so very helpful.
Replies
Sign in or sign up to reply.
Have you ever had a problem with the photos that you print off of your photosmart printer? I did some and by the next year they were faded bad. I was just wondering if you have ever had a problem with your pictures.
Replies
Hi Regina - I haven't had any issues with this printer. This is my second HP Photosmart - I've been using them for about four years total now and the pages I created four years ago still look good. What paper are you using? Does that seem to make a difference?
Just a note that I prefer the printers that have individual cartridges for the colors (such as cyan, magenta, yellow) and then black.
Regina, I have two printers at home. I have an HP Photosmart 7150 and a Kodak something or other. I bought the Kodak b/c the ink is so much cheaper. And I know why. I printed out photos on it and within six months they looked like pictures of ghosts, totally faded out.
The HP pictures never fade at all. ???
Ali, do you recall if the DD templates you did last year are 6x8? I'm planning on going digital this year and I have the templates from last year. Don't want to buy a duplicate product. :P
This is the first year I've done 6x8. All the other December Daily templates are 12x12.
There are also new 12x12 templates - same basic structure and type-design as the 6x8 here: http://www.designerdigitals.com/digital-scrapbooking/supplies/product_info.php/products_id/10703
Ali, the printer was a kodak. I ended up taking it back and just ordering my prints online, but with seven kids I would like a way to just print them at home so I can do the December Daily and work on it at night while the kiddos are sleeping. I am looking at a hp and before I invested money into it, I want to be sure I will get good pictures. Thank you'll for helping me.
Thanks so much for your advice. My new epson 1100 is like that. I love that feature and I will be looking for it in my new hp.
Sign in or sign up to reply.
Ali, don't know if you have a Whole Foods near you but their holiday brown paper grocery bags have this printed on them in red: Every meal has a story - celebrate yours. I love it!
Replies
Thanks for the heads up Laura - I wish we had one close - the closest is about two hours away :(.
Sign in or sign up to reply.
[...] This post was mentioned on Twitter by Ali Edwards, Josephina Mydreama. Josephina Mydreama said: December Daily 2010 | Ideas For Using The 6×8 Layered Templates (+ Video Walk-Through… http://goo.gl/fb/rYkoZ [...]
Replies
Sign in or sign up to reply.
I was just wondering the other day if you are still doing the Project Life and if so, how you are handling doing both projects at once. Are you using some of the same images in both books, or are you taking special pics for your December Daily? I'm attempting to do Project Life online and am struggling, hopefully the holidays will bring out the urge to photograph more!
Replies
Hi SteffB - I am definitely still doing project life! For me it has become a great place for collecting all kinds of pieces of life - photos, drawings, little stories, etc. I will most likely not be using the same images in both books (but I might and that would be ok too). The way I look at it is that there are always more than one story that comes about over the course of the day - one can be told in Project Life and another can be told in December Daily. I think they actually work nice together.
A note about my Project Life - for me it's very low-key. No stress. I'm not trying to do a photo a day - it's more a place to store stuff and to include photos when I can. I'm actually planning to do a big printing of most of my photos from last year to fill in the holes.
Ah, my Project Life is digital, I'm struggling not to abandon it (I started when the school year started), because I don't take a picture every day although I try, and I haven't figured out what to do with the empty spaces, have tried a few things but don't like them. Maybe the monthly approach would be better for me, but I like the IDEA of a daily thing LOL. Somehow taking a picture of ephemera is just not as fulfilling as putting the real bits of stuff in there :-(
Sign in or sign up to reply.
Great tutorial...can't wait to start filling up this book!
Replies
Sign in or sign up to reply.
Lovely ideas! I want them even more now...
Replies
Sign in or sign up to reply.
I haven't jumped into digital scrapbooking yet, but love what you have done in this post. What size page protectors/album are you using? Is it 8.5 x 11 ? or a smaller size?
Replies
Hi Kristi - this album size is 6x8. There is a cover and interior pages but no pages protectors (most of the minibooks I do don't have page protectors). Here's a link to a post where you can see through video all the pages: http://aliedwards.com/2010/10/december-daily-2010-interior-page-steps-video-walk-through-of-album.html
If you prefer to see just the images go here: http://aliedwards.com/2010/10/december-daily-2010-creating-a-foundation.html
Sign in or sign up to reply.
Thanks for that Ali! I really like listening to you explain things, your so easy to listen to!! Actually makes me wish I was doing a 6x8 size so I could use the templates - mines just 12 days in a 4x8 size :)
Replies
Sign in or sign up to reply.
Another visual learner here. I am really loving the 6x8 size and have an idea for my Decdaily album.
Replies
Sign in or sign up to reply.
thanks a lot for the tutorial. i got the templates & with these tutorials, it would definitely simplify my album. you're great, Ali!
Replies
Sign in or sign up to reply.
thank you Ali, these are great and very helpful.
Replies
Sign in or sign up to reply.
Thank you so much for your designs and more importantly for the time you take to show us how to create a gem of a scrapbook with them:-)
I though have two questions
First, all templates are 6x8 so I was thinking that will be the size of the album when's ready but in this post today you print photos on 8.5x11 paper ... Does it mean the actual album size will be larger then 6x8 ?
Another, more important question:-)
While preparing to get going with the project I suddenly realised... Does it actually mean thati need to be making picture every day? I work fulltime so there's not much left in energy and day light by the time I am home and my son is in bed... Can I use photos from other months? Or even - can I take other people photos if they illustrate the point? We will be celebrating husbands 40th in a restaurant that's beautiful but dark - can I nick a photo from their website or is it cheating?
Replies
Hi - I print my pages on 8.5 x 11 and then cut them down to 6x8. All the pages shown in the images above are 6x8.
It definitely does not need to be a photo a day for this album. In my past albums I usually have a couple days without photos. I always encourage people to make this whole process work for you -
I definitely think incorporating a photo of the restaurant from their website would be a cool addition. One of my favorite things to do when documenting any story is to look for things that can bring additional "life ephemera" to the page/project.
Sign in or sign up to reply.
amazing tutorials, ali! thanks!!!
Replies
Sign in or sign up to reply.
Thanks, Ali. Your videos are always helpful! Feeling very inspired. Can't wait for Dec 1st! :)
Replies
Sign in or sign up to reply.
Thanks so much for the specific instructions and ideas! I should have gone ahead and bought these templates during the sale, but I was waiting on your tutorial. I'm using hybrid more and more and I love that it's like you're holding my hand in the process. Thanks so much!
Replies
Sign in or sign up to reply.
So helpful - love the step by step, and love seeing more details about your work even more!
Replies
Sign in or sign up to reply.
these are great ali. thanks.
Replies
Sign in or sign up to reply.