Day In The Life™ | March 2016 ( + Project Life® 2016 | Week 13)
Tags: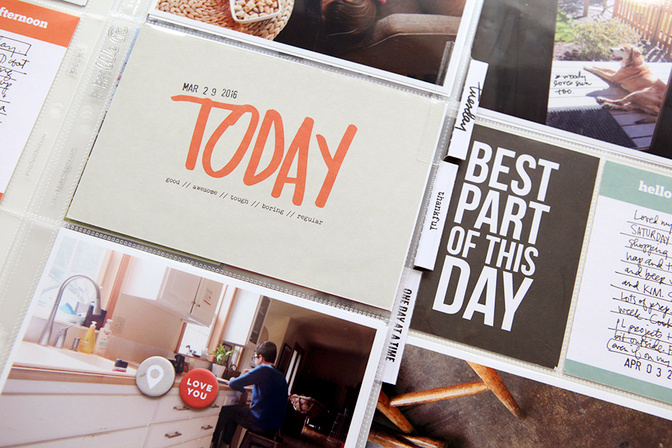
Today I'm sharing how I brought my photos and words together to document my Day In The Life™ within Week 13 of my Project Life® album.
Yesterday I posted a video tutorial on how to work with the Day In The Life™ 6x12 layered template set. You can check out that post here. You can also check out my post where I share just my photos and journaling here.
You might notice that I skipped Weeks Eleven & Twelve of Project Life®. They are in the works and I'll be sharing them soon - I wanted to get this one done at the same time that I completed the insert so you could see how it all worked together.
If you missed out on the physical Day In The Life™ kit you can pick up the digital version that includes the cards and chipboard circles here. We will be offering a new kit for the next round of Day In The Life™ in a couple of months.
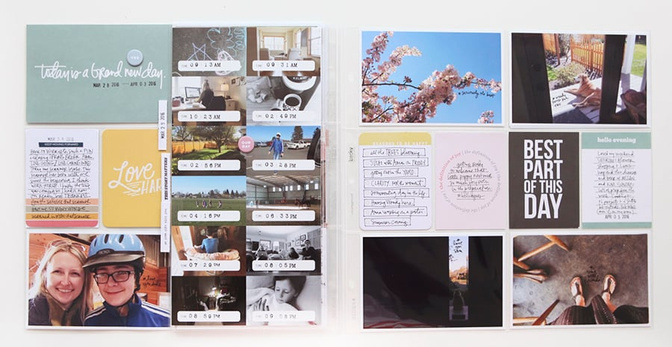
I'm going to start by just showing you how the inserts turned out and then below I'll show you how it looks inside Project Life® Week 13. You can think of this as a story within a story - a deep-dive into one day of the week sandwiched between other stories.
Scroll down for an 18-minute video overview of this project:
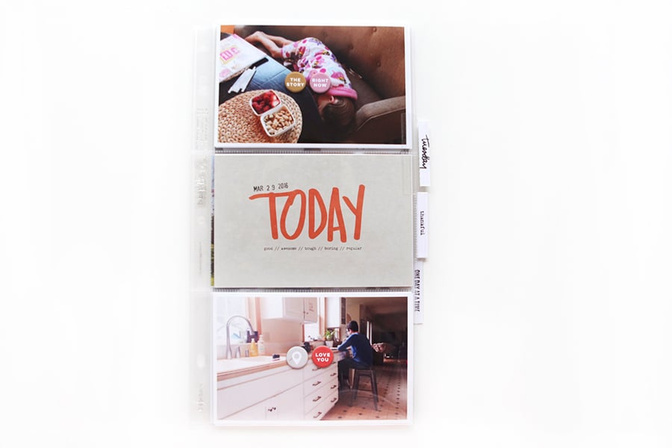
For my story I ended up using three page protectors:
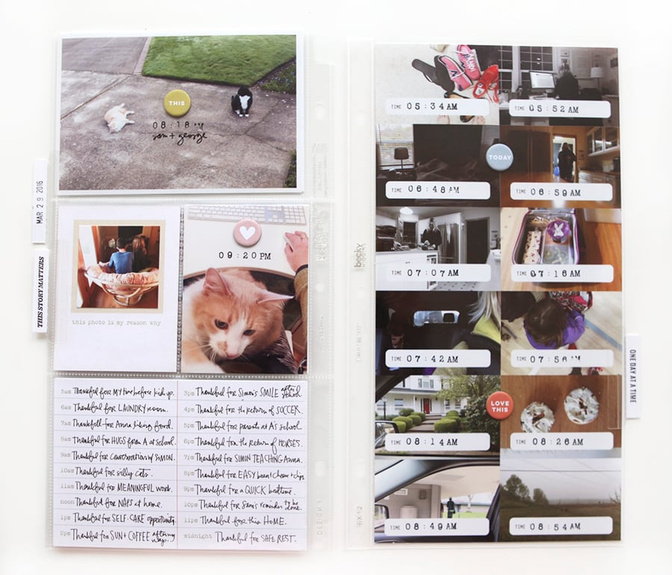
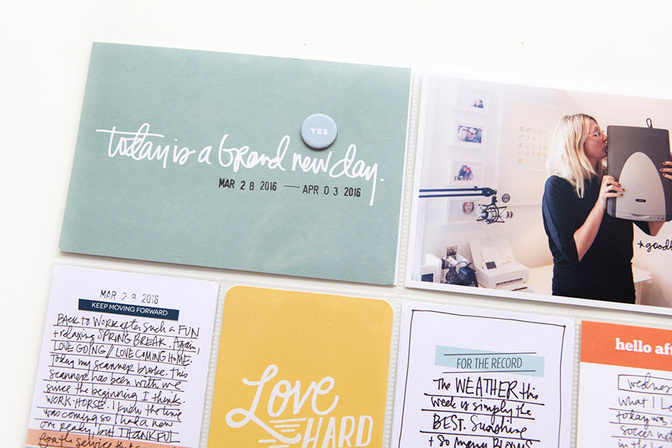
6x8, 3-pocket page protector (I just cut this one from a Design A page protector - the one I use every week for Project Life®).
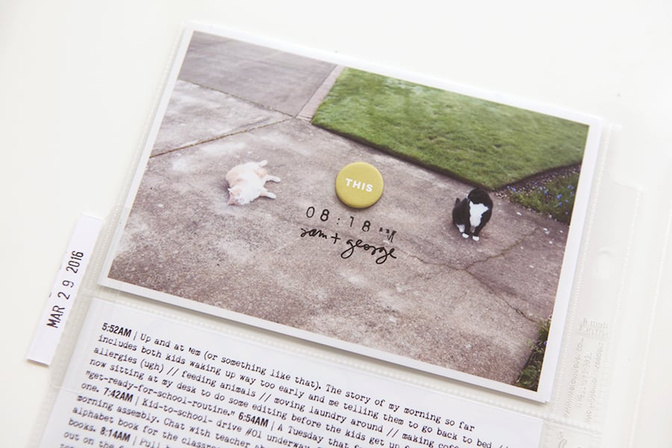
I printed 4 photos to 4x6 using my Epson PM400 printer. I decided on these 4 as I was working with the 6x12 layered template. On top of each photo I added a chipboard circle (or two on the front) + the time and a little phrase.
The bulk of my journaling came directly from what I wrote when I posted my photos and times to Instagram. It made it so easy to do it right then and then be able to copy and paste into both my blog post and then onto these two 4x6 cards. As you can see, I created some space within my journaling to hold the #1 and #2 chipboard circles. I used Helvetica Condensed Bold for the times and Remington Noiseless for my journaling.
I used Avery Index tabs and stamps - one on each insert. The stamps I used come from the following sets: These Days Are For, Gratitude, Love, Stories, One Little Word 2015
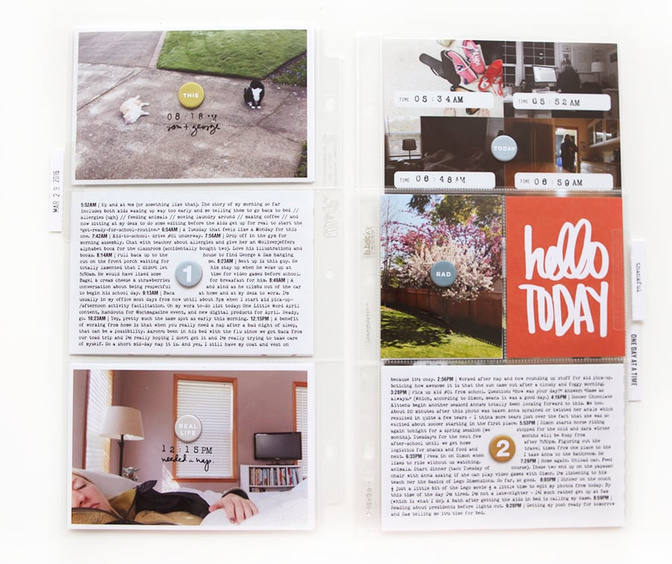
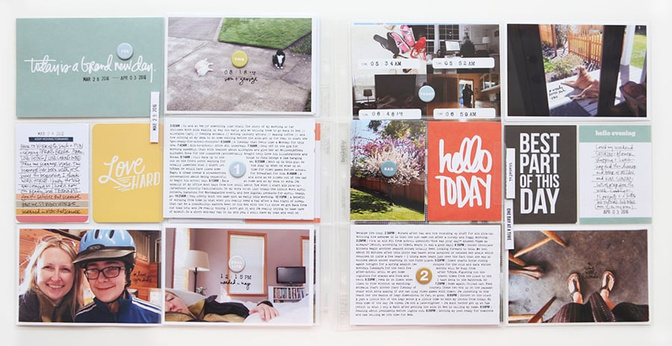
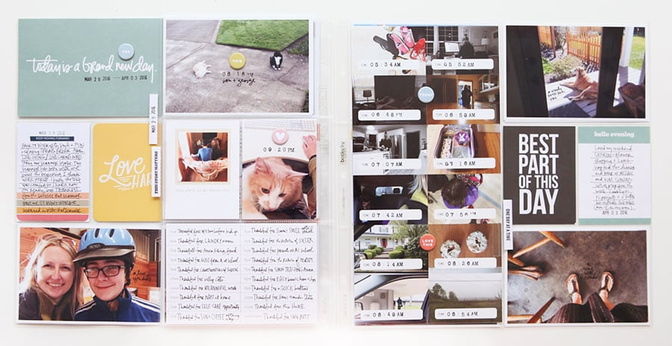
The bulk of my photos were used on a 6x12 layered template that I used for two pages.
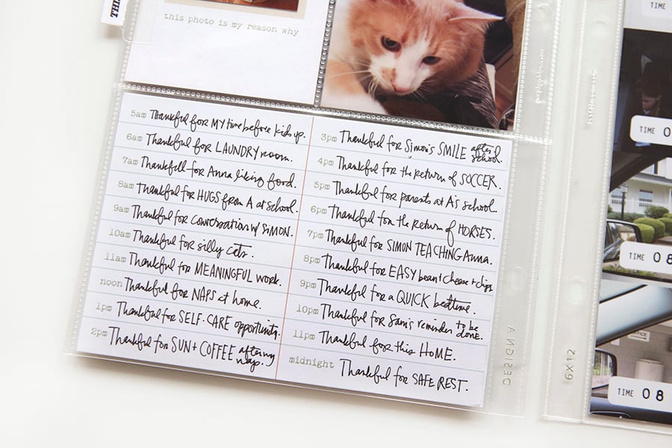
On the time card I decided to write something I was thankful for. I could have had this out during the actual day, but instead I just looked back through my photos and generated thoughts while looking at my photos based on what was happening at that time.
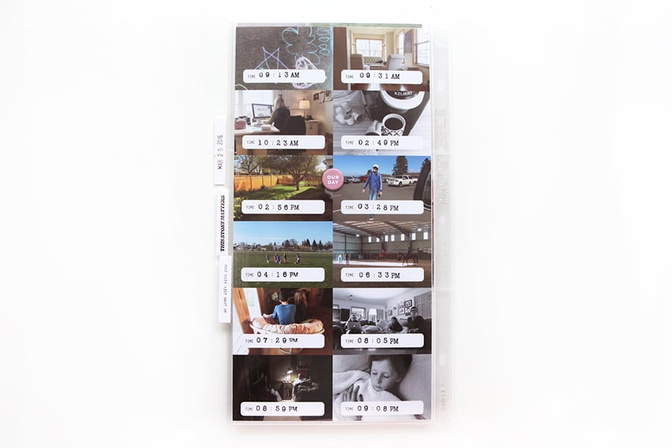
I ended up with two pages of the 6x12 layered template. Such a great home for all these photos + times.
And here's how it looks within Week 13 of my Project Life® album:
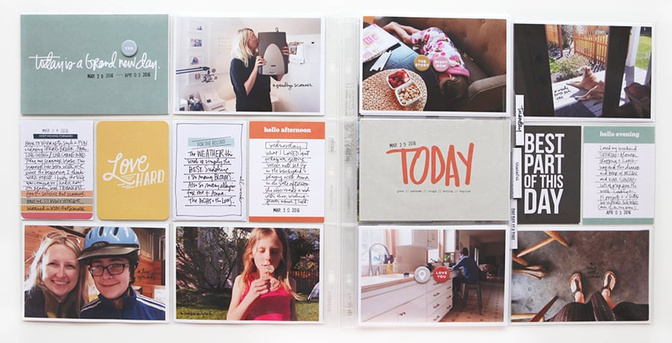
I decided to keep my spread super simple this week - just words + photos. I incorporated additional cards from the Day In The Life™ kit + cards from a couple recent Documenter kits from Studio Calico. I also printed all my photos with a white border to keep it consistent between the day and the week. I love how that turned out.
"Love hard" is from the Homespun Documenter Kit.
I love seeing all that typed-up story.
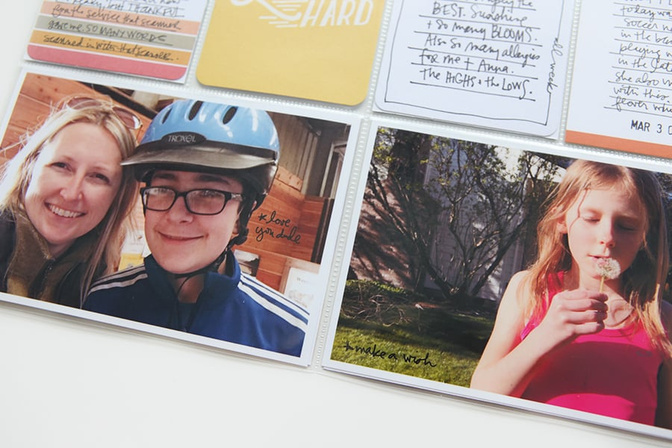
Love those two.
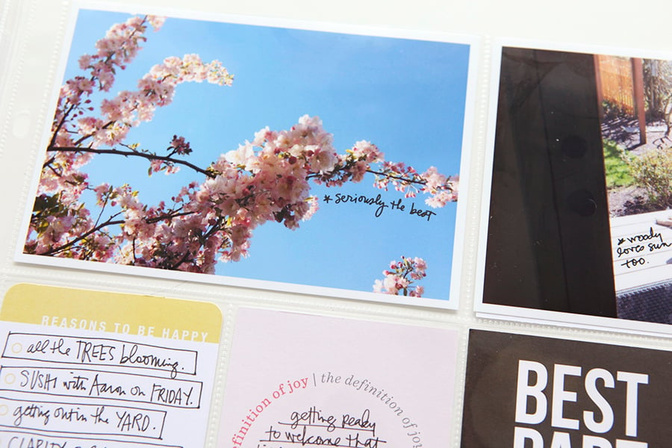
The trees, man they are so awesome right now. The "reasons to be happy" card and the "definition of joy" card are from the Savannah Documenter Kit.
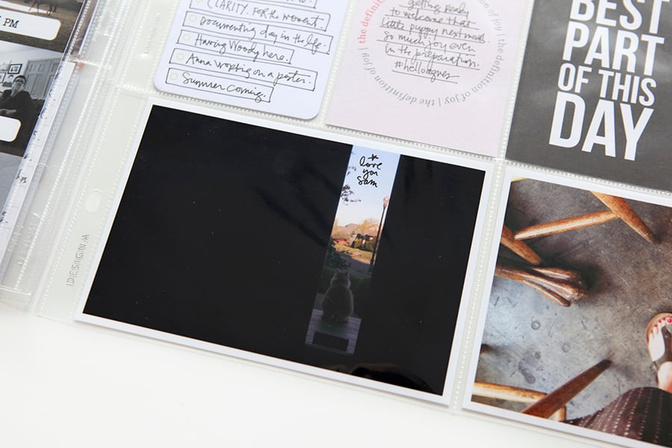
One of my favorite photos from last week is this shot of Sam sitting on the porch. I took it from inside my house - my front door has two long windows, one on each side of the door. This shot was taken with my phone and I simply tapped on the screen on the sky portion to make the inside super dark and the outside light (vs. what it initially wanted to do which was to light everything so it was all washed out).
DAY IN THE LIFE™ | MARCH 2016 VIDEO OVERVIEW
SUPPLIES
Page Protectors: Project Life® 6x12 (one pocket) // Design A (cut one down to create the 6x8 size) // 6x12 with three pockets
AE Stamp Sets | These Days Are For, Gratitude, Love, Stories, One Little Word 2015
Epson SureColor P400 Printer (oversized)
If you enjoyed Day In The Life™ I hope you'll consider joining me for Week In The Life™ starting Monday, May 9th.


Comments
Sign in or sign up to comment.
20 comments
Hi Ali,
this is so inspiring!!!! Totally love the thankful list within your DITL.
Thanks for sharing!
Virginie
Replies to virginiegoujon
Sign in or sign up to reply.
Wow, Ali!!! Love how this all came together! I had so much fun with this project and finally learned how to use templates! Yay!!!
Thanks for all the inspiration! Im looking forward to playing along next time!
Replies to kathleen
Sign in or sign up to reply.
This is so awesome. Totally has me rethinking how I'm going to do my DitL spread. I love that you used three inserts to get in all in. I dont know why I thought to constrain myself to just one. This project, at least the documenting part, was so fun. I can't wait to do it again. And now I'm giddy about the prospect of another DitL kit. I can't wait to see what it is.
Replies to jamie59
Sign in or sign up to reply.
LOVE this - can't wait to use those layered templates for the next DITL.
Replies to Davida
Sign in or sign up to reply.
So inspired to work this whole idea into an album in one way or another! This was my first DITL and I'm already looking forward to participating again. :)
Replies to elisebydesign
Sign in or sign up to reply.
Awesome. Love the mixing of fonts, I always forget to do that! And like how you used the time card. I would love to see that card in a multiples pack (maybe with different colors?) or a digital stamp?!
Replies to papergoddess
Sign in or sign up to reply.
I love how you embellish your photos and cards, and your stamping. I learn so much from you. You have such a gift, and I appreciate how you share. Thank you. Michelle t
Replies to mtercha
Sign in or sign up to reply.
Love your videos. They help and inspire me. Will any of the week in the life stamp sets be restocked?
Replies to Erinaaaa
They will! We will post once they are back in stock.
Sign in or sign up to reply.
Loved your layouts and the videos! Thanks so much for sharing!
I don't use Photoshop, so I decided to keep it simple by using the collage function of the Becky Higgins Project Life App. I used the 4 x 6 photo size divided into four horizontal rectangles. I was able to journal or use photos in each rectangle, as I saw fit. I decided to order the prints from Becky's shop instead of printing them at home, which would also work. When they arrive, I will put them into the "A" design pocket pages and embellish them and add some more cards and photos if I wish. It took 30 min max to do the whole thing on the PL App!! I also used the App for a "Month of Gratitude" journal last November. Fantastic!
Replies to birdnscrap
Sign in or sign up to reply.
Really love these pages, Ali. I didn't document Day in the Life yet, but hope to do one every term this year. It would be great if the DITL kits could also have a set shipping fee for international people.
Replies to Lize
Sign in or sign up to reply.
LOVE the way it all turned out! Watching this inspires me SO much! I've been starting at my DITL photos all day - hoping to get some more time to create later tonight! Thank you for sharing!
Replies to KProffitt
Sign in or sign up to reply.
Looks great Ali!
Replies to NatashaP
Sign in or sign up to reply.
Love these Ali!! Some of my favorite DITL layouts yet! Quick question for you- how did you get the perfect circles in the middle of your journaling on the 6x12s?? I would love to know your secret!
Thanks!
Replies to nvarner
I did that using the "wrap text" feature in Illustrator - which is the program I used to make those cards. You can do spacing and return around a white circle to get the same look.
Thank you!!! Looks fantastic!!
Sign in or sign up to reply.
Hi Ali how did you print the photos with a border? I have the same printer and was wondering if you did it from there or if it was added in Photoshop? Thank you.
Replies to BSAW15
There should be two options when you print: 4x6 borderless or 4x6 (I've seen that in both Photoshop and Aperture). If you want the white border select 4x6 and if you want it to go to the edge select borderless (you might have to go into the print dialog box/options to make this selection).
Sign in or sign up to reply.
I ordered the digital DITL kit, but wished I could have ordered the time/date stamp from the hard copy kit. Maybe that stamp could be available separately later???
Replies to AlyciaIN
Sign in or sign up to reply.
Have you used the mini kit #2 yet? Am I missing it on your site?
Replies to Mpasquini12
Sign in or sign up to reply.