December Daily® 2013 | Interior Pages & Video Overview
Tags:
On Monday I shared how I put together my cover and title page for my 2013 December Daily™ album.
Today I'm sharing my preparations for the interior pages, including a video overview you will find below. These pages will become the home for my daily stories of December.
For December Daily™ my "pattern" each year is choosing one single story (or one moment) to document/highlight each day. Sometimes it's Christmas related and other times it's just an everyday thing like going to the dentist. In the past I have set up the pages in advance and fit the story to each day. This year I'm wanting more freedom to not be stuck with a 6x8 page protector if what I really want are 2, 3x4's and a 4x6. It's worked just fine for me in the past but this year I'm ready for a little more creative freedom.
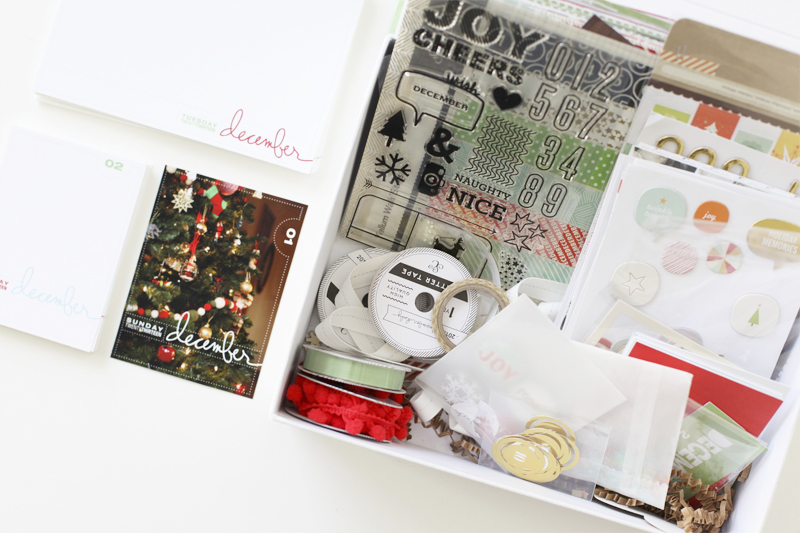
This year I'm primarily using items from the Studio Calico December Daily™ 2013 kit. There are a limited number still available if you would like to purchase this kit for your holiday documentation.
DO SOMETHING NOW.
Even if you don't plan to pre-make all your pages it's a pretty good idea to set aside some time to think ahead about your album.
Think about what works best for you - you - not your best friend or your neighbor or your internet buddy. It might be planning out some pages, it might be printing journal cards, it might be creating a bunch of see-through elements like I did, it might be pre-making all your pages or simply gathering up all your supplies into one box or onto a tray.
I think the key is to do something now so you aren't completely overwhelmed when December hits.
THE TASKS I'M DOING BEFORE DECEMBER
Complete my cover and title page.
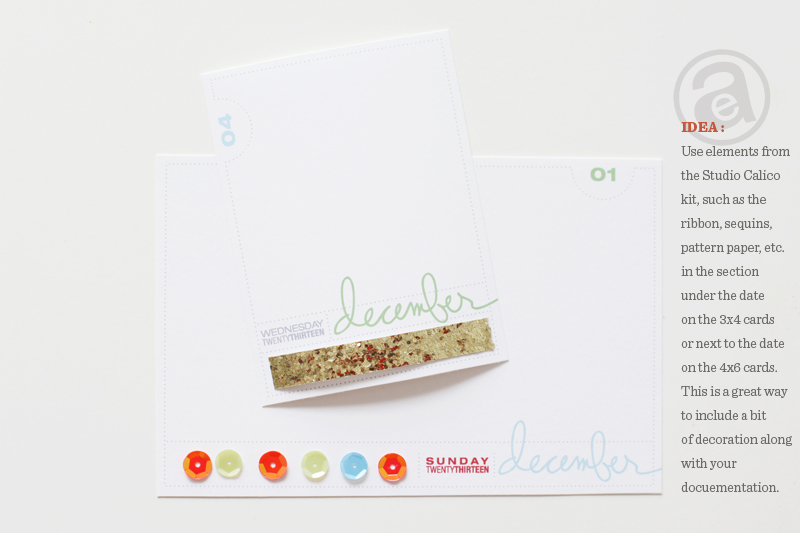
Print out the 3x4 and 4x6 printable daily cards. I'm waiting to embellish them on the actual days so I'll know which one I'm using. I love that the kit includes sequins, ribbon, glitter tape, pattern paper and other embellishments that fit just right on the journal cards.
Create a see-through element/card for most of the 25 days. See examples below.
Start thinking about the ways I'd like to celebrate the holiday season. Each year for me this is a bit different. Last year I was away from home for a portion of the month so I planned accordingly (smaller album, printed all my same size journal cards in advance, etc). What plans can you make now (or what can you plan to do less of) that will help you truly embrace the spirit of the season?
THE PRINTABLES
The next step for me after my cover and title page was to print out the 3x4 daily journal cards and the 4x6 daily journal cards which are available at Designer Digitals. Even though I don't know which ones I'm going to use in which pockets just yet (besides a few I've placed in my album already), I printed them out so I have easy access to them in December. These mulit-color printables were printed on Epson Matte Presentation Paper.
These digital packages include PNG files that can be used as overlays on top of your photos during the month (see examples below) + a multi-colored PNG file + 6 PDF files in five different solid colors and the multi-colored version I'm using in my album.
These would also work great if you don't plan on doing a specific December Daily album but would like to add 4x6 or 3x4 cards to Project Life.


There will be more layered templates and holiday products coming soon, including 6x8 and 12x12 overlays and templates.
These are the multi-colored 4x6 printable:
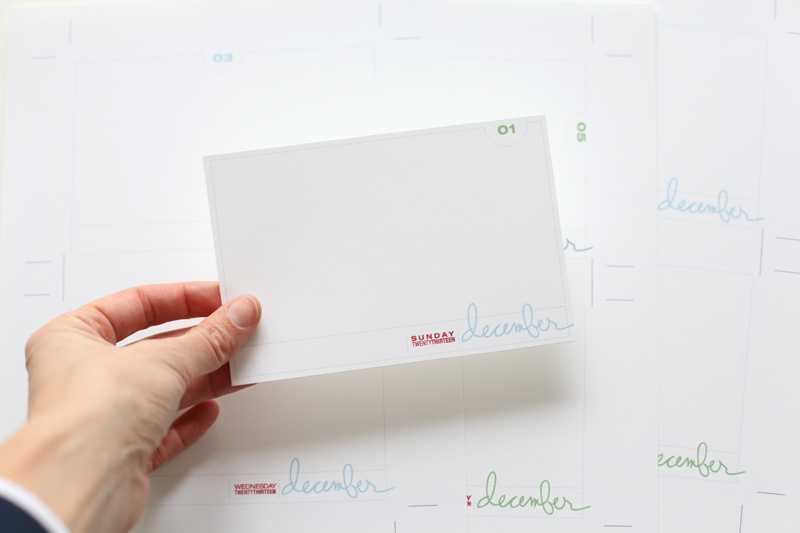
NOTE |Make sure when printing the PDF file of these that you select "actual size" or "don't shrink page to fit" otherwise your journal cards will come out too small. I always recommend a test print (even though I messed up this time again so if you do know you are in good company).
THE VIDEO OVERVIEW
To get an idea of what my album looks like right now I shot some video yesterday to walk you through the things I've already inserted into the pockets.
THE INSIDE PAGES
As I mentioned above, one of the things I really want to include/create in my album this year are see-through elements. To achieve this I sacrificed (meaning I cut up) a couple page protectors to use as the base layer for embellishment cards.
HOW I STRUCTURED THE PAGE PROTECTORS | The album in this kit includes four different page protector configurations. When placing them in my album I decided to just alternate them for now and then I can move them around as I see fit while I'm documenting December. This gives me a basic structure I can follow OR I can break free from that and move things around.
Here's a look at what I've included so far:
Details on my title page can be found here.
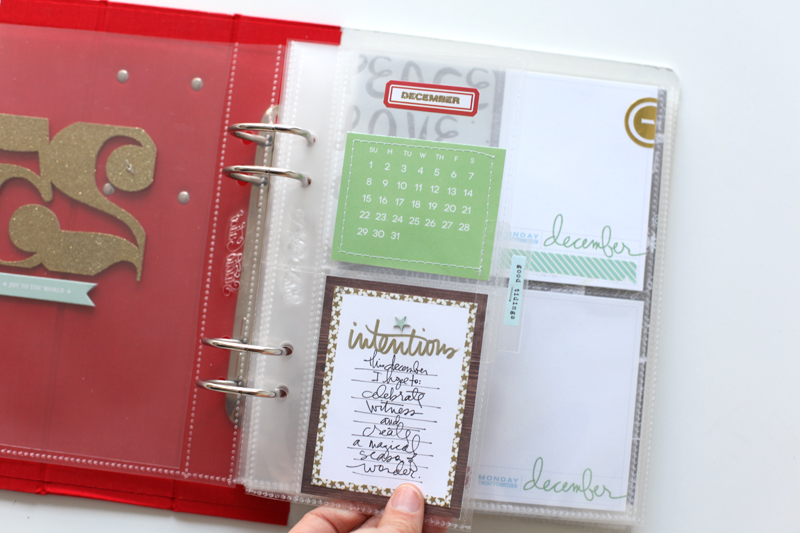
For the first page in my album I cut one of the 4, 3x4 pocket pages in half.
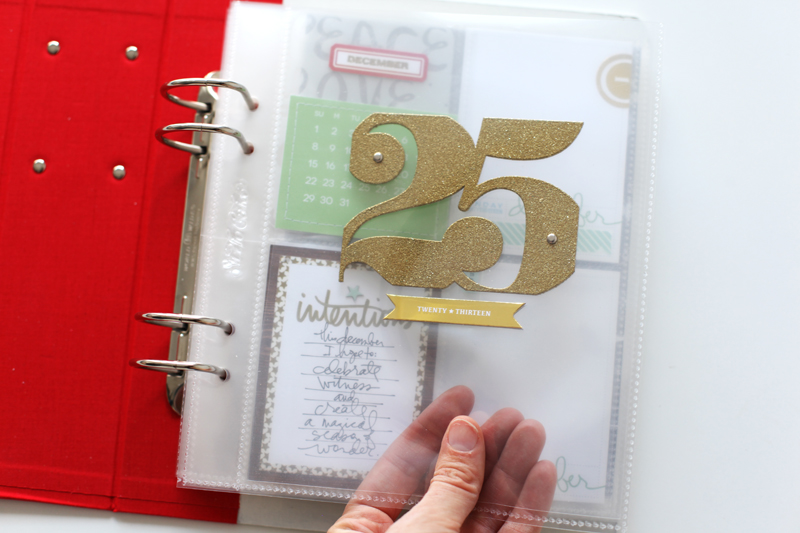
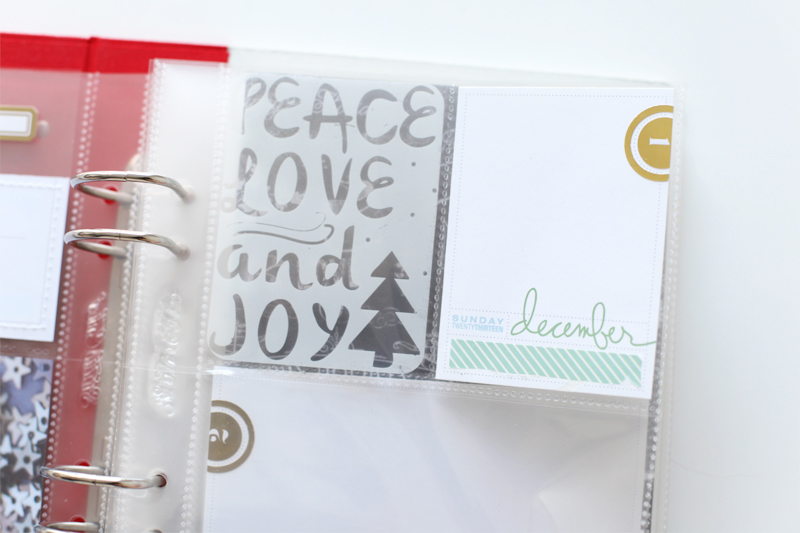
In the top pocket I added a card that includes a portion of the December calendar card + some left over page protector transparency + a label sticker + stamped and embossed in gold "December."
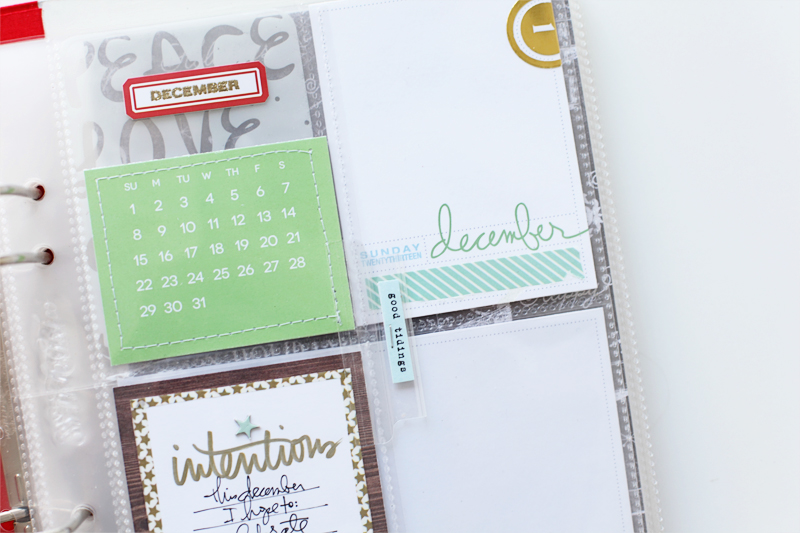
Along the edge I added an Avery 2-inch index tab down the side and cut up some of the word pattern paper that reads "good tidings" to slip inside.
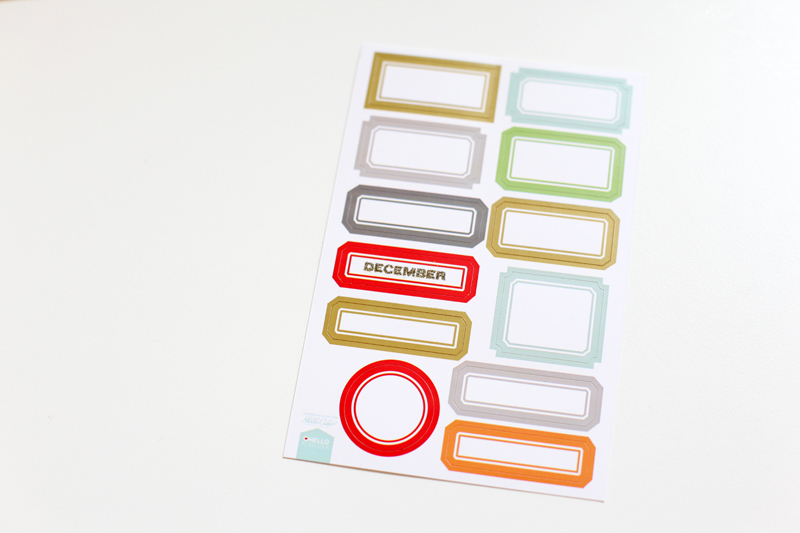
I stamped and embossed "December" directly onto the sticker sheet.
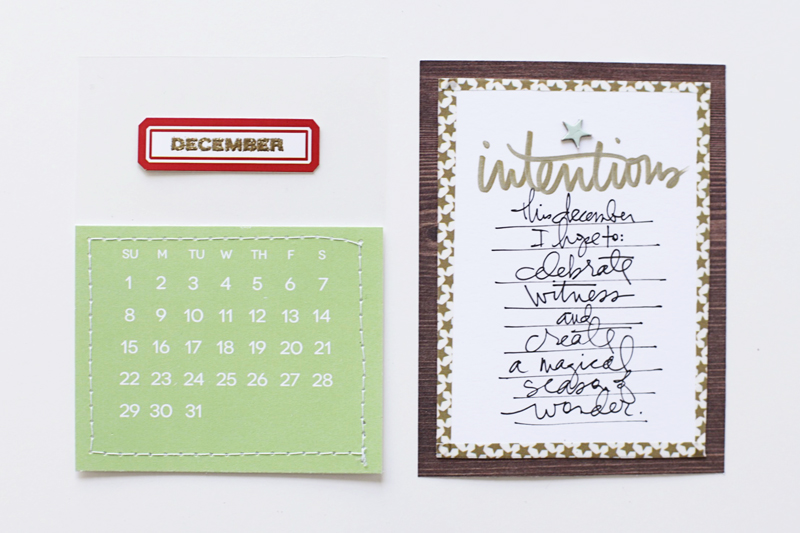
The "intentions" card includes a 3x4 woodgrain pattern paper background + a piece of white cardstock + a star washi tape border. I hand-wrote the word "intentions" with a gold metallic marker. The small star is from the chipboard set in the kit.
I left the back side of the calendar and the intentions card blank and will fill them in on December 1st.
To show you how I intend to use the journal cards I've added a few here in the beginning. You can see Day One above. The gold circle number clips fit perfectly over the number circle on the journal cards (both sizes). I adhered them with a glue pen and trimmed off the excess along the edge. I also added a strip of light blue washi tape along the bottom.
The journal card was paired with the transparent "peace, love and joy" card.
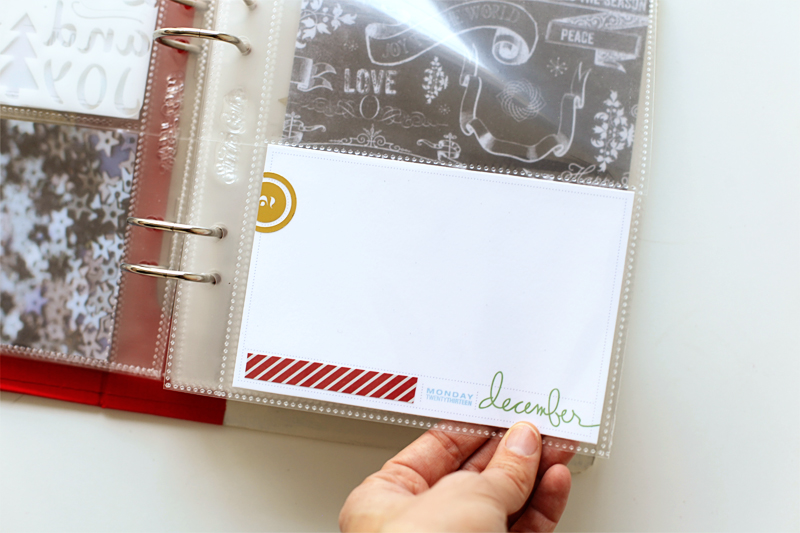
For Day Two I added a 4x6 daily journal card + a gold #2 circle clip + a piece of pattern paper.
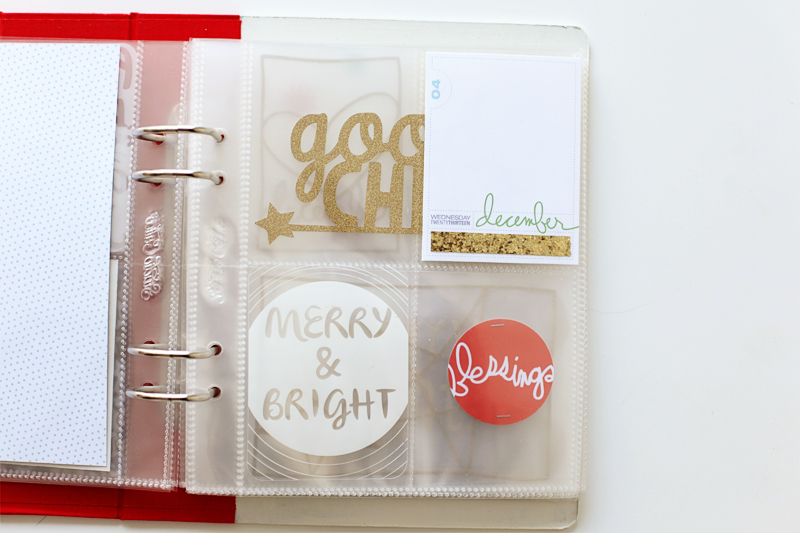
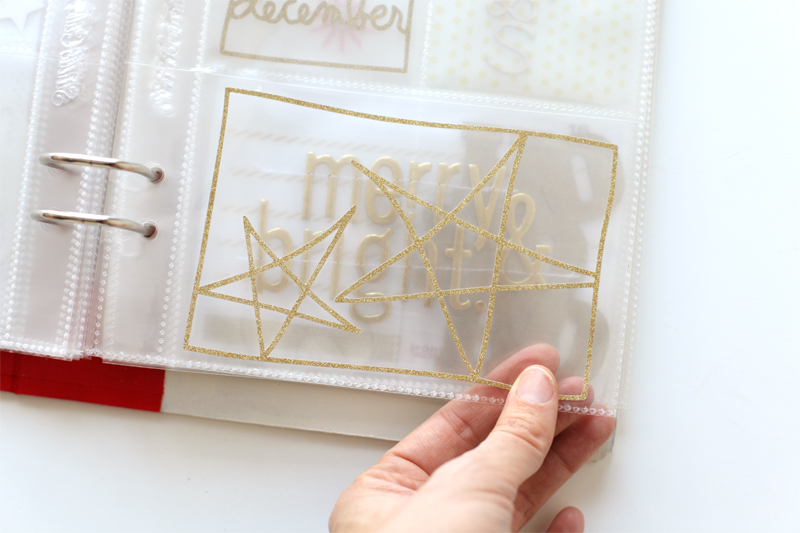
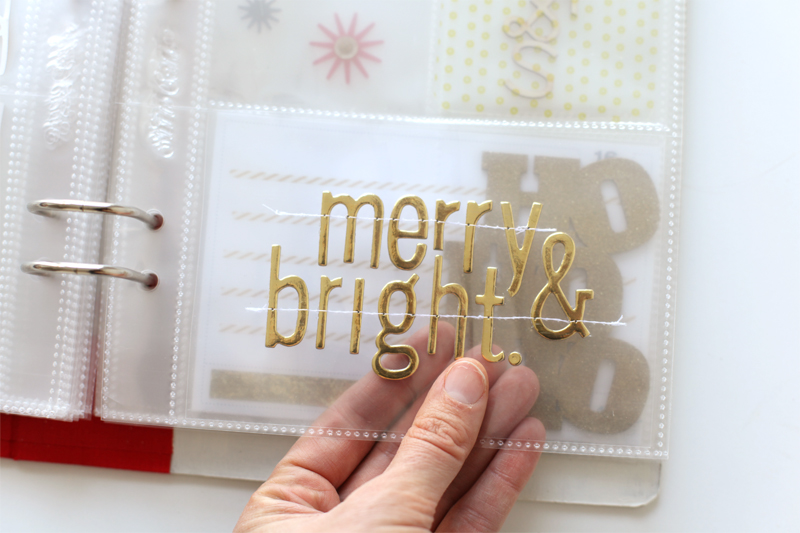
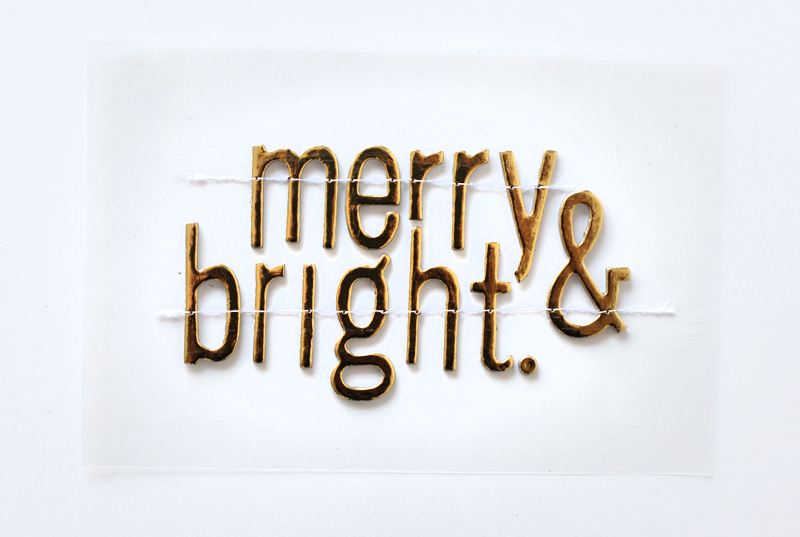
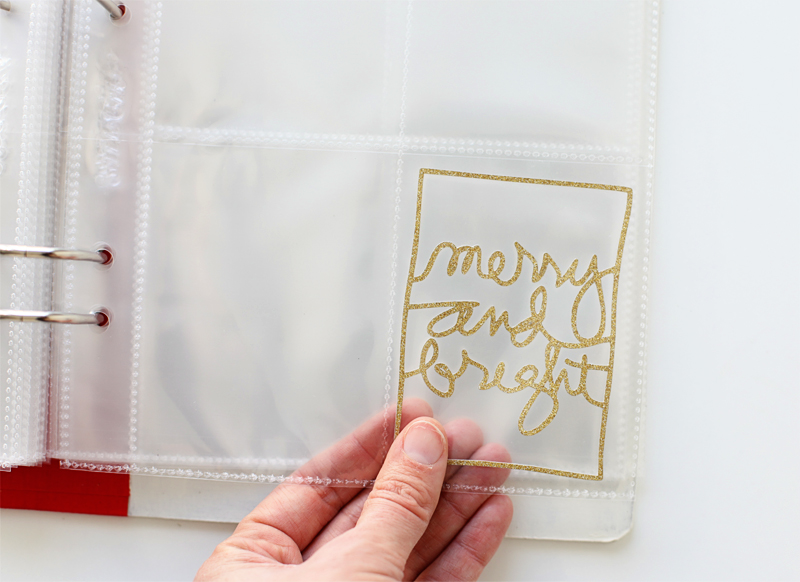
For Day Four I included another journal card in the top right pocket with the awesome gold glitter washi adhered in the space designated for embellishments. The "merry and bright" transparent card was inserted in the bottom left pocket.
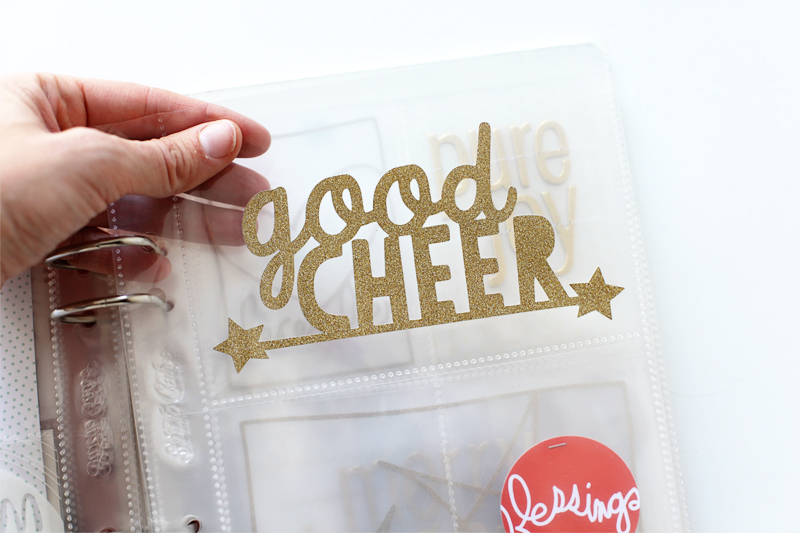
"Good cheer" is one of the cut files that's included in digital package when you purchase the December Daily™ kit from Studio Calico (you can find these printables and cut files on your dashboard over at Studio Calico if you've already purchased the kit).
This die-cut was simply slipped into the pocket (vs. attaching it to a transparent background).
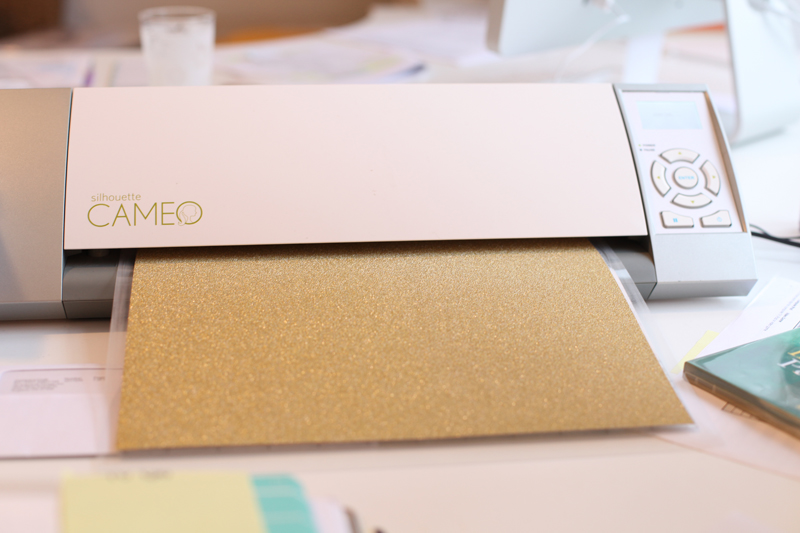
I cut out "good cheer" using the Silhouette and some of the gold POW glitter paper from American Crafts. I was able to find this paper locally at Micheal's.

I punched this "blessings" circle from a 3x4 journal card using a 2-inch circle punch and stapled it to a 3x4 piece of page protector and slipped it into the pocket. On the back I adhered a circle punched from one of the pattern papers.
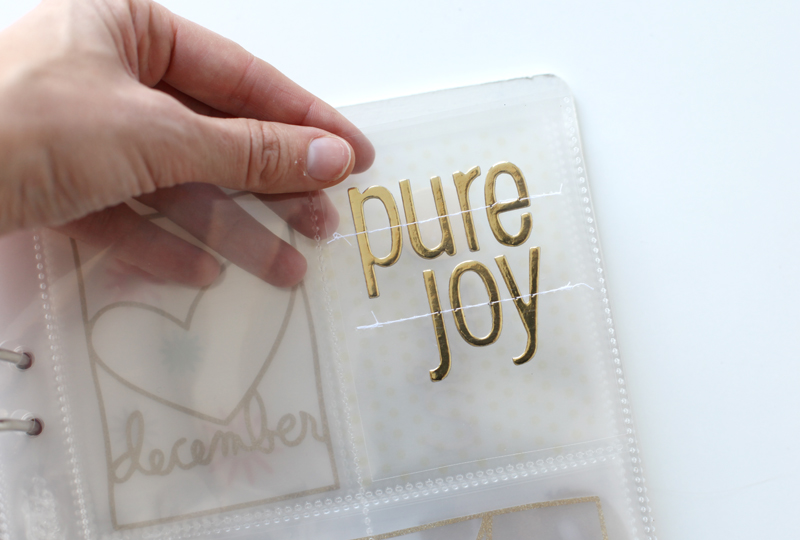
"Pure joy" was created by cutting a 3x4 piece of page protector (remember I talked about sacrificing a few page protectors to create backgrounds for my see-through elements) and then adhering the chipboard letters and running the whole piece through my sewing machine.

After stitching it I slipped it into the pocket.
I included a couple of my own designs such as the December Daily™ 4x6 Sentiment Boxes that I cut with the Silhouette and that same POW glitter paper. Check out this tutorial on how to trace and cut my digital PNG files using the Silhouette Software.
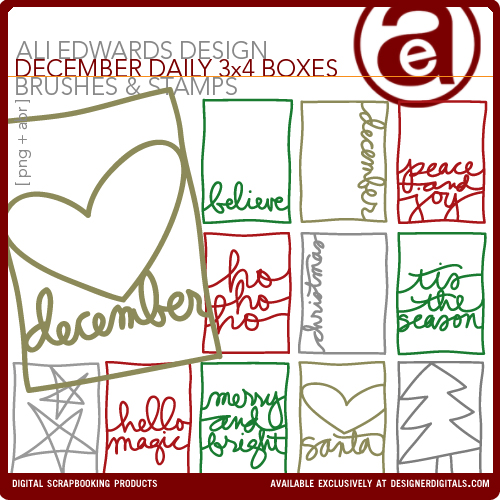
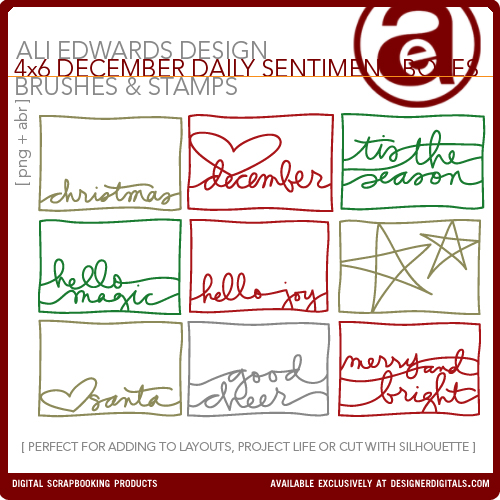
December Daily™ 3x4 Sentiment Boxes and December Daily™ 4x6 Sentiment Boxes.

On the next page I included another Silhouette cut in the 3x4 size from my December Daily™ 3x4 Sentiment Boxes package.
I liked that first "pure joy" insert so much that I created another one this time in a 4x6 size. To have enough letters I cut a "u" to make another "r" from the gold chipboard alphabet set. I also cut a portion of the "r" off on the bottom and also trimmed the "y" to accommodate the "t." I will likely make at least one more of these with the remaining letters (or use some of the wood veneer letters).
Yes.
The kit includes a fun 3x4 transparent pattern circle card. I added a chipboard circle to each side. I'll likely add something else to this card once I know what my story for that day will be during the month.
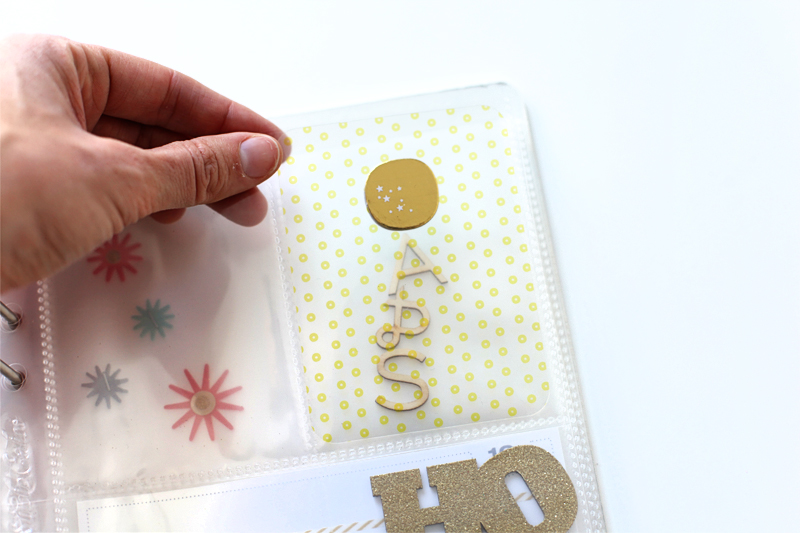
The "A & S" wood veneer letters were slipped into a pocket behind this card as a reminder to use them together to tell a story about Anna and Simon together.

The gold glitter Zing made another appearance on top of the Ho Ho Ho wood veneer.
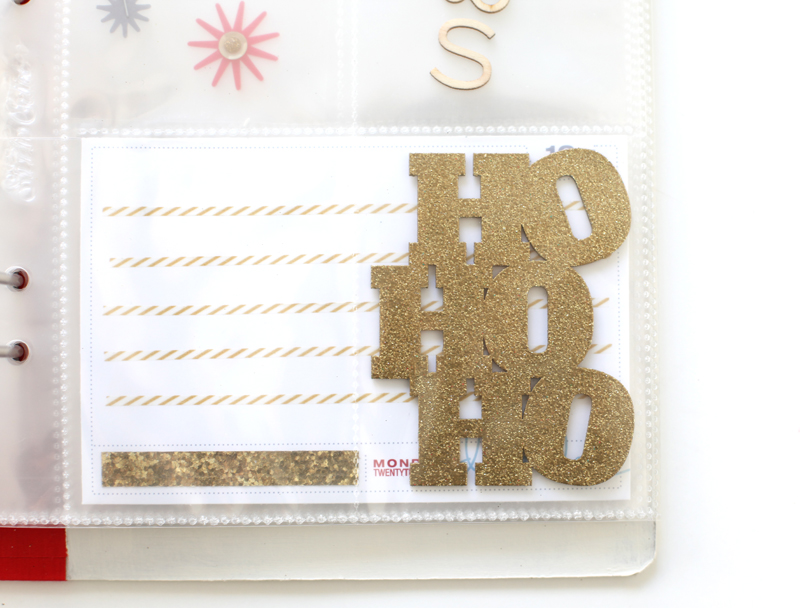
It fits right in a 3x4 pocket.

I used the awesome thin gold washi to create lines for this journal card. It will either be Day 16 or I can cover the 16 with one of the gold circle clips. Text will be added during the month.

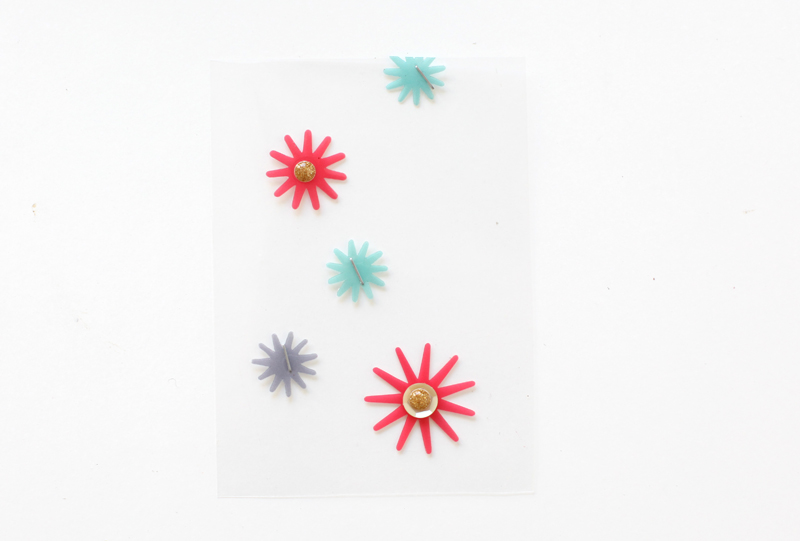
Cute little transparent starbursts were stapled (the small ones) and adhered using glue dots (the larger ones).
And one more of the December Daily™ 3x4 Sentiment Boxes cut with the Silhouette.
That's a look at where I'm at right now. I might do a few more transparent pages before December hits or I might just wait to be inspired by our daily life during the month.
I'm excited to see what you guys come up with this year whether you are using the kit or a fun combination of other supplies!


Comments
Sign in or sign up to comment.
104 comments
This looks like it is going to be a super fun album!
Replies
Sign in or sign up to reply.
It's all so cool, Ali. Looking forward to doing December Daily again this year. Thanks for sharing.
Replies
Sign in or sign up to reply.
You are off to a beautiful, magical start! Thanks so much for sharing this and making me smile this morning. We have a very special lady living with us, my mom, with a very serious diagnosis once again a few days ago. Unfortunately cancer is back for the 6th time in 7 years, and she is running low on options/waiting to hear what her limited choices are. You have inspired me to still believe and have faith that I can make this a magical Christmas vs a sad one. I am going to find a way to create a tribute to mom in each page in some way. At first I thought with so much unknown about the next 2 months, best not to start - it's almost like I am afraid the festive will clash with the melancholy that is also here. In looking at your supplies and how you used them, I am seeing many possibilities. Thanks.
Replies
I like Siri's idea about 'then and now' pages as a tribute to your mom...sometimes its good to have something 'normal' to hang on to while going through difficult times. I hope you will do this as it will be a great memory to look back on... best of luck to you and your Mom. Cancer sucks. I have been in treatment since last January and won't finish until the last of February. Almost there!!
oh! how about asking your Mom about her memories of past Christmases and documenting them along with what is happening today?
Peace to you and your family Paula. Love some of the suggestions above and love that you are open to really embracing the spirit of the season in the midst of all that life brings to us :).
Ann, you can do it in Word! Ali might have a video on it, It's really simple :-)
1. Place both "photos" into your document (one jpg and one png)Make sure both images is the same size. The photo should be your first file, the frame the second.
2. Select your photo, and Choose the option that makes the images "float" in front of your text. (Don't know the English term, directly translated from norwegian it is "after text"
3. You're all done!
Ann, My heart and prayers are with you. Thank you for your kind words. My faith tells me there is a place waiting for us that is the greatest comfort and joy we will ever experience, and in the mean time we create a little piece of that here on earth. May each day, week, month and hopefully year bring you and your family a slice of heaven on earth together. I have learned there is heaven on earth even in the very nonperfect days when we look for it. Wishing you joy and peace.
Paula,
So sorry about your mom. In my house, I'm the mom with cancer and it's terminal. I fear this is my last Christmas but even if I make it to the next, my son graduates high school this year so it's the last time we'll all be together in December - next year he'll be in college. I'm doing this December Daily for the first time, to celebrate our traditions but also just document a month in our lives so the kids will have it to remember. I'll probably even do my chemo day! Even though it can feel very bittersweet I am going to focus on the sweet and make this a joyous book. Who knows, it might even help me get out of the house once in a while. Just wanted to acknowledge the difficulty of this time and I agree, ask your mom some stories from her past and include them. And hey, she's survived a cancer diagnosis before, maybe she can do it again. I'll be hoping for you.
Thanks for being so generous a teacher Ali. Question-for those of us who don't do a lot of digital scrapping, do you think you can put those overlays on pictures using Paint? I don't want to buy Photoshop, is there maybe a cheap or free program that will do it? Thanks! (Windows 7 user).
Thank you for these suggestions. Faith, hope and love are the greatest gifts, and I am feeling the love :)
I know this is far from the same as your mother having cancer Paula, but I want to share anyway. I have been batteling (not suffering) severe depression and angsiety the last 7 years. Beeing depressed during the Holiday season is very difficult, but DD help me remember the good things, and "forces" me to find something positive in every day.
It helps me focus on the small, and maybe, insignificant things that happens during December, it also make me do things even though most of the time I just want to turn of the lights and curl down in my bed, shutting everything and everybody out.
Maybe you could do a "then and now" approach in your album? Having one page documenting something from your childhood or your moms memories, and one page documenting "today"? Make it magical!
Sign in or sign up to reply.
Oh my goodness!! This is perfection. Admittedly, when I saw images of the kit last month, I thought "it's nice, but I don't think it's me." Over time I caved and I'm SO GLAD I did. My kit arrived last week! Your album is looking amazing Ali, and I can't wait to get started on mine now. Love love love all the transparent/see through pages!
Replies
Sign in or sign up to reply.
I love that you've left yourself a lot of options. It's perfect.
Replies
Sign in or sign up to reply.
I used a handbook last year and I loved it. Every day had a see through element, and I loved how it turned out. I did it "semi flexible", using one divided page and one full page for every day. I added a large photo on the 6x8" side, and the divided page protector had a mix of either photos/journaling cards and one transparant pocket. The divided page was my flexible part, I also added more divided pages if needed.
I focused on one main story, but when I had great photos from different things I added them all. I only have 6 post-its in my album marking things that needs finishing, mostly some minor embellishments, and I´m so happy about that!
I´m doing PL as well this year, but I´m planning just having a 2-page spread for December, and adding the rest in my DD-album.
Replies
Sign in or sign up to reply.
LOVE, LOVE, LOVE it! Can't wait to receive my kit - thanks so much for sharing your wonderful work!
Replies
Sign in or sign up to reply.
Looks amazing Ali! I'm so excited to get started on this!
Replies
Sign in or sign up to reply.
One of my favorite things about the kit is those sequins. Can you talk about how you attached them and what might be the best way. I wanted to avoid sewing across them or stapling. Looking for a good glue or adhesive. Thanks.
Replies
I used mini-glue dots - they are great: http://bit.ly/16MwfUz
Thanks, I will try those.
Sign in or sign up to reply.
Thanks for sharing! It look beautiful already.
2 QUESTIONS: Does persnickty prints still have the 6x8 print option?
Do you have a link on how to resize a pic to 6x8 and how to put a 6x8 overlay on it? I now have photoshop and would like to create full 6x8 photos.
Thanks!
Replies
Hi! Yes - Persnickety still does 6x8. Here's a tutorial from a couple years back using 6x8 overlays: http://aliedwards.com/2010/10/december-daily-2010-working-with-the-6x8-printable-overlays-video-tutorial.html
Sign in or sign up to reply.
Love it! Love the idea of using transparencies, i am planning to do that as well. Cant wait to start working on my foundation pages, and look forward to seeing more of yours! Thank you for the inspiration!
Replies
Sign in or sign up to reply.
Ali I'm so excited that this is the first year I am doing December Daily with the Studio Calico kit. I discovered December Daily last year for the first time but the kit was already sold out so yes, this year, I'm excited and I love your ideas so far!
Replies
Sign in or sign up to reply.
I'm so inspired!!! I love the idea of adding transparent bits and pieces to it and really loving all the gold too. Must get my hands on that POW glitter paper and dust off my Silhouette!
Replies
Sign in or sign up to reply.
I love the look of the see through pages.
Are you going to prep any more of your transparency pages before December or just wing it when it comes time to do those pages?
Replies
Hi Brooke - I might. If I do I will share them here - it's mainly going to depend on what other projects I have going on (and I will be traveling for the next two weeks).
Sign in or sign up to reply.
For someone who hasn't scrapbooked or crafted in years, this looks too advanced / complicated for me. But I'd like to try it. Any advice on simplifying this, friend?
Replies
Yes - you could totally just use the PDF printable cards + photos and a few small embellishments and skip the die-cutting, embossing, etc. You could also substitute some other page protectors so that they are all the same size - I think having different sized pockets makes it more complicated from a planning standpoint. Simple would be one photo + one journal card per day :). You could totally do that.
Carrie, Last year I did one 6x4 picture and one 6x4 journal card per day. Try the washi tape lines or hand drawing if you have less to write on some days. It's easy and it worked. First time ever!
Sign in or sign up to reply.
Love how you are incorporating the transparencies into this cute album! I don't digitally scrap, but i am going to get the date cards and print them out. I will have to sub some blinged up chipboard for the cut file words (which I love!) and hope this will work.
Do you have trouble sewing over the chipboard letters? I am so afraid of breaking my needle. I see you use a long stitch, which may help. Would rather sew by machine than by hand!
THanks for all the wonderful tips included in your video tutorial: VERY helpful for a first time Dec. album creator like me!
Replies
Hi Kathy - I don't have trouble sewing over the letters but I do "push/help" them through the machine. I use a regular needle - all that said I don't sew on fabric unless I'm sewing onto paper (meaning my machine is mainly used for paper, plastics and other scrapbooking related stuff).
Thanks Lisa T. for sharing your idea for creating the cut files without a Silhouette. I'm going to try it tonight!
I don't have a Silhouette but I do own Ali's cut files from last year. To get the "cut file " effect I cut up a transparency & some white vellum. I printed out the cut files in black on a scrap piece of paper. I then placed the vellum or the transparency over the top and traced Ali's words with my Gold Metallic Sharpie pen. Worked like a charm:)
Lisa T. I LOVE that idea! Thanks for sharing!
Sign in or sign up to reply.
Dear Ali,
You tell in the video about the file include in studio calico kit, but i haven't got them. Where are they, can you tell me ?
Thanks for sharing your album, it's very nice and very inspiriting.
Kiss from France
Claudine
Replies
They should be on your dashboard over at Studio Calico. Click on your user name on the top right corner and that will take your to your dashboard - scroll down to see the digital items.
Thanks Ali, I find them !
kiss
claudine
Sign in or sign up to reply.
I just love the idea of embossing the wood veneer pieces. Normally I'm not a fan of veneer but I just love it all glittered up!
Replies
Sign in or sign up to reply.
Hi Ali! I'm attempting dd again this year after my miserable fail last year. I will eventually get it done but I'm still looking foward to this year. I love so many of your ideas and I wanted to mention that last year I made a few transparent pages and I used actual transparency paper(that teachers use/used on overhead projectors). Just thougth instead of "wasting" the page protectors you would want to try that option.
Replies
You can do it! Using transparency paper is a great idea too - I was mainly just trying to use what was in the kit - there are a bunch of extra pages if you are doing just 25 days.
Don't worry, it's not a race or competition, do what you can when you can, and whether you are done "on time" or have a work in progress for a long time, it's still a very special project.
Sign in or sign up to reply.
curious as to why sacrificing page protectors instead of using transparency...just preference...?
Replies
I think part of the idea I had was to use what was in the kit :) and use-up what I could (there are more than enough for doing 25 days - I will have extras). I also happen to have quite a few extras from other sets around here so it's a nice way to use up some of those products.
Ali, what transparencies DO you use, and could you please post the link to that? Also, since this is my first time doing December Daily, do you suggest using transparencies instead just in case I want to use the page protectors? Also, would you say that using transparencies are "easier" to do, rather than cutting up the page protectors, for beginners like myself?
Sign in or sign up to reply.