3 Things : playing with printing + a giveaway
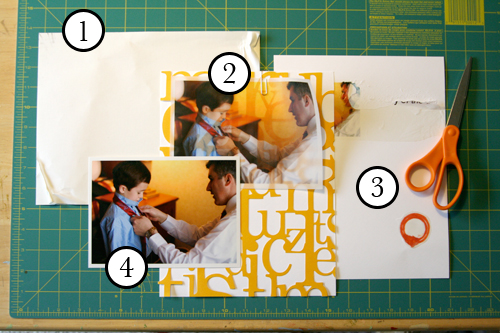
Staying in the theme of words + photos this week I wanted to experiment with a couple different inkjet printing surfaces. I took that photo of Chris & Simon and the tie and printed it on each of the following using my HP Photosmart D7360
[ Warning : any of my experiences below could very well be operator error. ]
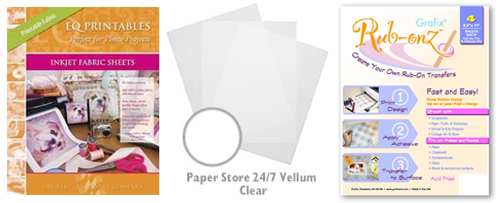
WorldWin Inkjet Printable Translucent Vellum : Quick and easy. Great result. See sample below. It's been awhile since I last used vellum and it was fun to reintroduce it into my supplies. Definitely want to play with it more: thinking about layering with transparencies and text and photos.
EQ Printables Peel & Stick Fabric Sheets
Grafix Rub Onz - Create your own rub ons. Super cool idea. I wanted to see if this would work with a photo + some words...and at least in my case it was a challenge. This is a multi-step process that includes printing, then placing adhesive paper on top, and then adhering your image to final paper. The real challenge is getting the adhesive paper onto your image without bubbles. The second challenge is in the choice of the paper you rub on to. I tried it on textured cardstock and it didn't seem to work - it just tore the paper. I will probably try this whole process again to see if I can make it work.
[1]
EQ Printables Peel & Stick Fabric Sheets
And now, the giveaway:
3 readers will receive the following from The Papermill Store/Worldwin:
• 1 pack 27 lb WorldWin Inkjet Printable Translucent Vellum
• 1 pack 40 lb WorldWin Inkjet Printable Translucent Vellum
• 1 pack 12x12 WorldWin Doublemates Cardstock
• 1 pack 12x12 WorldWin Rouche Cardstock
For more information on The Papermill Store/WorldWin, check out their blog here.
For a chance to win this selection of papers leave a comment below with your favorite photo tip or what you want to work related to taking photos. Winners will be drawn tomorrow at 5pm Pacific.
Don't miss today's words + photos post below.


There are definitely lots of things i need to work on with my photos. Need to remember to bring and use my camera on day to day comings and goings. Need to remember to print off photos on a regular basis to share with family and friends, not just when I'm ready to scrapbook. I'm dying to try and learn some different basic techniques in photoshop, like writing on photos and eliminating color on everything but one element. Also need to work on photographing my projects well, as I don't have a printer.
Leigh anne
Sign in or sign up to comment.
Favorite photo tips- I think it has to be shooting from above my subject, getting down on the ground to shoot up, and from your post today- shoot a lot of photos but be ruthless in the editing.
Sign in or sign up to comment.
Tip: get closer to your objects. Take lots of shots on auto & then put the camera down. Don't forget to make the memory you are trying to capture!
I am LOVING this series and really like the vellum photo idea with the KI lace paper... I think I would really like to try that! :)
Thanks Ali!
Lauren H in Colorado :)
Sign in or sign up to comment.
I would like to be able to print on fabric to make a fabric album.
Sign in or sign up to comment.
ha ha! I guess I missed the photo tip part! "Open your eyes, Shealynn!!" That was a note to myself. ;) LOL.
I am a professional photographer... my photo tip? Take pictures in the early morning or about 1-2 hours before the sun sets. You will get the best lighting. It's not as harsh, yet leaves a fresh golden hue in photos sometimes, which makes pictures look their best. Also, get to know your settings. I only shoot in Manual mode. You will have more control over what you can do.
:)
Sign in or sign up to comment.
hi there Ali ! i've tried that peel and stick paper, and got completely crazy with it ! never managed to do anything; I need to experiment more with my camera, and the way I print out the pics. waiting for tomorrow's post; SMILES !
Sign in or sign up to comment.
I would love a SLR and learn how to use it...maybe one day...
I print most of my photos at home and love to change my photos to black and white. I also use the diffuse glow function ,in my software, to give certain photos just a bit of a different look or whimsical feeling. It works well especially with wedding photos and photos of girls with angel wings etc.
Sign in or sign up to comment.
I have to say my tip for great photos are the photos you don't think will work out (point and click photos no planning) turn out to be the ones you cherish later in life as they are not set up and show the true meaning/way of life.
Love the new theme/photo section you are doing. Keep up the great work
Sign in or sign up to comment.
How about my favorite photo EDITING tip? (still trying to master the taking photos thing).
I had a beautiful photo of husband holding my neice, my neice's eyes were the deepest shade of blue I'd ever seen! Only problem was that the photo was slightly blurry and there was some distracting elements in the background.
Well, I resolved to use the photo anyway. In order to get rid of the distracting elements in the background, I drew a path around my husband and neice, selected the background, and performed a gaussian blur. This is a well known solution for getting rid of distracting background elements.
BUT WHAT A SURPRISE, by blurring the background enough, it made the subjects look in focus. The finished photo doesn't look blurry at at, it just looks like I took it in portrait mode (to blur the background)!
Thanks for the oppurtunity to win those cool products! I've been wanting to try both the printable fabric and rubons for a while now.
Amanda
Sign in or sign up to comment.
My favorite little tip is to simply use a sheet as my backdrop for great portrait photos....LOVE IT!!! What do I want to try??? printing on fabric...it jammed in my printer too....so that will be for another day as well.....Thanks for your many inspirations ;o)
Sign in or sign up to comment.
This is a wonderful series!
I love using Picasa (by Google) to organize and "tweak" my digital photos. It's very user friendly, and I can see all of my photos at one time!
xoxo
Sign in or sign up to comment.
This is a wonderful series!
I love using Picasa (by Google) to organize and "tweak" my digital photos. It's very user friendly, and I can see all of my photos at one time!
xoxo
Sign in or sign up to comment.
Turn your camera upside down and snap some shots from that vantage point! It loosens up the usual boundaries of camera play! I usually do this outside, on a sunny day, in the yard, with the trees and bushes and flowers all in bloom! I catch some in full and some in partial shadow. However, I took some upside down shots this past winter with just the bare branches showing on the deciduous trees and the dark green of the evergreens. When developed, everything was geometric and patterned. I cut up the photos and moved them around my layouts until I felt satisfied and I still have pieces left. Try it!
Sign in or sign up to comment.
Thanks Ali for always being such a great source of inspiration - I want to try creating my own rub ons! what a very cool idea!
Karen
Sign in or sign up to comment.
Thanks for all the great info today! My fav photo tip is to take shots from multiple angles. You can end up with a shot you like from an unexpected angle. Thanks for the heads up on the Rub-on stuff. I have it and haven't had the time to tackle it. I'm really hoping to upgrade to an SLR camera soon! I want to learn how to use the manual mode and different lenses.
Sign in or sign up to comment.
A favorite photo tip is using the rule of thirds when composing a shot. It really does make for beautiful pictures-and a lot of times it gives me some negative space to journal directly onto my picture (in PS).
Sign in or sign up to comment.
I just take photos in natural lighting whenever possible. An overcast day is perfect for outside portraits.
Sign in or sign up to comment.
Ali, I have one tip as to printing on fabric paper. If your Hp photosmart printing software has an option for "other specialty paper" in the drop down menu for what kind of paper to print on, then choose that and see what happens. That's what I do and it work perfectly for me. I hope that helps.
Sign in or sign up to comment.
Don't edit digital photos, didn't do it with film, don't waste the time now. HUGE time saver!!!
Sign in or sign up to comment.
My favorite tip is to always carry a camera with you as you never know when a photo op will happen and you want to be ready. Even if you have a big camera, buy one that can fit in your purse or pocket!
Kip
Sign in or sign up to comment.
The only things I know how to do are to crop and adjust light levels. But I've found that even just adjusting light levels makes the image brighter.
Sign in or sign up to comment.
What I would like to work on is being sneaky! I'd like to learn to take great candid shots, and to do that you have to be able to hang around without anyone noticing you're there!
Sign in or sign up to comment.
my fav thing to remember when taking pictures is to look at the whole picture: not just what you are specifically taking a picture of, but also the stuff surrounding and behind the subject. by remembering to do this, it can save some editing time!
something i would like to work on with my photography is lighting... i'm learning!
Sign in or sign up to comment.
Be sneaky! My best shots are when people don't realize they're being photographed, that's when they let their guard down.
Sign in or sign up to comment.
My best tip is to pay attention to where the sun is! This is harder than it sounds, and can make or break your pictures.
The other thing is to check your white balance. Often a small adjustment (tungsten for indoor pictures) can make a huge difference in the color of your pictures.
Thanks!
Dianne
Sign in or sign up to comment.