December Daily : Foundation Pages : Cover & Days 1-12
Today I am going to introduce you to the first half of my album and talk about what I did for the cover. Tomorrow I will post the second half of the images and a bit more explanation.
Something I stated last year should definitely be repeated again:
For me, this book is less about decoration and more about documentation. What that means is that when the time comes in December to add my words and photos I will not spend a lot of time trying to figure out what I want to add product-wise. I don't have any plans to spend more time each day than it takes to upload and print a photo (here at home), write up some journaling, and adhere it into my book (and maybe add one embellishment or a couple word stickers). I don't want this album to take up more time than necessary during the holiday season. Again, I want to be present and experience the season and do a bit of documentation as we go along.
I like to do documentation as we go along, rather than after the holidays, because I find that I have a tough time remembering what were the specific important or poignant or endearing or special parts of the day months after the fact (sometimes they are comments in passing or very simple things that end up meaning the most). Instead of "we went to see Santa today" I want the journaling to be more personal and real: how did Simon react, what was special about the moment, did he say anything silly or wonderful, what made it unique from last year, etc.
Those are the things I want to capture in this album.
As you will see below this is all about keeping it simple. Don't spend too much time deciding where to put the numbers or journaling blocks. Get it done. When December rolls around you will be working with what you have in front of you rather than starting from scratch. Making it work is a creative task in and of itself.
One of the questions I receive each year is how can you set this up in advance when you don't know what you will be doing on each day? This, for me, is part of the creative adventure. I create the album first and then format my content around the pages during December. If you look back through my pages from 2008 (see the full list here) you can see the before and the after to get an idea of some of the things I did with my foundation.
DECEMBER DAILY 2009
Let's begin with the Prima canvas album.
WHY THIS ALBUM? One of the main reasons I went with this album was that I wanted to do something different from the last two years. I still wanted the flexibility of having a variety of different pages (textures, sizes, etc - and this includes some page protectors and canvas pages) and I was looking forward to the creative challenge of seeing what I would do with it.
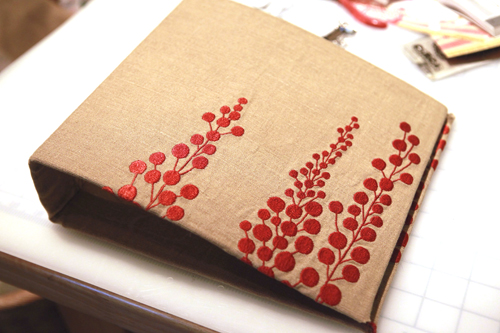
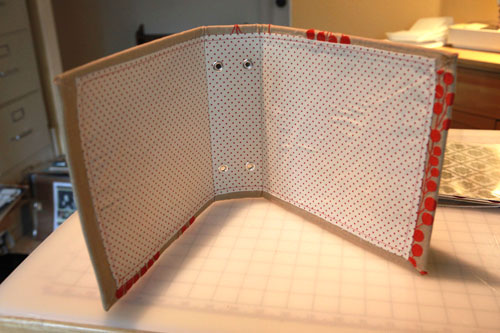
After lots of thinking about what I was going to do, I decided to cover the album with fabric.
In my stash I had this cool linen/cotton blend piece with red berries that I ordered last year from Purl Soho. In looking at their site it looks like these are embroidered fabrics come from India and this color is available here (it's called Natural/Rust Branches).
To cover the album I used a product called Wonder Under 
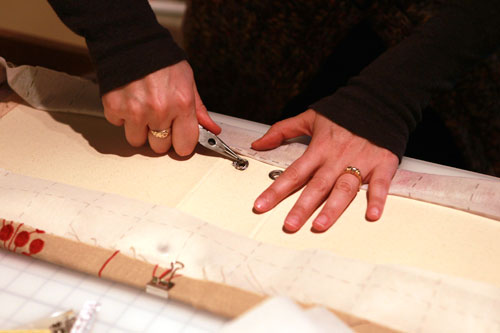
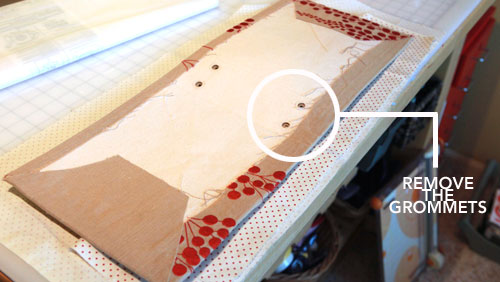
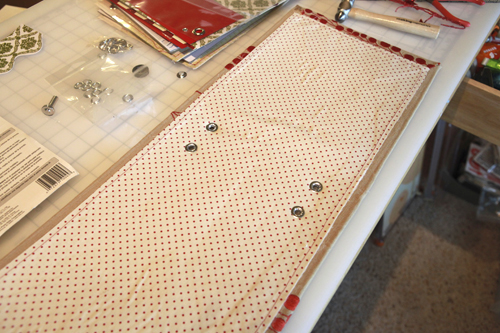
Before covering the album I removed the grommets (the little metal circle pieces that held the ribbon) with small pliers.
Before covering the interior with fabric I made sure to punch holes where the new grommets would be placed (in the same original location). If you don't punch the holes when you can still see them it is a bit challenging to get them in the right spot.
For the inside of the cover I stitched two pieces of fabric together (just one was too thin and you could see through) and used the Wonder Under again to adhere it to the inside of the album.
New grommets were set after the album was covered inside and out.
If you are interested in working with the canvas album but not interested in covering it with fabric I saw a cool version that Amanda created using stars and Scarlet Glimmer Mist.
Once I had the cover done I was ready to tackle the inside.

One big difference from year's past is the inclusion of more page protectors. Last year I did a couple pages with divided page protectors - this year there are more. In addition to the pages that come with the album I also found that some old KI Memories 8x8 post bound page protectors fit just right.
THE RINGS : One thing I really wanted to try with this Prima album was to see if I could use rings instead of the ribbon that comes with the album. I was able to use 2.5 inch metal rings (in some of the photos below you will see where one of them is open - need to replace that with a new one) through the grommets.
After figuring out that the rings were going to work I decided to put eyelets in the holes of the pages I was creating (the ones that come with the album already have them in place). The Crop-A-Dile worked like a charm for setting all those eyelets.
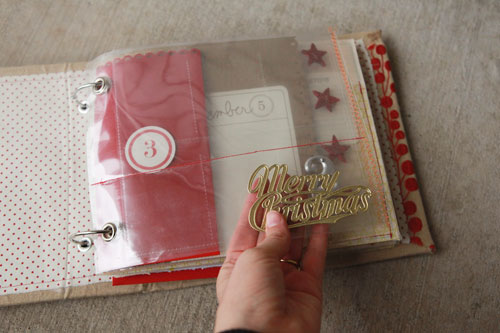
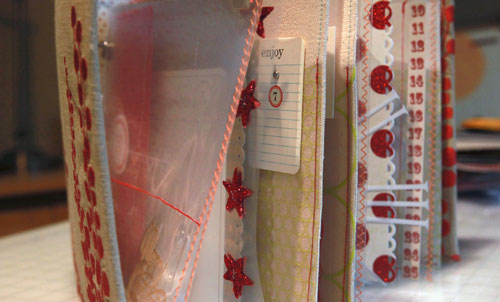
DAY ONE : Merry Christmas foil from Papier Valise (you can find it on page 3 of her paper section - you get a bunch of them that you can share with friends or use on other projects) is placed inside a page protector. To keep it in place I ran it through the sewing machine with red stitching (I did red stitching for the entire project to keep it simple). The content for the day will go above, leaving the part with the Merry Christmas foil see-through into the rest of the album.
I will add a number one to the photo when I document the day.
DAY TWO : Metal 2 from Tim Holtz. This page is an 8x8 page protector that came with the album with part of an 8.5x11 baseball card page protector trimmed down and slipped inside (when trimmed there are 6 pockets). Basically I cut off the top row of pockets and the part along the side where the holes are located. There is an example of a page like this in the December Creating Keepsakes magazine.

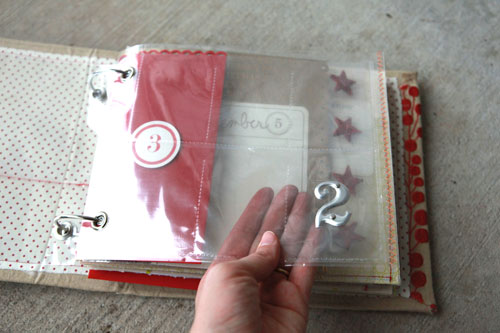
DAY THREE : Red envelope from Paper Source. Red Circle Number from Every Jot & Tittle. Scalloped edge along the top of the envelope created with the Fiskars Apron Lace border punch.
I like that there are some things I have used every year like these red circle numbers.
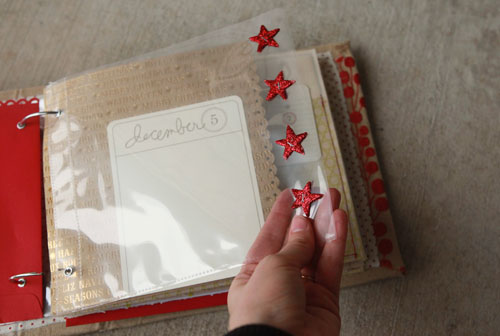
DAY FOUR : Red Galaxy Stars from Prima. I stapled four on the front and four more in the same location on the back side of the page protector. The photo or journaling will slip into the pocket alongside the stars. I may end up stitching a vertical line alongside the stars once I have the rest of the content in place.
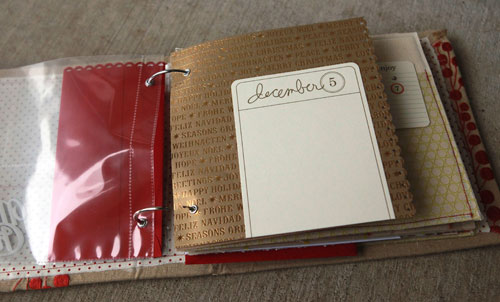
DAY FIVE : 25 Days of December Overlay from Designer Digitals printed on cream cardstock with corners rounded on the top. Gold embossed patterned paper from K&Company.
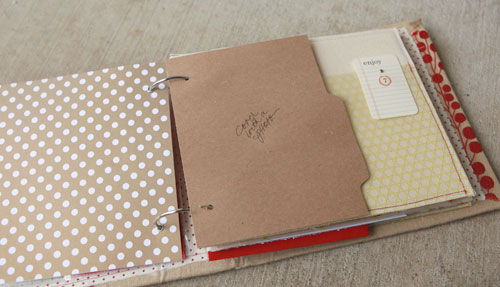
DAY SIX : I cut down a file folder and wrote the words "cover with a photo." I tried to leave myself a few pages that will be entirely photos with journaling on top since I ended up wanting more of those sorts of pages last year. Gold with white dots paper is American Crafts.
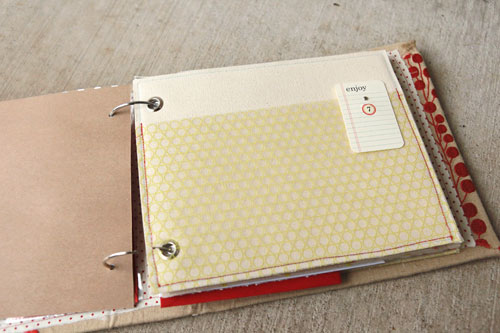
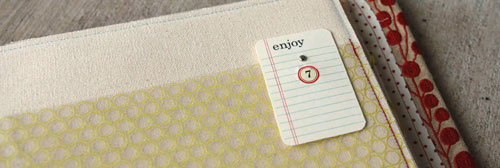
DAY SEVEN : For the canvas pages that come with the album I decided to create pocket pages by sewing pieces of Hambly overlays on top. Small Enjoy card is from Banana Fish Studio. Circle 7 is a rub on from October Afternoon. I stitched transparency overlays to both sides at the same time with my machine (creating a pocket on the front and the back).
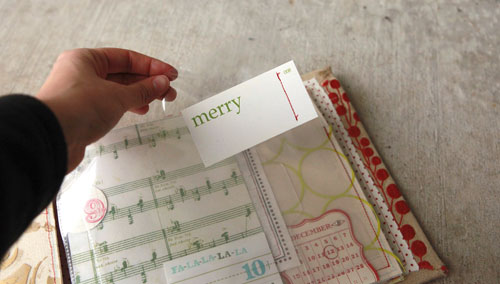
DAY EIGHT : A small "merry" card from Elles Studio was stitched to the outside of a page protector. The number "008" was already on the card.
DAY NINE : Pages from other minibooks make great pages for your December Daily. In looking though my stash of minibooks I grabbed one of the clear acrylic ones from Clear Scraps (8x8). I used my trimmer to cut a bit off the edge (removing the holes) and then used the Crop-A-Dile to punch the holes.
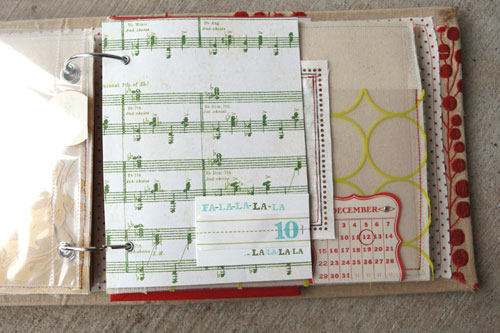
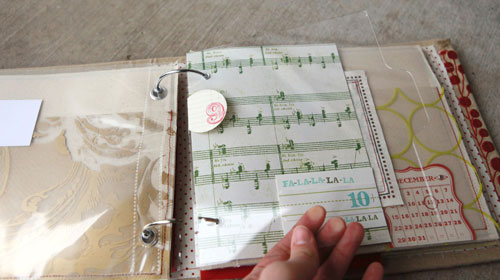
DAY TEN : Green glitter music pattern paper from Making Memories. Fa La La letterpress card from Paper Source. Small blue rub-ons from Jenni Bowlin. This is one of the easiest ways to create pages - adhere pattern papers back to back and punch holes for the binding.
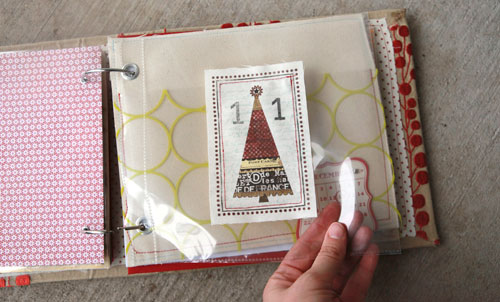
DAY ELEVEN : Pink Paislee canvas tag machine stitched on top of a page protector. "11" stamped with Studio Calico Noah alphabet stamps and black Staz-On ink. The content for this page will likely be a new page behind the page protector (like a full page photo).
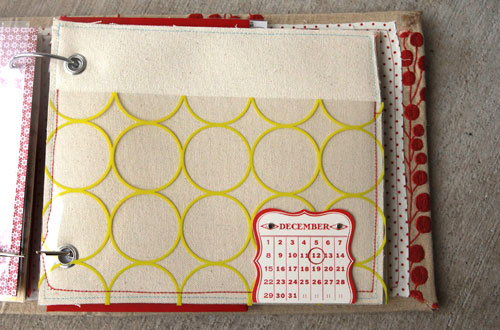
DAY TWELVE : Another canvas page where I created a pocket by machine stitching a Hambly overlay right onto the canvas. Red calendar is from Jenni Bowlin.
TOMORROW : Days 13 through 25.

This is part of a series of posts on creating a December Daily album. All posts for 2009 can be found here.


very. very. cool and exciting.
I love the stitched elements, and the fabric cover. I'm going to incorporate more stitching this year as well. Thank you for always inspiring me, Ali.
Sign in or sign up to comment.
Very inspiring! I am working on mine now. I know you said you were keeping it simple but I am surprised just how simple you kept it-that's a great thing! I am wondering how you used your sewing machine to stitch through the top sheet of a page protector and not go through the bottom of it? I love this but only have a basic sewing machine so hopefully with your tips, I can do it too!
Last year my Daily December was a wonderful thing and this year will be just as special! Thank you!!!!
Sign in or sign up to comment.
I was waiting for this! Thank you for taking time to share with us in details. I have mine almost completed... trying to keep it simple. Very exiting!!!
Sign in or sign up to comment.
Thanks for sharing. I am going to work on mine today
Sign in or sign up to comment.
wow Ali i love it! lots of cool new ideas for this year, i can't wait to start mine! love how you make your own page protectors, i really want to try doing that. beautiful book, thanks so much for sharing with us!!!!
Sign in or sign up to comment.
Love it Ali - looks awesome - I am so glad that mine is ready and I actually have a photo printer this year so am anxious to do it daily rather than on the weekend when I have a chance to pick up my photo order for the week.
I can't wait - think it will make the process so much easier.
Can't wait to see the second half!!
Sign in or sign up to comment.
Gorgeous Ali! My December Daily is still in the 'thinking about' stage. I am away for a whole week in December and have made a separate album to cover that trip. Looking forward to seeing the next post tomorrow.
Sign in or sign up to comment.
Awesome (as usual)! Really inspiring! Thanks for sharing this amazing project!
Sign in or sign up to comment.
Thank you for the idea of using the rings instead of the ribbon that came with the album. From the minute I opened it I hated those ribbons and was trying to think of an alternative.
You're always full of creative ideas...thanks Ali!
Sign in or sign up to comment.
Wow! I love how simple it is! I watched you do yours last year, but this year I am joining in the fun. I already have all of the pages made; now I just have to make a cover and get rings for it. I can't wait to see the rest of your pages!
Sign in or sign up to comment.
Hi Ali, I am so inspired by your album. This is the first Christmas of my son, so I think, I'll try the adventure if I find some time.
I have a question... where did you find your D-ring, I'd like to make my own album but I've never seen we could buy some D-ring separately, can you help me?
I live in Canada (Montreal) but maybe I could order them somewhere in USA... Thanks for your help!
Sign in or sign up to comment.
Thanks for the inspiration Ali, my personal goal is to get mine going by the end of the week:-)
Sign in or sign up to comment.
Love it! Can't wait to start mine.
Thanks for sharing.
Sign in or sign up to comment.
I plan on doing one again this year as well. I loved my album from last year (although I didn't finish the last few pages of december). Can't wait to do this years! I love the fabric, and the stitching.
Sign in or sign up to comment.
so gorgeous. it exudes you. loving the inspiration. especially the prompt to make the album ready and waiting for daily photos and documentation in december. love that!
Sign in or sign up to comment.
I am really enjoying this album! I love how you covered it and your choices for the cover are beautiful. I haven't yet joined in and made this project for myself but I would love to do it this year. I just need to go get myself organized and pull all of my supplies like you did and make it as simple as possible. Thanks for all of the wonderful ideas and inspiration!
-Sarah
Sign in or sign up to comment.
It's looking really good so far...as always! Love the foil Merry Christmas...can't wait to see the rest :)
Sign in or sign up to comment.
Hi there, I am in Canada too. Just go to an office supply store (like Staples) they have lots of different sized rings. good luck!
Sign in or sign up to comment.
Beautiful album. I need to do more stitching on my albums & pages. I liked that you used red thread through out.
Sign in or sign up to comment.
Thanks Ali! This is so great! I can't wait to get started on mine. I look forward to this every year. December Daily is now one of my favorite holiday traditions :)
Sign in or sign up to comment.
hi ali, i've noticed a few times that you're able to trim your acrylic pages. the one time i tried doing that, i shattered the darn thing. what are you using to trim and does acrylic come in different strengths? love your pages aleady!
Sign in or sign up to comment.
You are a master and this album is another masterpiece!
Sign in or sign up to comment.
It looks great, Ali! You've inspired me and I'm already done with my December daily, too. I went REALLY simple this year and just used a 5x7 chipboard album and scrapping kit from Stampin' Up! (all the paper and cardstock stickers included) and cut 5x7 pages to post 4x6 photos onto, as well as adding some 5x7 favorite pictures that will be their own pages. I'll just add the kit's embellishments overtop of the photos as I go and it will be done. Thanks for all the inspiration.
Sign in or sign up to comment.
Hola Ali, me encataría tener más tiempo para empezar mi propio albúm, mientras tanto disfrutaré de tu trabajo como hice con el de 2008, eres toda una artista. ¡¡Muchas gracias!!!!
Saludos desde España.
Beatriz
Sign in or sign up to comment.
beautiful :)
Sign in or sign up to comment.