Stamp Week | Alphabets

To kick off Stamp Week 2020 I'm sharing a video showing how I used alpha stamps on two different projects.
Alphabet stamps have long been one of my favorites because they make WORDS. And, as you might guess, I love words for a million different reasons.
In memory keeping I love being able to create words that directly apply to my project. Alphabet stamps allow me to create custom words vs. only using the words that might be available on a sentiment stamp. Being able to stamp custom words helps me to get my stories told in the way I want to tell them.
A few things to keep in mind related to alphabet stamps that came up as I was working on these projects:
- Mix + match your alpha stamps to create mix + match words.
- Choose to add all the stamps onto one block OR go letter by letter. This is going to depend on what you are wanting to say/create on your project. For these two projects I laid out the words I wanted to use and stamped them all at once (vs. going one letter at a time) - I was able to do that because I was "repeat" stamping the word/phrase to create a background/pattern.
- Alphabet stamps are great for creating titles and then select a sentiment stamp for your "subhead" (the words below your title). Play around with the contrast in size + color for your title and subheading.
- Words are embellishments. I've long been a fan of typography in general and it definitely fuels the choices I make in lots of my memory keeping adventures.
- Always have a practice piece of paper nearby when stamping. This helps me avoid mistakes and allows me to test the stamp + ink before using it directly on my project.
SHOP PROMOTIONS
- Try the Story Stamp Subscription for just $5. Use the code TRYSTORYSTAMP. Offer ends 3/9/2020 at 11:59pm EST.
- Sale on stamps in the shop (up to 60% off) - including some past Story Stamp + Stories By The Month designs!
- Giveaways on the @aliedwardsdesigninc Instagram account.
Here's a look at how I played with alphabet stamps today:
Here's a closer look at the two projects shown in the video:

First up I created a 2-page, 6x8 project that includes a photo taken by Tara Whitney and words I wrote for an Instagram post last month.
I started by printing the photo to 6x8 and then copying and pasting my journaling from my Instagram post onto a 3x4 card, making the background red and the type white in Photoshop, and then printing it out on photo paper using my Epson PictureMate PM400. I used a 1/2 inch corner rounder before adhering the journal card with foam adhesive.
To create my stamped background I used an upper case alpha stamp set and three ink colors. Because there was only one "E" in the set I was able to stamp "THE ON" and then I had to stamp the "E" separately onto the kraft cardstock. While stamping I used a technique called "stamping off" to remove the excess ink from my stamps - "stamping off" can create really cool texture patterns and I ended up using that piece of paper to punch out my heart.
On top of the heart I used this stamp set to add "love you good" before adding two metal brads and adhering the heart with foam adhesives to my enlarged photo.
To finish off my spread I pulled out my heart embellishment box and selected a bunch of plastic hearts. Those were added as a banner across both pages using a Tiny Attacher to staple them in place.
SUPPLIES
- Large Sans Serif Alphabet Stamp
- Small Alpha Stamp from the 31 More Things Classroom Kit (super deal at just $3.49)
- Inks: Tillamook, Pendleton, Rose Garden
- 1/2 Inch Corner Rounder
- StazOn Ink
- Plastic Hearts
- Tiny Attacher
- Mini Brads
- Kraft Cardstock
- Epson PictureMate PM400
- Adhesive Foam Squares
- Heart Punch

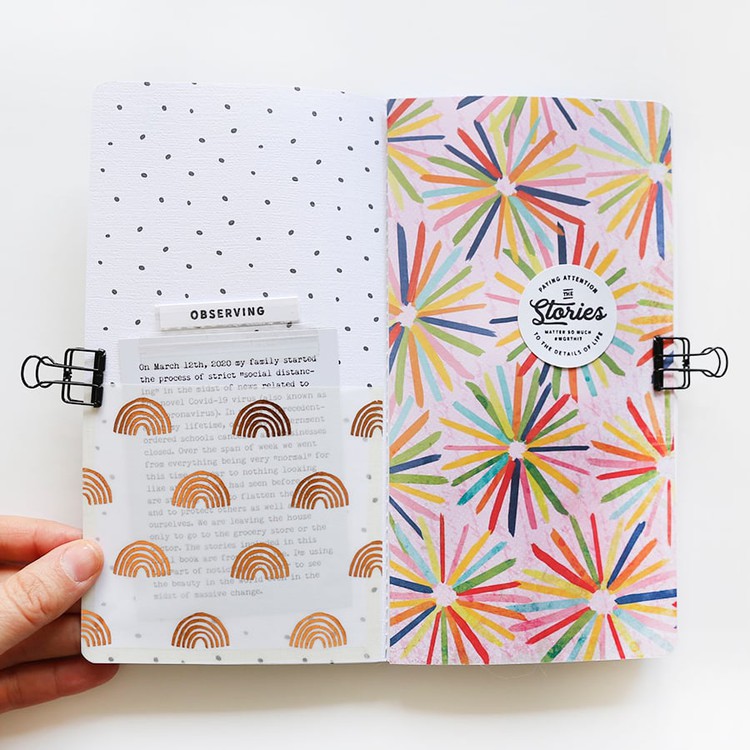
Aaron and I spent some time in Las Vegas last week to see Dave Matthews Band and I took along one of my Art Of Noticing notebooks to document the getaway. I loved this for travel as I was able to make notes in the box for the photo and then write in real time when I had a few moments while we were in Vegas.
Over the course of this week I'll be working on finishing up the documenting from this adventure using different stamp ideas each day.
Today what I decided to do for the first page of this section of the notebook (basically an "opener" for this trip) was to use my alphabet stamps to stamp "Vegas" over and over again on top of cardstock. I cut a piece of cardstock to 4.25 x 8.25 and then used a Mixed Alpha stamp set and three different ink colors. In addition to those I added a sentiment from a past travel stamp in black to fill in that hole. I also used a 1/2 inch corner rounder on the two outside edges.
Once I'd completed the stamping I adhered the cardstock to the page in the notebook using rolling adhesive.
SUPPLIES
Shop This Post


Is the mixed alpha stamp set still available?
Looking into if we can get that back into inventory.
Sign in or sign up to comment.
Mind. Blown. Love these two projects!
Sign in or sign up to comment.
Just when I thought I was ready to go digital on stamps-- along came stamp week and now I need that alpha set!!!
Sign in or sign up to comment.
Wow, Ali. Love that Vegas paper and the idea of using your stamp off paper to create an embellie. Really tied the layout together. Thanks!
Sign in or sign up to comment.
Love it ! Your inks seem to dry faster then mine 😅
Sign in or sign up to comment.
Sometimes you have to press down across the whole stamp block stamping them in groups, instead of only pushing down from the edges
Sign in or sign up to comment.
Loving this project to use stamps more. I just wanted to share if your stamps are not all printing on your flat surface, it can help to use a mouse pad or piece of fun foam under your paper.
Thank you!
Sign in or sign up to comment.
Oh wow! Really love your "The One" page. So beautiful (words and all). ♥️
Sign in or sign up to comment.