Stamp Week | Mixed Media

Wrapping up #aestampweek with a fun look at a couple ways you can use your stamps in mixed media play to create homes for your stories in memory keeping.
I seriously had so much fun playing with watercolors, paints, and a Gelli Plate for today's projects and ended up splitting my video into two separate videos. The first one covers playing with stamps with watercolor and with a Gelli Plate and acrylic paint and the second video is my process for creating a couple scrapbook layouts using things I'd created while I was playing in the first video.
This has been a truly inspiring week for me and I hope you've had fun as well. I will definitely do something like this again in the future!
A few things to keep in mind related to playing with paints + stamps that came to me as I was working on these projects:
- Experimentation = joy. I hope that you can literally hear my enjoyment in the video as I work with the paints + stamps. I'm at a place right now where I'm feeling really into embracing not knowing the outcome with this kind of stuff and letting it be what it is and enjoying it for that.
- I need more shape-based stamps! I learned through experimentation that you can't use text based stamps with a Gelli Plate because they come out backwards.
- YouTube is my friend for learning as I go. So much inspiration and technique tips on there and I'm so happy I can always be learning something new.
STAMP WEEK SHOP PROMOTIONS // ENDS 3/9/20
- Try the Story Stamp Subscription for just $5. Use the code TRYSTORYSTAMP. Offer ends 3/9/2020 at 11:59pm EST.
- Sale on stamps in the shop (up to 60% off) - including some past Story Stamp + Stories By The Month designs! Sale ends ends 3/9/2020 at 11:59pm EST.
- Giveaways on the @aliedwardsdesigninc Instagram account.
Here's a look at how I played with stamps, watercolors, and acrylic paints today:
PART ONE // THE PLAY
PART TWO // CREATING LAYOUTS
STAMPS + WATERCOLORS

The first thing I played with today was using watercolors with stamps.
I paired the fun graphic stamp from the My Stories Stamp Set with different watercolor colors and stamped them onto watercolor paper. What I learned is that it's all about the amount of water you add to the stamp and whether you want it really watery or more concentrated color. The cool thing with water colors is that you can always add more water directly to the paper if you need to adjust. I let this page dry and then cut out the squares for use on a project below.
Remember, this is all about play! I love the fact that I don't always know how things are going to turn out and that I learn through experimenting.
Here's how I ended up using those pieces in a layout:

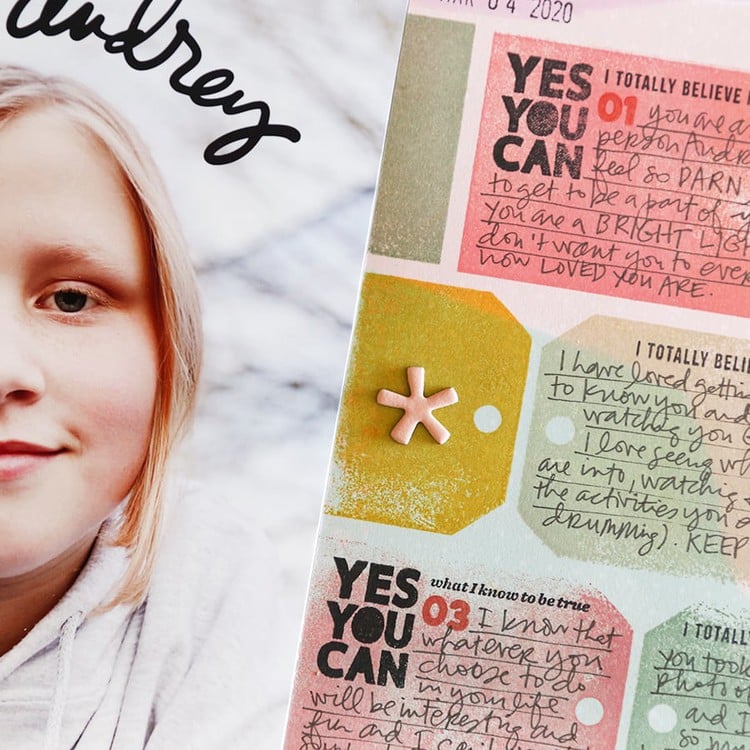
After cutting out the watercolor squares I rounded the corners and stamped "this is so you" from the You Story Stamp on top.
In the bottom right corner I added a bunch of plastic stars using a Tiny Attacher stapler. When I cut off the edges of the plastic stars I used the cut off pieces both in that right corner and along the outside edge of my photo.

To finish off the page I added an "A'' for Anna alpha sticker and I stamped the date on top of the photo.
SUPPLIES
- Watercolor Spiral Paper Pad
- Watercolor Paints
- My Stories Stamp
- Round Stamp Block
- 1/2 Corner Rounder
- You Story Stamp
- Precision Pen
- Gold Mirrored Stars
- Plastic Stars
- Tiny Attacher Stapler
- Small White Alpha Sticker
- Rolling Date Stamp
- StazOn Black Ink
STAMPS + GELLI PLATE + ACRYLIC PAINT

Next up I played with a 6x6 Gelli Plate and acrylic paints.
I am super new to the world of printing with Gelli Plates. Laura Wonsik was the first to tell me I needed to get one once I was expressing interest in playing with art journaling again. After I collected my supplies I learned a bit from Mou Saha in the Get Messy membership classroom and then today I watched a couple more videos on You Tube this morning. I also highly recommend checking out Julie Fei-Fan Balzer if you enjoy this kind of play.
I could seriously play with this stuff for hours.
The very basic technique I'm using here entails rolling paint onto a Gelli Plate, stamping into the paint, and then laying a piece of paper on top and pulling it up to reveal a "print" on the paper. Check out the video above to see this process in action.

My goal here was to create some backgrounds that could be paired with photos or a photo for another scrapbook page.

Ah, colors and textures and layers. Seriously just love.
Here's a look at how I used one of those backgrounds as a home for my story:

I paired the mixed media background with a 6x8 photo. On top of the Gelli Plate print I added "just this" using the Sans Serif Alpha set (we found a few more of these in the warehouse and put them in the shop).
I typed out my journaling on the computer and then cut it into strips before adhering it on my custom background. I added an asterisk stamp (from the large December Daily® Number Stamp offered last year) to both sides of the title and to the far right edge of my photo.
SUPPLIES
Shop This Post


.jpg)
.jpg)


This is probably a dumb question, but I wonder what kind of pad/binder of paper you use to stamp off or Breyer off into? (Wording???) is it a special kind of paper? It would seem to me like it wouldn’t have to be as good quality as the watercolour paper, for example. Advise?
Also, this is all too much fun and I love it all. I am really grateful that I found you! I learn something with every video! You amaze me! Thank you!
Totally not a dumb question. That paper pad doesn't have a cover I can recognize any more but I think it's just a drawing pad - not any kind of specialty paper.
Sign in or sign up to comment.
Hi Ali
I have absolutely LOVED this stamp series. Watched every video all the way through.
I am very interested in your storage for your stamps and inks and wondered if you've ever done a video on that. Also curious about what you actually keep in your stash and how you decided to cut down your paper to only 20 sheets of so.
Thanks!
Lynn Furr
Thanks Lynn! The first video in this series includes a look at how I store my stamps. My inks are in a drawer in my desk :).
Ooops, sorry! I thought the alphabet video was the first one. Going back to watch now!
Sign in or sign up to comment.
I just want to say how much I have enjoyed this week. What fun! With your pieces of you, this stamping week, DITL, and even the 12 hour Christmas prep class the inspiration is phenomenal. I haven’t been this excited to craft in a long time. I have really appreciated watching you drag out the past supplies and then create such new ideas. Thank you more for such open sharing. Such a giving heart. Sending you hugs. Have a great weekend. Jill B
It was really fun for me too - so glad you enjoyed it!
Sign in or sign up to comment.
LOVED this stamping series! So happy to see you getting back into the "artsy" stuff. Very inspiring! Thank you for taking the time to film all of these videos. Felt like I was right there in the studio with you crafting away. :-)
Awesome! I had so much fun too!
Sign in or sign up to comment.
So that your words aren't backwards, wait to stamp after the page is dry with white pain on top of your paper! Looks really cool!
Yes! I'm going to try that another time! I also saw a video where someone use letter stickers (I think) and placed them backwards into the plate.
Sign in or sign up to comment.
This STAMP series has rocked my tube socks off!!! I hope the momentum continues!!!!! STAMP ON!
Sign in or sign up to comment.
Thank you so much. This week has been as lot of fun and full of ideas.
Sign in or sign up to comment.
I have thoroughly enjoyed your stamp week! I'm feeling totally inspired and ordered a few stamp sets and an Art of Noticing notebook to use for an upcoming get-away. I do have to mention that I most often watch your videos after a long workday and dinner. Your voice is so soothing that more than once I was head-bobbing at my computer desk, lol!
Sign in or sign up to comment.
Love the creative play! Gelli plates are so fun.
Sign in or sign up to comment.
Appreciate how you have the videos + you included photos showing your process for those of us unable to watch the videos (because of time issues, or other reasons.) Thank you! It's been an inspiring week!!
Sign in or sign up to comment.
you will really love your gelli plates when your flowers and plants start to bloom, you get a cool silhouette, then pull up the flower and you get a very detailed print. ferns are my favorite. have you tried stamping on marker paper? thanks for this week, it’s been great to follow and pull out some items i haven’t thought about or played with in awhile!
Sign in or sign up to comment.
Mixed media...so much fun. Thank you once again. Ali, can we use your paints on the Gelli plates? Off to place an order.
Definitely! I'm out of mine!
Sign in or sign up to comment.
I was playing again with the new Gelli plate and learning. Your acrylic words work beautifully in the reverse. Just thought I'd share.
Oh that's a super cool idea - thank you!
Sign in or sign up to comment.