3 Things : playing with printing + a giveaway
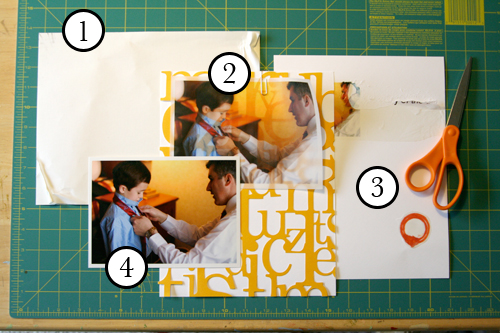
Staying in the theme of words + photos this week I wanted to experiment with a couple different inkjet printing surfaces. I took that photo of Chris & Simon and the tie and printed it on each of the following using my HP Photosmart D7360
[ Warning : any of my experiences below could very well be operator error. ]
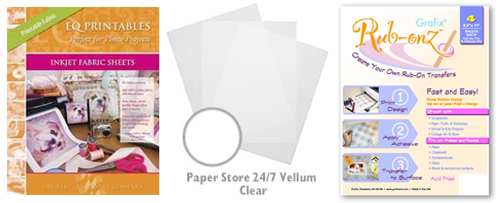
WorldWin Inkjet Printable Translucent Vellum : Quick and easy. Great result. See sample below. It's been awhile since I last used vellum and it was fun to reintroduce it into my supplies. Definitely want to play with it more: thinking about layering with transparencies and text and photos.
EQ Printables Peel & Stick Fabric Sheets
Grafix Rub Onz - Create your own rub ons. Super cool idea. I wanted to see if this would work with a photo + some words...and at least in my case it was a challenge. This is a multi-step process that includes printing, then placing adhesive paper on top, and then adhering your image to final paper. The real challenge is getting the adhesive paper onto your image without bubbles. The second challenge is in the choice of the paper you rub on to. I tried it on textured cardstock and it didn't seem to work - it just tore the paper. I will probably try this whole process again to see if I can make it work.
[1]
EQ Printables Peel & Stick Fabric Sheets
And now, the giveaway:
3 readers will receive the following from The Papermill Store/Worldwin:
• 1 pack 27 lb WorldWin Inkjet Printable Translucent Vellum
• 1 pack 40 lb WorldWin Inkjet Printable Translucent Vellum
• 1 pack 12x12 WorldWin Doublemates Cardstock
• 1 pack 12x12 WorldWin Rouche Cardstock
For more information on The Papermill Store/WorldWin, check out their blog here.
For a chance to win this selection of papers leave a comment below with your favorite photo tip or what you want to work related to taking photos. Winners will be drawn tomorrow at 5pm Pacific.
Don't miss today's words + photos post below.


My photo tip - get in closer. closer still. Turn off the flash and click 3-5 more times! I learned this from Allison Tyler Jones at CE 2006!
Sign in or sign up to comment.
I just got started with digital photography with my Canon XTI. My best tip is to avoid the automatic settings and explore the subjects your are shooting with the program setting. Then...you can always go back to the automatic button, but forget that flash!
Sign in or sign up to comment.
I am still a newbie when it comes to a DSLR and am trying to learn and am starting to panic as my daughter's grad is coming up (last child to graduate)ina couple of weeks and I want to take as many perfect shots as I can... ,my last chance! Thank you for your tips, helped me to relax a little and know that I can only do the best that I can.
Sign in or sign up to comment.
I need to learn how to edit and make photo collages. I am timid with Photoshop, and just need to get over that!
Sign in or sign up to comment.
Ali, you have just the greatest ideas. I'm reading Life Artist right now and totally enjoying the ideas there, too. Using the suggestion in the book to put together a travel journal to take with me to Europe this month. Thanks for another great idea with this post.
Margaret
Sign in or sign up to comment.
WOW, how neat to get such reviews of the many products out there!! For me, i have so much to learn about my photos...i learn SO much here and my next "treat" will be the photo freedom book....i really hope to learn about using the settings on my camera this year...i am committing to it and will try something new each week!
Thanks for all the inspiration here!!
Sign in or sign up to comment.
My favorite photo tip actually came from Candice Stringham at a CKU event. She recommended shooting in aperture priority and I have loved it since I started doing it.
Are my pictures always in focus? No, but I just love the natural light I get without the flash.
Thanks again for everything!
Sign in or sign up to comment.
The photo tips are awsome. I just got the Canon 40D so I still have a lot to learn. On the positive side, I do know how to work my Epson printer, that paper would come in handy. Thanks for the giveaway.
Sign in or sign up to comment.
Cool stuff Ali! This year I joined a couple photo challenges online + Flickr and just the fact that I'm taking daily pictures and seeing what works and what doesn't as helped a ton. I agree so much with take LOTS of pictures, then there a more to choose from and more likely to get that great shot! I take my camera everywhere - which is one reason I still have a point and shoot! Loving all the tips and info. I learn so much from reading your blog! Thanks, Cherie
Sign in or sign up to comment.
For me, I would like to try writing on photos directly or printing words onto photos, especially enlarged ones.
Thanks for the inspiration.
Sign in or sign up to comment.
My photo tip is to take pictures from different vantage points, looking up, looking down, close up, far away. I would like to learn the manual settings on my camera! I am enrolled in a photography this year to do just that!
Sign in or sign up to comment.
my photo tip?? because i am FAAARRRR from being Tara Whit-Nay. . .my tip it to keep a small digital cameral with you at all times. . .honestly - you can really capture a moment that way - no matter where your life takes you.
Hillary
Sign in or sign up to comment.
My favorite tip is to move closer to the subject instead of using the zoom. When I do this my pictures seem to have a different look in my eyes.
Sign in or sign up to comment.
My photo tip might seem lame, but sometimes simple works best.
My tip is this: Get close. Then get closer. Shoot. Then move around and shoot some more. Great photos are rarely taken on the first try.
Second tip, and perhaps even more important: Before pressing that shutter release, look, and really see. Look around the viewfinder, from corner to corner, all the way around that rectangle.
Sign in or sign up to comment.
My tip that I am working on right now is focusing on capturing different relationships. I have a lot of pictures of me and my husband together, and me and my sister, but very few of the other relationships in my family captured. I would love to have more pictures of my parents or my husband's parents together or of them interacting with their children and grandchildren.
Sign in or sign up to comment.
Take the photo - even if the light isn't perfect, or someone has chocolate all over their face - doesn't matter - embrace the imperfections.
Sign in or sign up to comment.
I have 5 grown children and 5 grandchildren. Group photos are always a challenge. My tip? Take a LOT of photos when trying to get a group shot and then be happy if you have 2 or 3 that you can use! Sometimes imperfections turn out to be a lot of fun or can tell their own story.
Thanks Ali. I'm loving this week on your blog.
Sue
Sign in or sign up to comment.
My fave photo tip is sanding the edges. By sanding the edges, you can make a photo pop on dark carstock, without having to worry too much about embellishments or papers. Sanded edges also allow you place pictures flush to one another without concerning about how the images blend together visually, the sanded edges create a barrier of sorts without need to allow the white space. I am also partial to rugged and natural feels in my work, so the sanded edge also plays that up A LOT.
Sign in or sign up to comment.
I really want to learn how to take better pics...all about different settings to get the pics that I want!!!
Sign in or sign up to comment.
What a bummer that those other two products didn't work easily through your printer! The vellum looks great though.
Thanks for the wake-up call about the importance of words and photos. Lately I've found it too easy to get bogged down and un-inspired by the "what's the latest/newest/hottest product" bug. Looking forward to see what ideas you share here over the coming week and beyond! Thanks Ali.
Sign in or sign up to comment.
I am a Cannon girl and use the i9950 A3 printer which is fabulous. My photo tip is related to printing. I take a photo and working with photoshop divide the photo into thirds. Then I print each third to a full 6x4 size and lay them together on a scrapbook page. It is a nice jugsaw effect.
Love all your tips.
Sign in or sign up to comment.
i recently purchased a olympus dslr and i love it. i find myself taking pictures ALL the time . . .what i want to do is teach my husband and children to use it so that i too can be in the pictures and the stories. loving your concepts this week. thanks so much.
Sign in or sign up to comment.
i think this is so great what you are doing this week.
i would like to enjoy the process. seems whenever i take pictures i'm always worrying about following the rules. i love how you accept and use blurry photos. wish i could do the same.
thanks so much.
Sign in or sign up to comment.
my tip for when you are trying to print on stuff that keeps trying to jam and separate in the printer...I put a piece of tape along the top edge that feeds thru the printer. I overlap it just enough so that the printer can't get at the edge. It works well enough. Sometimes you have to trim the edge with the tape on it becasue it doesn;t always pull off well, but it sure does allow it to go thru the printer.
Sign in or sign up to comment.
What an awesome giveaway! I definitely need a better way to back up all my photos.
Sign in or sign up to comment.