December Daily™ 2013 | Cover And Title Page (Includes Video Overview)

December Daily™ is about celebrating the magic of the season.
My goal this year, as it has been every year, is to intentionally embrace the season in all it's wonderment and all it's imperfections. To be present. To be real. To pay attention to the traditions that have survived from year to year, those we have moved on from, and the new ones we continue to make. To be thankful. To be a witness to and to create magic during the Christmas season.
Each December I create a scrapbook album that documents the 25 days leading up to Christmas. Some people choose to go longer but I've found that by Christmas Day I'm ready to be done with the daily documentation. What you choose to do and the way you approach it is entirely up to you.
You can check out all my albums since 2007 here (including my process for making each one, the daily documentation, and additional thoughts on the process): December Daily™
Today I'm sharing my 2013 album cover and title page. Tomorrow I'll share my interior foundation pages - essentially things I'm getting ready in advance to prepare me for daily documentation in December. I needed a little more time and a little more daylight to capture my plans.
I've included a 30-minute step-by-step video overview of my process below where you can see me figuring it out as I go (playing around, making mistakes, changing my mind).
For 2013 I'm keeping some things the same and mixing up others:
1. I'm not completely planning ahead. GASP. I know some of you are freaking out and others are saying "finally." This means I'm not numbering all my pages in advance. This means I'm not sure exactly the order of my pages. This means I'll have more flexibility over the month as I want more or less content each day. I'll talk more about this tomorrow and show you how I'm laying out the pages and thinking ahead even if it's not all set up in advance.
2. The main collection of products I'm using for this project come from the Studio Calico December Daily™ kit. There are limited quantities of the kit still available at the time I'm publishing this post. The kit includes the album, page protectors, pattern papers, ribbon, and the majority of embellishments I will be using to document December. In addition I'll be printing journal cards I designed for Designer Digitals that are both 3x4 and 4x6.
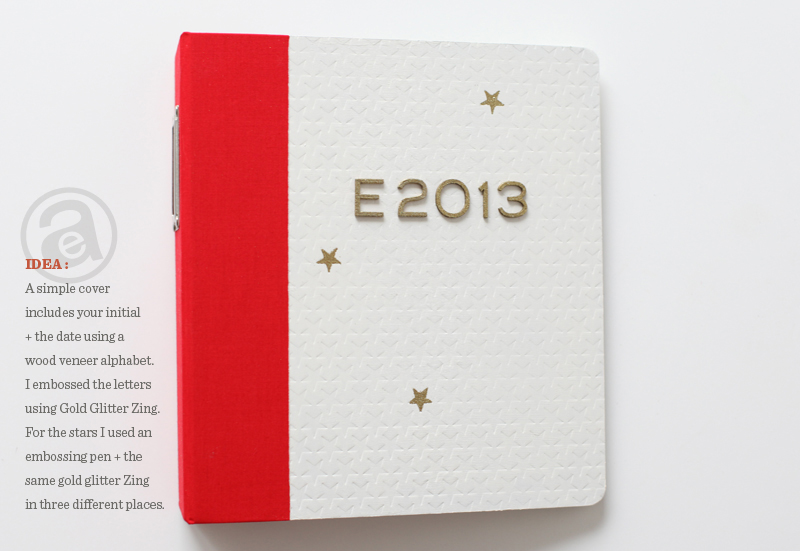
THE COVER
Do you guys panic a bit about the cover each year? I do. Covers are not my thing. Well, I guess you could say that simplified covers are my thing.
Here's the how to:
1. Tape off the red linen portion before painting. I used some wide washi tape for this step and was able to paint right on top of it to get a pretty clean line where the red linen meets the chipboard.
2. Paint the chipboard portion of the cover using Martha Stewart Crafts Summer Linen. I did about three coats on the outside and inside and then let it dry overnight.
3. Use Gold Zing Embossing Glitter + Versamark Embossing Ink on top of the wood veneer letters and numbers. I went with "E" for our last name initial + the date. Use a heat gun to set.
4. Use 1/8 inch red line tape to adhere the wood veneer letters to the painted cover. This seemed to be the best solution for me after also trying a glue pen. With the 1/8 tape I added just a small strip to the back of each letter and trimmed off the excess with small sharp scissors before peeling up the red backing.
5. Emboss a few of the stars on the cover using a Zig Embossing Writer (pen) + Gold Glitter Zing + a heat gun. For this step I simply used the pen to color in each star, dump the glitter on top and set with the heat gun.
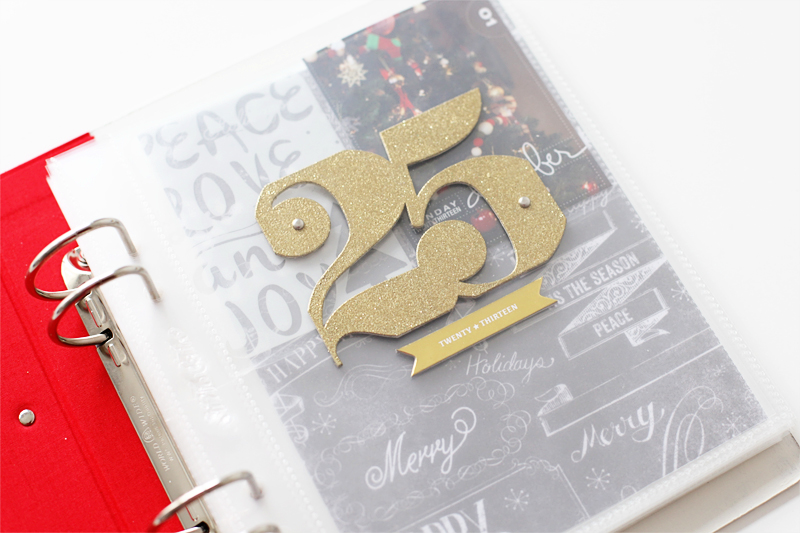
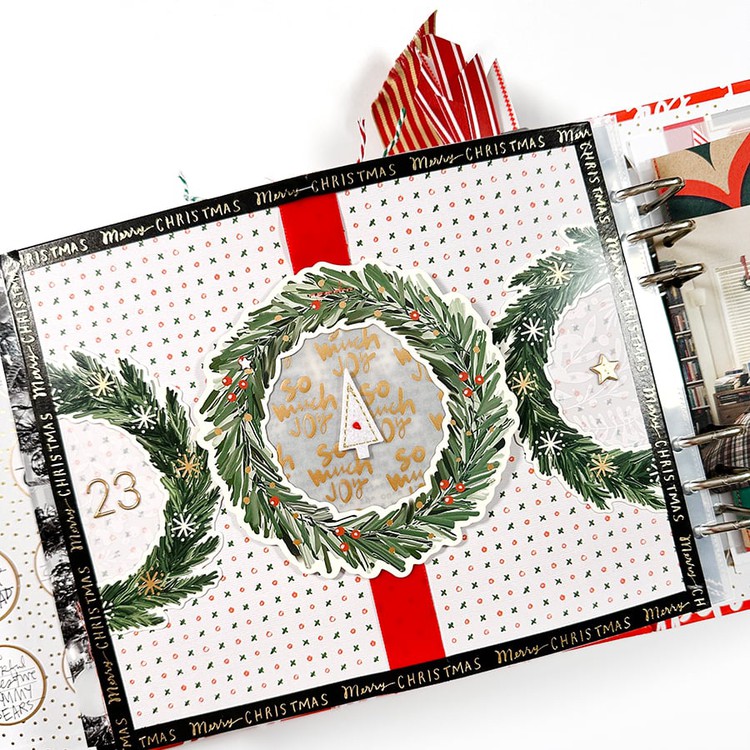
THE TITLE PAGE
It's probably not much of a surprise that I'm a big fan of transparent pages in my December Daily™ albums. This year I want to continue to have see-through elements in my album but they will likely come from die cut pieces slipped into pockets.
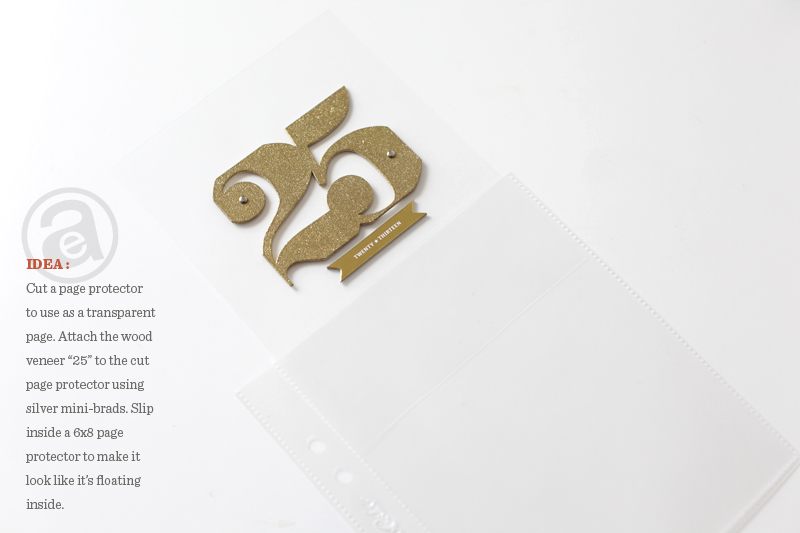
For my title page I wanted to prominently feature the awesome "25" wood veneer piece and the gold "twenty-thirteen" banner and make it look like it was floating inside the 6x8 page protector.

Here's the how to:
1. Use Gold Zing Embossing Glitter + Versamark Embossing Ink on top of the wood veneer 25. I embossed both the front and the back since it was going to be seen on both sides.
2. Cut one of the 6x8 full page protectors so that you have two transparent sheets that will be able to slip into another of the 6x8 page protectors (or can be cut smaller to also float other embellishments in smaller pockets - you could do this with any extra page protectors you might have on hand in your stash). You could also use a pattern transparency here or attach the 25 on the outside of a page protector. See image below.
3. Attach the glittered 25 to the cut page protector with small silver brads using a Tim Holtz Craft Pick to first pierce a hole through both the wood veneer 25 and the page protector. Below the 25 adhere the "twenty-thirteen" chipboard piece.
4. On the back side of the transparent page adhere one of the other matching banner chipboard pieces. I went with the light blue one that says "joy to the world."
VIDEO OVERVIEW
I put together a video that walks you through my process for the cover and the title page. Hope it's helpful as you begin the process of putting together your own album!
SUPPLIES | DECEMBER DAILY™ 2013 COVER & TITLE PAGE
Click on the images to link to the products.
    |


The simplicity of your cover is amazing! Thanks for sharing.
Sign in or sign up to comment.
I did indeed GASP about you not planning out the days of the month,. Lol. Loking forward to watching the video.
Thanks as always for sharing.
Sign in or sign up to comment.
Thanks for sharing Ali. This year, I'm doing this. We have had lots of changes in our life but we still like some things the same at Christmas...time to document.
Sign in or sign up to comment.
Love the video. Has me excited to get my December Daily album started. For small and delicate embossing, I have some strong hold post it notes and use it to hold the item so it doesnt fly away.
Sign in or sign up to comment.
This looks so cute! I can't wait to see what you do with the interior pages tomorrow!
Sign in or sign up to comment.
Ok the whole thing is amazing but my favorite line is "just bring on the gold" LOL!! LOVE it!
Sign in or sign up to comment.
Absoutely love that cover. Off to find my white paint...
Sign in or sign up to comment.
Amazing Daily December album. Can you please tell me where the twenty thirteen gold banner is from?
Thank you. And I imagine I can only find them in the Calico kit.
Hi Vicky - it's included in the Studio Calico kit (they are custom chipboard shapes manufactured by American Crafts).
Vicki - you can make something like this easily with an electronic die cutting machine by cutting multiple layers of kraft cardstock and then pasting them one on top of each other with a glue stick until they are thick like chipboard. Just an idea if you can't get the kit!
Sign in or sign up to comment.
Love the cover simple but elegant. Love that you are not planning out all the days. I had decided when doing last years that I would not plan all the days out, because some of the pages I would have done differently had I not printed out all my foundation pages ahead. It's going to be another good album this year!
Sign in or sign up to comment.
It looks great Ali! I'm loving the gold and silver this year too, planning on using it throughout my DD as well. I also love the simpleness of this.
Sign in or sign up to comment.
BEAUTIFUL. I love the simple clean design! The cover page is amazing!
Sign in or sign up to comment.
Love the 3 stars. It's my favorite part so far. Little details like that give your embellishments meaning beyond just being pretty.
Sign in or sign up to comment.
Love it! We're doing the opposite this year, I usually am more flexible while going through the month, but this year I'm doing more prep ahead. :)
Sign in or sign up to comment.
That is just amazing, I'm raring to go with mine now.
Sign in or sign up to comment.
LOVE! I didn't get approval to spend the money this year for the kit. Bummer... BUT, I love your idea of the embossed stars. May have to imitate that on my SN@P album cover. Can't wait to see your digital files for this year! :D
Approval? You should allow yourself to spend on things that bring you joy. Life is short!!
Sign in or sign up to comment.
Love love love. The Simplicity is perfect. Thank you Ali.
Sign in or sign up to comment.
Super excited! Will carve out some time today to watch your video. Those stars are perfection.
I didn't do a foundation last year, just had a plan and I loved how it worked for me.
Sign in or sign up to comment.
I love the simple clean design. Looking forward to the rest of your album. Thank you for the video! It is so much fun to view your process.
Sign in or sign up to comment.
LOVE what you've done with the wood veneer 25! I have never embossed but I am definitely going to start - so beautiful.
Sign in or sign up to comment.
Here's a tip for embossing small pieces... Use a mini glue dot to stick your pieces to the craft mat before you heat them and they will keep from blowing away!
Sign in or sign up to comment.
Hi Ali- I'm really excited for DD. I'm wondering if you can share a list of the other recommend products that you'll be using in addition to the DD kit from Studio Calico. I noticed there were a few extra items today- like the paint & the embossing powder. Just want to make sure I'm all prepared. Thanks!
Sign in or sign up to comment.
The symbolism of the three stars is not lost on me. You're still doing a great job, too. :)
Sign in or sign up to comment.
Another tip for embossing small pieces is to hold them in place with some tweezers. Thanks so much for sharing your process. I can't wait foe December to come!
Sign in or sign up to comment.
This is my first time making a December documented album. Since my kids are older now (16&18) we don't do as many activities as we used to. I decided to break my album down into sections:traditions, deck the halls, deliciousness, Christmas Eve and Christmas Day. I'm looking forward to documenting my December this way!
Sign in or sign up to comment.
WOW! Great minds think alike. I was thinking about painting mine white with gold stars but in a different technique! Love the way yours looks! Can't wait to try mine! Had a different idea for the title, but you have me thinking. Can't wait to see what I end up with! :)
Sign in or sign up to comment.