Week In The Life 2024 | Ali's Design Formula + Storytelling Approach

Our Week In The Life™ community documenting week is coming up starting on April 22nd and I'm so excited to tell the story of my week alongside you!
In today's post I'm sharing my design formula for this year's project using products to support my stories from our 2024 Week In The Life™ collection.
WHY THIS PROJECT?
Before we dive into the design formula for this album I want to share a couple thoughts:
- Your story matters. You, the you who is reading this right now, have a story to tell. You are alive. You have thoughts and feelings. You are living in a season. You might be struggling or you might be feeling a lightness. You might be at the beginning of a parenting journey or somewhere else along the path. You might be working in an office all day or working from home or driving your kids around from one thing to the next (or a unique combination of all those things). If you are on this page you likely enjoy scrapbooking, memory keeping, and/or journaling. Maybe you've been collecting supplies for years and waiting for the "perfect" time to jump in. There is honestly never going to be a perfect time - there's simply time. Come play with us!
- You don't have to do this the same way I'm doing it. Maybe this year a simplified version where you just focus on the words + the photos makes the most sense. Maybe you want to try something different like documenting in our Week In The Life™ notebook. Maybe you just want to follow along and take a bunch of photos. Maybe you want to make good use of your stash and build your own formula! Maybe you want to make each day have a unique design. Do what makes the most sense for you in this season of life!
WHY A DESIGN FORMULA?
For an in-depth project like this one that often includes a lot of words + photos I love the ease that comes from having a set design foundation. It takes some of the guess work out of the entire process.
My goal in setting this up in advance is to create homes for my words + photos. This will help me know approximately how many photos I'll want to use.
Don't forget to check out my Storytelling With Week In The Life workshop if you are looking for more tips and ideas for embarking on and completing this type of project. In that workshop I have the content organized into four sections:
- Looking Back: Video walk-throughs of all my past Week In The Life™ albums along with thoughts on what Ali's learned over the years
- Before Documenting: Establishing your mindset, setting up your Design + Story Plans (based on what's most important to you to document in any given season)
- During Documenting: Tips and ideas for capturing your words + photos during the actual week
- After Documenting: Bringing your words + photos into your album (basically how to tackle completing the project after you've collected all your content)
You can also check out all my past Week In The Life™ posts in the archives here. That includes all my posts featuring my photos, words and bringing them together in albums. Here are a few of my personal favorites to get you ready:
ANYTHING NEW TO MY APPROACH THIS YEAR?
In past years I've approached this project with a sole focus on the words + photos during the documenting week and waiting to bring it all together in the album until the week has ended. I've always loved how that's given me a chance to simply focus on the words and the photos without having to think about the album. That also helped me spread out the project and make it more manageable during some very busy seasons in my life.
This year I'm considering changes things up a bit and writing/working directly in my album during the documenting week. I'm in a different season of life now and the way I've set up my album this year
Let's dive in to my process video for setting up my album:
Here's a look at my design formula for 2024:

Download the printable PDF here.
Here's a look at it all in my album:

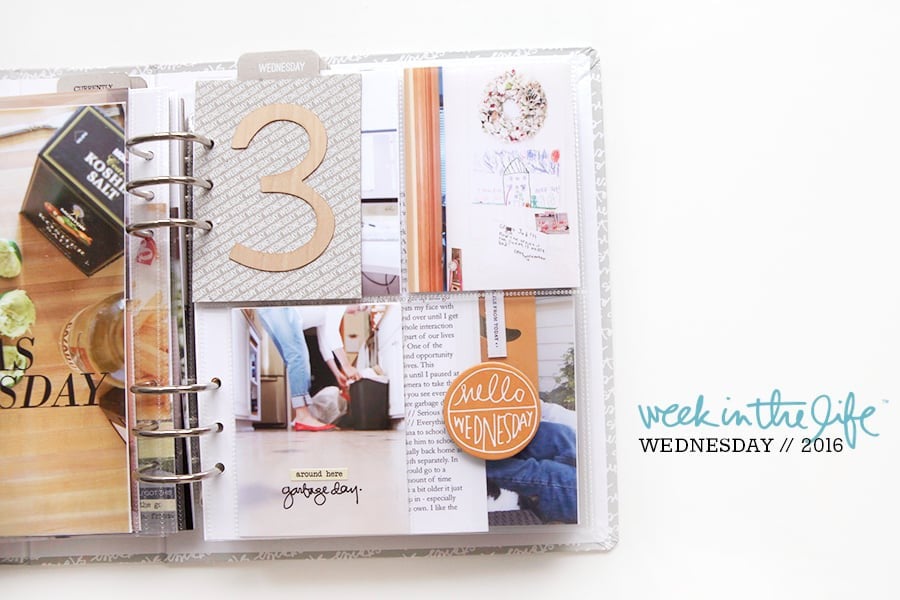
I'm starting off my album with two back to back 4x6 cards from the Main Kit. On top of the "the stories of this week" card I adhered the "a week in the life" chipboard piece.

On the back side I've got the Reason Why card. I'm planning to handwrite my reason why I'm embarking on this project again this year on this card.

My plan is to include a random collection of 2x2 images from throughout the week in this first page protector. I'll add those at the end of the week. Last year I added photostrips at the end of the week to the front of the album and I loved how it looked.

I'll fill both the front and the back with 2x2 photos. The first page in my design formula that will be repeated for each day is the day of the week transparency. I cut down the 10x8 transparency to 7 inches wide and I use the leftover piece for another page as you'll see below.
On top of the transparency I adhered the vellum day of the week pocket card from the Main Kit.

On this card I'll be adding either a photo or journaling. It's just ready + waiting for me to add a piece of the story.

On the back side of the transparency I adhered the 3x4 daily card from the Main Kit. I'll either add a photo or journaling on this spot.
Next up are the die cut cards. I'm thinking of things I could add on top of the "hello Monday" card:
- maybe quotes from family members (think cut up strips of black type on white paper)
- maybe circle punched photos (small ones that would be collaged around the title)
- use a white POSCA paint pen to handwrite something on top - such as a note to self or other memory from the day
- maybe just leave it as it is

I think I'm going to use this space (on the left) for journaling (again thinking I might do this throughout the day in real time). This would also be a great place for a collage of photos.
Next up is a 2x2 page protector. Right now I've got a plastic banner along with the three Monday cards from the Mini Kit.

In addition to those embellishments I'll be adding 2x2 photos from the day.

On the back side of the plastic banner I've added the day of the week chipboard banner. I'll add photos from the day here.
Next up is the 1/2 circle die cut page. It's pretty likely that I'll include one or two full page photos for each day and I'm thinking that I'll do that around this 1/2 circle insert. Depending on what I choose to do with photo enlargements I can either use this 1/2 circle for journaling or another photo/collage of photos.

On the other side of the 1/2 circle I'll either add a photo or journaling.

Here's where I took the piece of transparency I cut (from the 10x8) and stitched it to the 3x8 card from the Main Kit. I'm thinking I'll add what I'm listening to and watching in these spots. This would also be a fun spot to document your food or your car trips or some other thing that you repeat in your life each day.

The back of the 3x8 would be a great place for a photo, collage of photos, or journaling.
Next up is either a 2 pocket or 3 pocket page protector. I've slipped the high/low cards for each day into this spot and will add journaling or photo on top. The other pockets will be filled with photos.

More homes for photos or journaling on the back.
The last page in my daily design formula are the vellum pages with circles. Ideas for this page include:
- some kind of a timeline: stamp times on each circle and write a bit about what's happening at that time (loving this idea)
- a home for circle punched ephemeras
- small photos punched into circles
- little moments captures using words/photos

I'm not sure yet what I'll do on the back of the vellum. I'll either repeat something along the lines of what I'm doing on the front or something else. It will be fun to see what happens.
And repeat! As you'll see in the video above I followed the same design formula for each day of the week. Remember, this is what works for me and it's okay if you want to try something different!
Do you have fun ideas that you are planning to play with in your album that fit your season of life? I'd love to hear about it in the comments below.


Adding words or circle photos to the front of the Hello cards is brilliant! Such a fun way to include more details.
I'm excited!
Sign in or sign up to comment.
I’m just wondering how you will approach your Project Life for that week if you are using a separate binder for the Week in the Life?
Project Life for me is more of an overview of the week vs. a deep dive (WITL is a deep dive into each day where I will have multiple photos for each day). I'll have more than enough photos to add into my PL spread for the week. Heres's an example of my PL spread for 2018 that was the same week as WITL: https://www.aliedwards.com/2018/05/project-life-2018-week-nineteen-week-in-the-life
Traditionally for WITL I start each day with a 6x8 photo I then use the pocket pages that are A but reversed with vertical 6x4 spots. I put a use a 6x4 photo from each of the days with a 3x4 journaling card that overviews the day. It's a nice way to represent the week with a very simple overview.
Sign in or sign up to comment.
Any idea how or if you will use the big transparency rainbow days of the week words?
Thinking that I might add them onto my photo enlargements.
I was thinking something similar. I walk my dog very early every morning (to go potty) and I was thinking of taking a daily sunrise picture, printing as a 6x8 and adhering one to the pic.
Sign in or sign up to comment.
I love your set up. I really love the idea of words on the Hellow cards.
Sign in or sign up to comment.
I enjoyed your video and love the looks of your design formula! I see the link to your sewing machine but I’d love to hear your thoughts on it, if you don’t mind sharing… Is it user friendly? Thanks!!
So far so good! I have a basic knowledge of working with a sewing machine (and had a Brother before this one). What I really like is all the stitching options that are preprogrammed - you literally just punch in the number and decide the width/tension and voila! It’s been fun + easy so far!
Great to hear! Thank you
Sign in or sign up to comment.
I love you've "taught" us so well - that I was already thinking to sew the left over the the daily inserts to the 3x8 cards! I just don't have a sewing machine and I was thinking how did I do it by hand! My last attempt was MESSY! lol
Sign in or sign up to comment.
Will there be new digital templates for this project? Just trying to plan my approach.
I remember reading that there will be new layered templates, but they would be released closer to mid-April when Ali does her documenting week.
Thanks!!
Sign in or sign up to comment.
I think it was asked but I can't find it - what is the font used for this WITL?
Susan, I asked Kelly on her post and she said it was Aurochs.
Sign in or sign up to comment.
I just watched the video and set mine up! This way I can focus on the activities of the week. I’m going to start on Sunday instead, since it’s my son’s 14th bday. Love the flexibility! I got two Tuesday vellum 3x4 pockets and was missing Sunday. Anyone have an idea for creating Sunday, or get an extra Sunday?
Sign in or sign up to comment.