December Daily® 2023 | Paint + Play with Jill
Tags: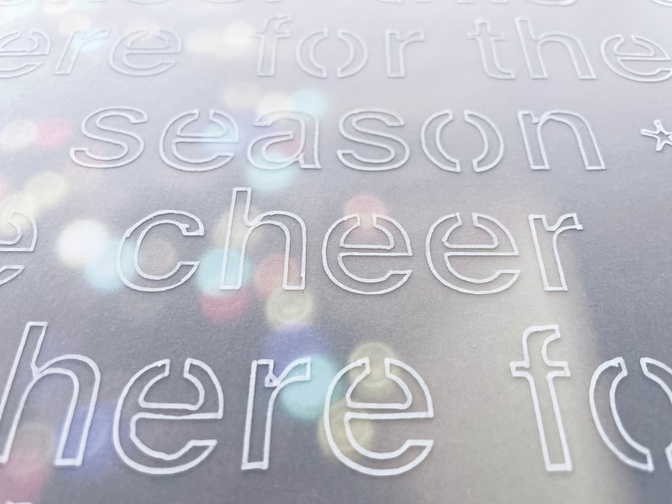
Hello friends! Welcome to Paint + Play with Jill! My intention for this series is to experiment with this year's December Daily® mixed media products to either inspire you to give them a try or give you new ideas for how to use them.
To start the series, I want to show you simple ways to use the stencils to create your own patterns on vellum. You can also try these techniques on regular paper but I went with vellum because I'm obsessed with see through elements in my December Daily projects and can never seem to have enough vellum! So whether you missed out on the specialty paper pack this year, want to add some different colored vellum patterns to your stash (I'm obsessed with the red!), or, like me, you want to expand your vellum options, I hope you give these a try!
Notes: The vellum I am using here is a medium weight vellum that has been in my stash for a very long time. I do not have the exact weight or brand available but if you are shopping around for vellum, I recommend looking for a heavier weight variety because it holds up better as a full page in an album.
I have created all of my patterns on 8.5 x 11 sheets of vellum because I have not yet decided on my album size and they can be easily cut down to 6x8 later.
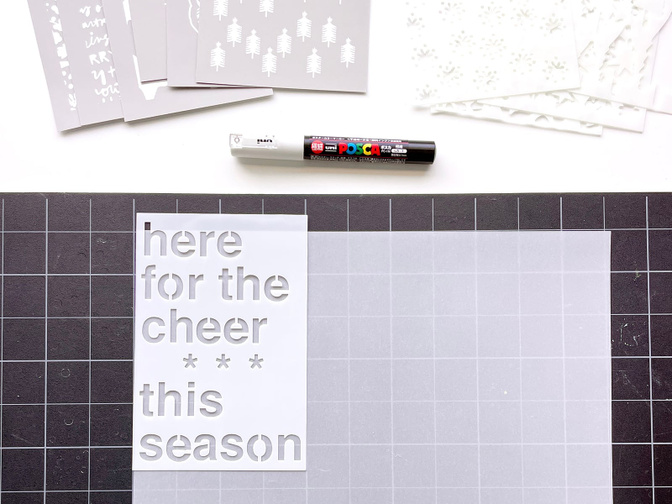
Technique #1: FINE TIP POSCA PAINT PEN TRACING
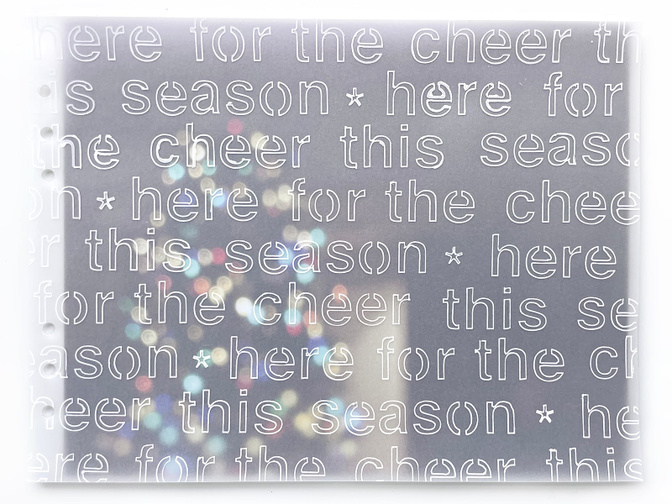
This is my favorite way to use text based stencils because it's quick and not messy. All you have to do is trace the inside of each letter with a fine tip Posca Paint pen. The paint dries relatively fast so you can pretty quickly reposition your stencil as you go along without waiting for drying time. Just be sure to lay the stencil directly down flat without skidding to prevent any smearing. I've used this technique many times without any issues.
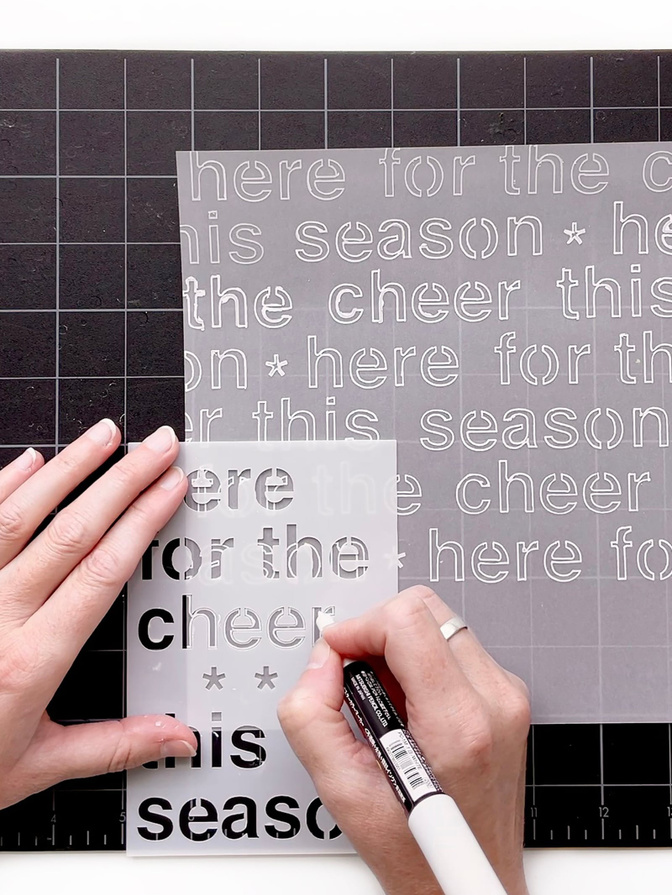
The "here for the cheer this season" stencil worked perfectly for creating an all over pattern. Just stencil each word one at a time in subsequent rows. I like to do it over a cutting mat with a grid to help me keep the lines straight. In between each complete phrase, I added one of the little asterisks from the stencil.
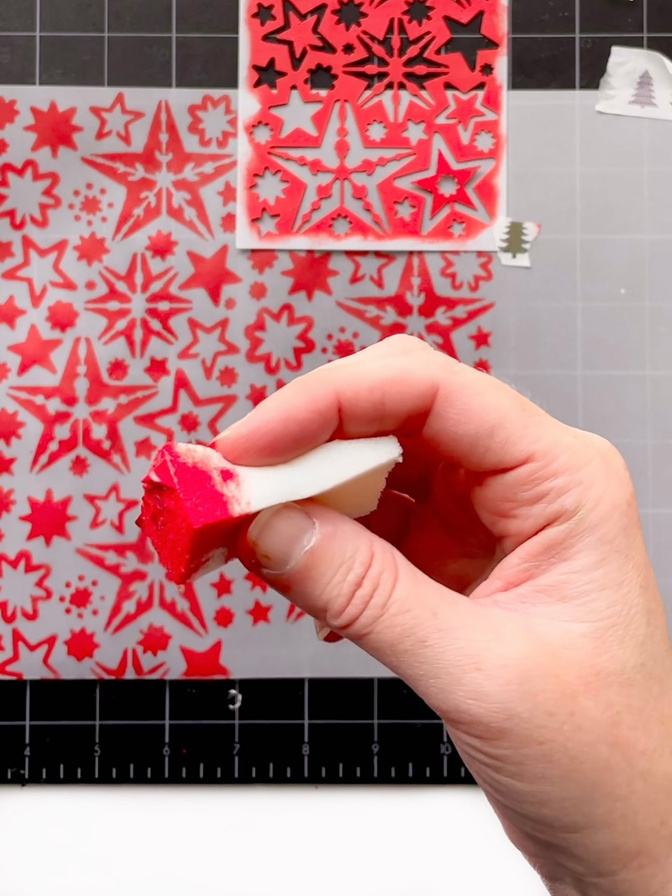
Technique #2: DABBING ACRYLIC PAINT WITH A MAKEUP SPONGE
This technique is very similar to what you've probably seen Ali doing with the ink pads and paper pouncers, except with acrylic paint. To check that out, refer to the full collection blog post in the stamp section. The ink pads work great on regular paper and card stock and offer a lot of fun color options, but if you would like to stencil on something slick or non porous, I recommend acrylic ink because it dries significantly faster.
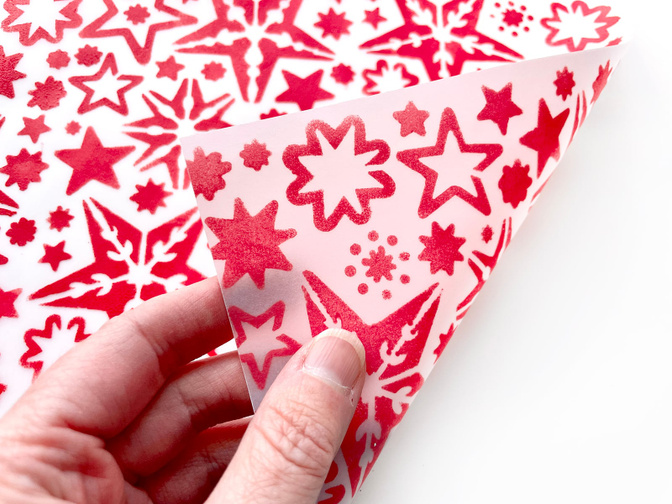
Ali's new paint is a heavy body acrylic so when you apply it in a thin layer like I'm going to show you, it dries very fast. Fast enough that by the time you are ready to move the stencil to continue a pattern, you are able to layer it on top of fresh paint pretty quickly. I also tried this on a sheet of transparency, and while it worked, the coverage was not quite as even and could be scratched off. So I recommend sticking with vellum if you are going for a hand stenciled see through paper.
Because acrylic will ruin the paper pouncers by clogging them up, you'll want to pick up some cheap makeup sponges at the dollar store that can be thrown out after each use.
For my examples, I will be showing you how to create all over patterns, not smaller tags or cards, so not all of the stencils will work for that. But most of them do! The stencils that work the best for creating a pattern are the ones that have full shapes without any portions being cut off at the edge, like the trees or stars. However I will show you how I got around that to use the little starburst/snowflake pattern a little later.
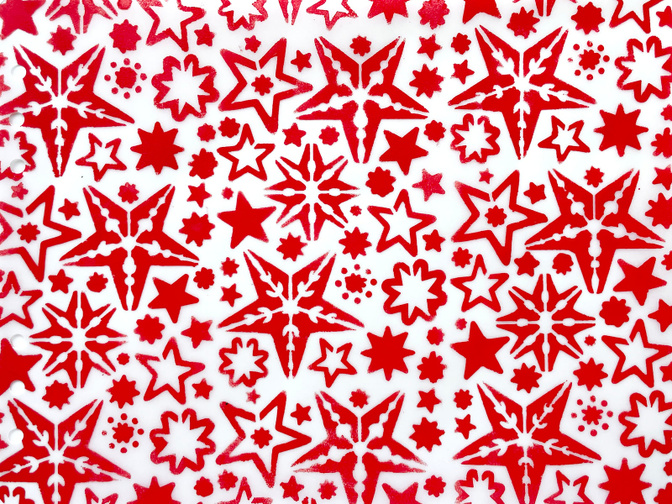
Let's start with my favorite star pattern stencil!
Start out by taping a sheet of vellum to your work surface with washi tape. Then tape the stencil on a few sides as well. I also use my fingers to hold it down, but the washi tape helps keep it in place.
Gently dip your makeup sponge in the paint so you have a very small amount on it, and then dab it off a few times on a scratch paper or excess plastic packaging you have laying around. You just don't want it to be globby and want an even layer on your sponge before taking it to your stencil.
Start quickly dabbing or pouncing the sponge all over your stencil and reapply more paint as needed. You'll want to keep doing this until you have even coverage on your design and the texture of the paint stops looking sponged on. It will start out with a spongy texture but as you keep dabbing, it should even out to a nice solid thin layer of paint. Note that my tests with transparency sheets did retain more of the sponge texture than the vellum does.
If it looks like you have added too much paint when you start dabbing, just keep going and dabbing over that part. The sponge will pick up some of the paint and redistribute it throughout your design.
When you go to reposition your stencil to continue the pattern, gently peel up the washi tape and pull the stencil away. Then check to see if what you've just added is dry by gently touching it. If you have been applying the paint with the correct thickness, it shouldn't take more than a minute or two to dry.
For the stars stencil, you will want to overlap your stencil a bit with what you previously did to create a seamless design. Try to get the edge of the design to be right next to the part you just stenciled, which means overlapping the border of your stencil over the previous design. I'll admit that the first time I tried this, I did not get them close enough, so I tried again and it ended up looking much better.
I also staggered the placement of the stencil to help give it a less blocky pattern.
It only took me about 20 minutes to finish one sheet of 8.5 x 11 paper with this stencil. If you don't love your results, try again and see what tweaks you need to make. Experiment and have fun!
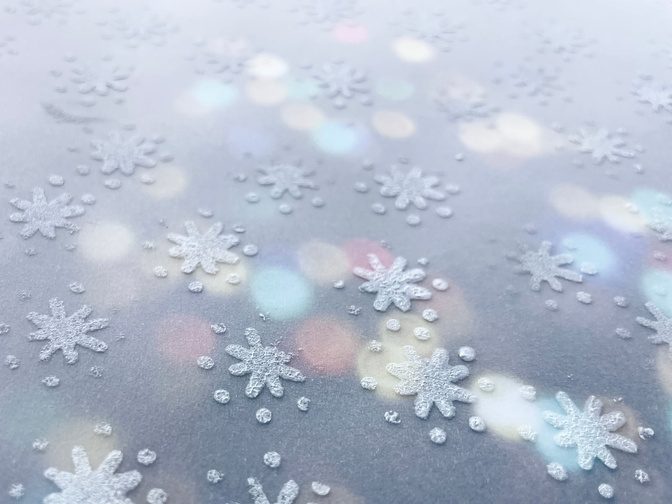
Now let's try one of the 4x4 stencils that has cut off elements. I really love the little snowflake looking pattern so I was determined to make it work.
First I took some washi tape and used it to mask off any snowflake that was cut off. Now it's read to create a pattern!
Use the same dabbing technique as before. I chose white to make it look like snowflakes but gold could also be really pretty!
Because the shape of your pattern does not have straight edges as last time, you will have to do some puzzling together this time. Consider rotating your stencil to try to get them to fit together.
In the end you may have some small blank spaces. I fixed that by carefully dabbing in just one or two snowflakes at a time.
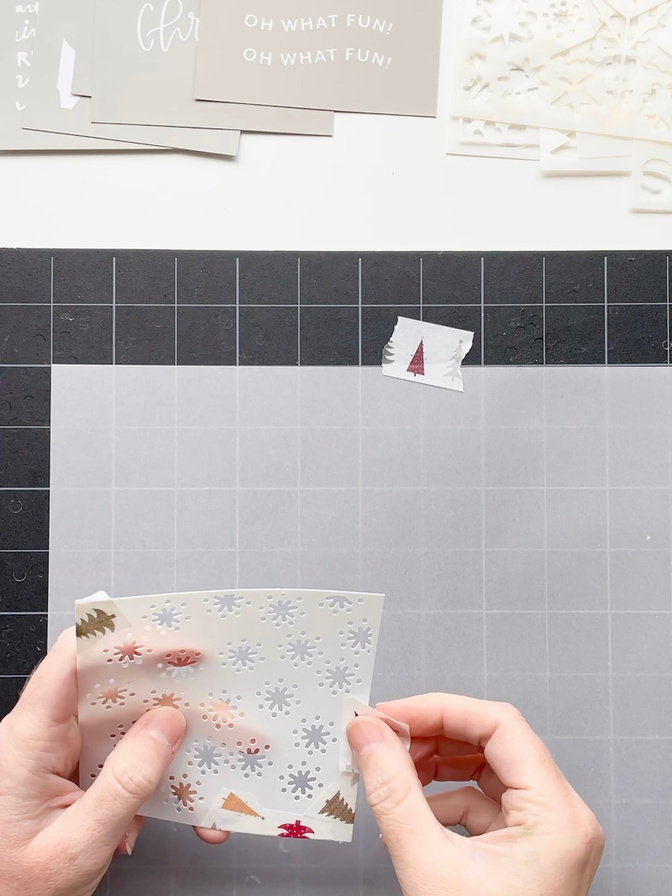
My end result was a little messy and I accidentally dabbed paint over the edge a few times but am able to easily hide that by layering over some other elements.
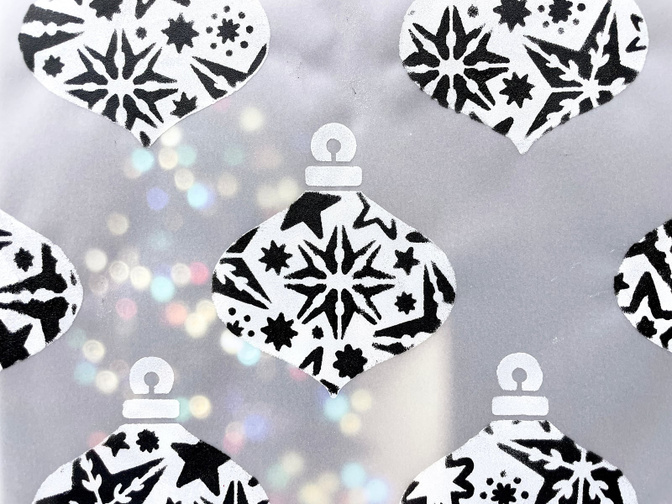
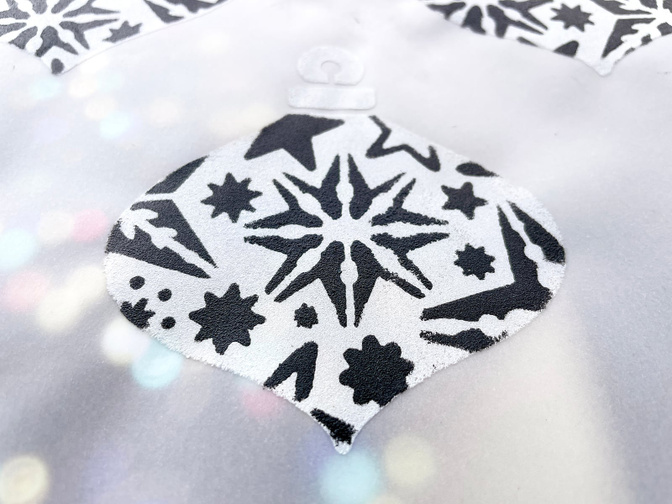
Technique #3 USING STENCILS TO MASK A PATTERN
When I saw the large ornament stencil, I knew I wanted to try masking in one of the other stencil patterns inside. The floral, stars, or the snowflakes would all work great for this, but I went with the stars because they are my favorite.
I had a hard time choosing my color combination (so many fun options!), but ended up trying a fun black and white ornament pattern. I used the ornament pattern papers from the collection as my inspiration for how to lay them out (as well as using my grid for spacing), but if I were to create this again I think I would make the ornaments a bit close together. I guess that means I need to play with more colors!
Ornament Pattern Instructions:
Start with the ornament stencil and your base color. I chose white. Tape down your paper and stencil like described above and then start dabbing your paint on. Since this is a stencil with a large open area, you will need to do a bit more dabbing to create an even texture. But keep going until you get a nice matte finish.
Move the stencil to create the rest of the ornaments in your pattern. I recommend lining up the point of the ornament with a an intersection of a grid to help you measure how much space is in between each ornament.
Once the white ornament bases are all created, put the ornament stencil back onto the one you originally created, making sure to line it up as close as you can. Tape it down with washi tape and then use another piece of washi tape to mask off the ornament topper. Then tape down your desired pattern stencil directly on top.
Now you can dab your next acrylic paint color onto your ornament through the second stencil to create the pattern. You may consider making off the edges of the ornament to prevent excess paint from going off the sides.
Peel up both stencils and you should now have a lovely patterned ornament! Continue with the rest of the ornaments, shifting the placement of your pattern stencil so that the pattern on each ornament varies.

I hope this post inspired you to give the stencils and acrylic paint a try and I can't wait to see what fun patterns you create!
You can find me on Instagram as @jill.drangsholt
I will be back next week with more mixed media play! Now that we've warmed up with some simple patterns, I have some fun ideas using lots of layers that I want to try. But if you have any requests for something you'd like me to try in the next few weeks, leave a comment below and let me know!


Comments
Sign in or sign up to comment.
42 comments
Awesome ideas!! 💕 Can't wait til I get my order and can play!
Replies to laura_g_
YES! The waiting is so hard! But by the time it comes you will hopefully be full of fun ideas to try!
Sign in or sign up to reply.
Loving your wonderful creations! Can't wait to play with products!
Replies to RhondaN
Thank you!
Sign in or sign up to reply.
So great Jill! Love these ideas!
Replies to AliEdwards
Thank you Ali!
Sign in or sign up to reply.
Love how you used the fine line Posca paint pen. I forget how versatile they are.
Replies to Anne235
They totally are! I think I need to get more colors!
Sign in or sign up to reply.
These are great ideas, Jill. I was thinking of using distress inks, but using the paint is now definitely on my agenda. Thank you for this inspiration.
Replies to jstock17
Yes, try it! Stenciling with paint is so fun!
Sign in or sign up to reply.
Love the idea of using paint pens on vellum. This is what got me to add the stencils to my box. Well done!
Replies to cjdragonfly
Thank you! The paint pens will also be fun for outlining the ornament, the flags or the circle journal spots
Sign in or sign up to reply.
All the designs are beautiful. The video was super helpful. Can't wait to try this technique out once I get my December Daily order. Thank you so much.
Replies to eaw1976
I'm glad to hear the video was helpful!
Sign in or sign up to reply.
Hello friends! I forgot to mention in my post that the video included here is a longer version than the one we posted on Instagram with a voice over and some real time stenciling. If you want a close look at all of my projects!
Replies to Jill Drangsholt
Sign in or sign up to reply.
Were you able to clean off all the acrylic paint? I find it a very stubborn medium to get off 🙄
Replies to mathea_x
If you mean off of the stencils, then yes I was. If you rinse it off right away it comes right off. But you may have noticed that I often let it dry on there and just keep stenciling other projects. So if you have several layers of the paint on there, just soak it in hot water and soap and the paint should just start peeling off. I also have an old tooth brush I use to brush the paint from the little crevices. I was able to get pretty much all of the layered on red and black paint off the star stencil when I was done with these projects.
Sign in or sign up to reply.
Hi Jill
I like the white paint on the vellum! I will try that with some stencils I already have. I think it will also work with a pensel, but then it’s maybe not so nice… I have to try it! Thanks for the inspiration.
Replies to kimvanderveen
You should totally experiment and see what works with what you have! That's how I stumbled across the posca paint pen idea.
Sign in or sign up to reply.
Thanks for this Jill, it’s awesome.
Replies to JHogno
thank you!
Sign in or sign up to reply.
Love that paint pen with the stencil! How cool would it look with some of the words filled in all the way too?!
Replies to adawson816
Yes!!! I thought of trying that but in the end decided to keep it simple. But YOU should try it!
Sign in or sign up to reply.
Great ideas as always!
Replies to anotheramanda
thank you!
Sign in or sign up to reply.
Very inspiring, I especially loved the stencil on stencil, never thought about doing that. Since I missed out on the speciality paper this will be a fun project to try.
Replies to mariapresson
Oh yes, go to town making your own vellum sheets! There are so many options!
Sign in or sign up to reply.
Such incredible ideas, Jill! I have a whole new appreciation and excitement for paint and stencils! After watching these videos, I HAD to add the paint and stencils to my box. ❤️😍I’m looking forward to seeing more of your ideas!
Replies to Lorretta
Yay for playing with paint!!
Sign in or sign up to reply.
Great idea!
Replies to MariaElena
thanks!
Sign in or sign up to reply.
Great ideas. I can't wait for my December Daily box to arrive. I might have to pull out last year's stencil to practice my techniques. Thanks for the inspiration. :)
Replies to Untiedt
you totally should!
Sign in or sign up to reply.
Supplies:
1. Extra Fine Tip .7mm white Posca Paint Pen
2. Medium weight vellum
3. Makeup sponges (from the dollar store)
4. 2023 DD stencils
5. DD paint pack
Note: I called my Posca paint pen a fine tip, but then realized it is actually the extra fine! I think the fine tip would also work, your lines will just be thicker. I also apologize for consistantly calling the makeup sponges brushes (oops) and the acrylic paint ink.
Replies to Jill Drangsholt
Sign in or sign up to reply.
These look so great! Thanks for sharing. I can't wait to try out these ideas.
Replies to TaunX2
Thank you!
Sign in or sign up to reply.
The way you used the stencils - mind blown!! So simple, yet stunningly beautiful. What a great share!! You are so creatively brilliant!! I always look forward to your albums. Thank you. 🤩
Replies to visualgirl
Thank you!
Sign in or sign up to reply.