New favorite photo & newsletter update & miniBOOKS.

Doesn't get much better than this. Love these two so very, very much.
Because of being sick this last weekend I am going to hold off on a new newsletter for this week. I want to give myself a chance to delve a bit deeper into style for the next one. Look for it in your inbox next Monday.
In the comments from yesterday there were a couple really good questions about miniBOOKS - specifically related to the spiral books. There are quite a few manufacturers out there who sell sprial books with chipboard covers. Some come with chipboard insides, some with thick cardstock, some with envelopes, some with tabbed pages - there are tons of options. Two I really like are 7gypsies and Rusty Pickle.


Here's the basics:
1. Remove the spirals. To do this, open to the back page and locate where the spirals meet together. Gently pull apart with your fingers - I think I usually end up using both hands.

2. Remove all the pages and the front and back covers. Normally, I take the entire thing apart - this makes it easier to get at each of the pages and gives me more flexibility in my design. Now when you do this make sure to put the spirals in a safe place so that they don't fall on the floor and you (or one of your family memebers) don't step on them.

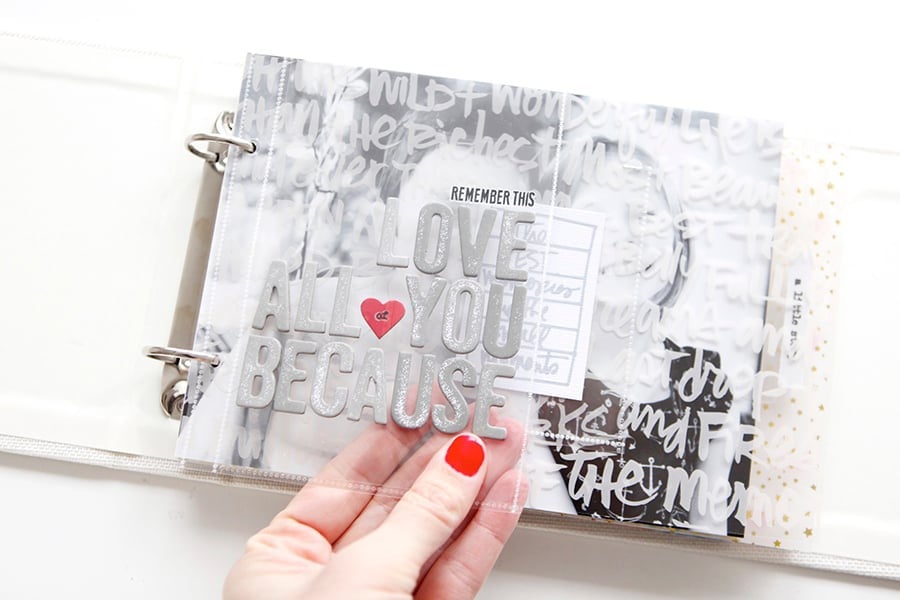
3. To cover the interior pages I tend to do one side at a time and punch the holes after each page is covered. That way when I turn it over I will know where the holes are supposed to go.
Note: Most of the times the holes on these books are rectangle. In the past I have always just used a circle hole punch or my Making Memories setter to punch the hole. 7gypsies has a new border punch coming out that will create those same rectangle holes as the books. Fiskars has a rectangle hand-held punch (like a regular hole punch) that works well. Also, Beary Patch has a system that helps you create those rectangle holes too. Lots of options. It has never bothered me having circles instead of rectangles - usually the circle holes will become more like rectangles as the books relax from opening and closing.
4. These books are made to be touched and loved. I want people to grab them and flip through them. In general I have been using glue sticks on these miniBOOKS. If I notice an edge starting to come up I grab my glue stick and fix it and it goes back into the miniBOOK basket.
5. Sometimes these books come with more pages than I want to use. I have a basket of extras sitting here right now that may get made into something else someday...or may get donated to the schools. Don't feel like you have to fill up a book just because that is the number of pages that were presented to you.
6. Once you have done all your creative decorating it is time to put the book back together. Here is the trick to putting these spiral albums back together: (1) Stack all the pages in the right order with the cover on the top and the back cover on the back - just as if you were going to flip through it. (2) Take the back cover off the back and place it on the top of the stack (with the interior page facing up). (3) Run the spirals back through the holes - this is going to make it so that the spirals meet on the inside of the book (between the last page and the back cover).
Super easy once you get the hang of it. Any more questions on this process? Feel free to post them in the comments section.


i love the picture of chris and simon...i can see why it is a new favorite. i am going to have to get cracking on those minibooks soon if i want to give them out for christmas. great ideas, thanks.
cindy
Sign in or sign up to comment.
Awesome Ali! Thanks for taking the time to give us such great instructions. And telling us the most important part...how to get those little books back together. I can't tell you how many times I've pulled apart my Portland miniBOOK to get that spiral binding back on right. I could never get it - putting the back cover on top is the hint I needed. I pulled my book apart for the last time tonight and it looks great. Thanks again Ali...hope you are feeling better.
Sign in or sign up to comment.
you rock plain and simple Ali-way to go with giving us the goods on MiniBOOKS! love that photo of your boys-so sweet.
Sign in or sign up to comment.
rock n'roll ali edwards.
that was a super duper lesson (sorta like secrets of the scrap industry) that makes minibooks pain free.
thank you!
Sign in or sign up to comment.
Awesome instructions - thanks, Ali!! Handsome dudes, those two!!
Sign in or sign up to comment.
Ali- love the advice on spiral books and as always love the photos you take. Just curious as to what kind of a camera you use? How do you get such great close ups? Would love to know, because I can never get my close ups of scrapbook pages & other artwork to look so clear up close. Thanks.
Sign in or sign up to comment.
Thanks so so much... I have had these great notebooks from Target and was not putting them back together correctly... now I know why! :) Cute pic btw.
Sign in or sign up to comment.
Awesome photo Ali and thanks for the mini book advice! Jane
Sign in or sign up to comment.
Aaaawww...LOVE that new favorite picture. What a gem!! Have a BLESSED Thanksgiving and thanks for the minibooks tips!!
Sign in or sign up to comment.
I love the picture of Chris and Simon too! very cute!
Also...great tutorial on the mini book. I remember back when I did my first mini book and I had no idea how to get the spiral spine off. You really do help so many people. http://jolenegeorge.blogspot.com/
Sign in or sign up to comment.
Ali, you are such an inspiration the very reason why I can't wait for the next CK issue to come out! I only work in Sprial books and have never taken them apart I kind of just worked around the spiral so thanks so much for sharing. I'm a huge journal fan even though everyone keeps telling me that I'm a scrapbooker :) Whatever title fits I just love to create. Can't wait for the next newsletter! Have a wonderful Holiday with you and your very handsome guys.
www.sheilamichelle.blogspot.com
Sign in or sign up to comment.
I just love these mini books - I started to do many more of them after taking your favorite photos class last year in VA - such a great idea, thanks for sharing
Sign in or sign up to comment.
Great photo!
Thanks for the great directions on the spiral bound mini books. Think I'm going to have to give it a try. Lovin' the mini books!
Sign in or sign up to comment.
This is my trick for putting mini albums back together - get frustrated, screech, pull out hair, step away, deep breath, and then back to it.
Okay, so it's really not that bad, and I really just wanted to post to say HAPPY THANKSGIVING! I hope you guys have a wonderful time!
Sign in or sign up to comment.
Thanks for the tips on the spirals, Ali! I just bought a Rusty Pickle album at the convention here in Minneapolis a couple of weeks ago. I am super excited to use it! Thinking of doing a baby album for a gift.
Thanks again,
Jennifer
Sign in or sign up to comment.
One word- duh! Just thought I would let you inside my head for a second. I am finishing up my very first mini-book, (love it) and have promised a second for Christmas, but never thought to take the thing apart. So, my book has margins. It is ok. :) Thanks for your continuing advice and inspiration Ali.
Sign in or sign up to comment.
Ali, you rock- thanks for the instructions :-) I'm going to go dismantle one right now lol!
Sign in or sign up to comment.
I've made my own spirals by wrapping heavy-gauge wire around a glue stick. :D
http://creatingistherapy.vox.com/library/photo/6a00c2251fda6c604a00c2252911e28e1d.html
Sign in or sign up to comment.
Hi!
I want to say Thanks for the destructions. I know I tried doing this before and something so easy can be hard.
Happy Thanksgiving!!
Sign in or sign up to comment.
I bought a mini album yesterday and I am so excited to get started. I remember your mini album last year from Christmas and I wanted to to do one this year. So I am so glad you gave the instructions. Thanks for all you do to keep use scrappers so motivated! Have a great vacation!!
Sign in or sign up to comment.
Ali,
You mentioned that you have a "miniBOOK" basket. I would love to see a picture. I've made several mini books but never now how to store them. Your idea sounds cute!
Stephanie
Sign in or sign up to comment.
Thank you for showing how you pull things apart. I have two of those journals as well as some accordians waiting for me to alter! Now I'll now how to tackle them! I am totally addicted to miniBOOKS and just made one for our Thanksgiving trip to journal in as we journey to/in/around Long Island. I posted it on my blog yesterday. It was so much fun to make and I love having something to capture my thoughts about our adventure as we journey around some of my husband's childhood town. Love it! Have a very happy Thanksgiving!!!
Sign in or sign up to comment.
I love how you've shown a great, pain free way to make a mini book. I'm working on a couple of my own which I've cut myself.. Somehow, I'm not able to get a hold of Rusty Pickle and 7 gypsies mini books in Toronto! I just love how yours turned out.
Sign in or sign up to comment.
What a great picture of your guys!
Love to see what you are doing with mini albums. They are so much fun.
Happy Thanksgiving to you and the boys.
Sign in or sign up to comment.
Know this doesn't fit this post...but just wanted to wish you a happy thanksgiving, and let you know how much I enjoy reading your blog.
Sign in or sign up to comment.