December Daily® 2014 | Foundation Pages + Free "Reason Why" Printable

Hey guys!
I took some time this past weekend to get my foundation pages in order for December Daily® and I'm happy to share them with you today.
Here's a look at the steps I went through in getting this album ready for December 1:
1. Organize my page protectors. I use the term "organize" loosely as you'll see: I laid each of the four designs out on my table and put them into the album in this order: full 6x8, 4 pocket (3x4), 2 pocket (4x6) and then the 3-pocket one (4x6 and 3x4 combo). You'll run out of the 3-pocket first and then the 2-pocket next. Once I ran out of those two I just put the rest of the full page 6x8 and the 4-pocket in the back of my album. I want some flexibility. I want to decide I want another 6x8 page for my story today. The order of the page protectors really isn't super important in the long-run (and can make some people more frustrated than others). Also, as you'll see in the video - I have quite a few left over that I'm just keeping at the back of the album to work in during the month if/when I need them.
2. After I got the page protectors in the album I simply began the process of getting a number on most of the pages. I mixed in the December Daily® 2014 Overlay Combo pack with the wood veneer numbers (I embossed those in white) and the big gold numbers (+ a couple others as you'll see below).
3. I cut the three transparencies in half and am using them as fun dividers. I'll probably move them around during the month so that they go with stories I might be telling, but I might also just leave them right where I have them now. I used the Crop A Dile to punch holes in the sides (use a page protector as your guide) and then I folded over the sticker tabs and stapled them in place with a Tiny Attacher. NOTE: There is a "film" - basically a plastic layer on top of the transparencies that you should pull off when you are ready to work with them.
4. After that I really just started playing with paper and numbers and embellishments as you'll see below.
Here's a look at where my album is at right now:
2014 FOUNDATION PAGES

On the cover of my album I added a gold letter "E" for Edwards using red line tape. I embossed the wood veneer numbers using white embossing powder (mine has been contaminated by gold glitter from a previous project so there's a few flecks included here and there). If you want to learn more about embossing I showed how I do it in my Foundation Pages video last year.

The first page of my album for 2014 is a "reason why" page which is a great way to begin an album like this. Why are you participating in this project? What is your reason why? You can handwrite or open the 6x8 PNG in Photoshop and type in your words. Above "the reason why" I added one of the glitter stars and below I added the December Daily rubber banner (adhered with red line tape).
Today I'm sharing a Reason Why printable/PNG package with you:

The package includes PNG files and printable PDF files of "my reason why," "our reason why," and "the reason why" so you can choose which one fits best for your own project.
CLICK HERE TO DOWNLOAD THE REASON WHY PACKAGE.
I printed mine on Epson Matte Presentation Paper.

I can't wait to read your reasons why.

After my "reason why" my album begins with December 1. For December 1 I included a 6x8 overlay printable (these can be printout out like this or added to your photo in Photoshop).

If you are adding pattern paper strips to the printables, the size on the 6x8 that worked for me was 4.5 inches x 1.25 inches. On top of the green and white pattern paper I stamped using red ink + the strip of stars on the stamp set.

Here's the first of the transparent pages that I cut in half. To the middle edge of each I added the small word tab stickers (folded over) from the kit and stapled it in place with the Tiny Attacher. I punched holes in the transparency using the Crop A Dile. Don't forget to pull off that "film" before attaching the tab.

For Day 2 so far I've included the "All I Want For Christmas" card (I stamped those numbers on there using stamps from the kit + Gray Flannel Memento Ink) + a gold glitter tree + a red plastic star + the embossed #2.

On the back of Day 2 I started Day 3. Behind that gold glitter tree I cut pattern paper to fit and adhered it + a cute little puffy heart (from the kit). On the Day Three card I stamped "the story of today" three times.

Day 4 includes the pink-border 4x6 card + the star circle stamp + an embossed #4.

For Day 5 I used the gold glitter to emboss two stars from the stamp set.

Here's the second transparent insert - love these ombre dots.

Day 6 is starting with a pocket full of tissue confetti circles + the plastic word twinkle + a plastic star + a few random gold sequins I had laying around. This pocket is going to be stitched closed, along with the #6 pocket, when I complete that day. I want to leave it open in case I want to add something else (or emboss the back of the #6).

I added one of the gold glitter stars to the "o" of "more." This is one of those places where I'm leaving a little room to play during the month (no date set on the page opposite).

Day 7 is an overlay + some of the orange triangle pattern paper + stamped "make merry" at an angle.

Day 8 is currently just the number 8.

I did emboss the back of the gold 8 - thinking I will probably do that for the other numbers. I like the back with the white vs. the plain chipboard. You can also simply back those numbers with a pattern paper - I just like the idea of keeping some of these pockets see-through.
I'm using that fun number page for Day 9 - thinking I'll stamp "remember this" at the top left and then hand-write the things I want to remember from that day along the edge there. Or not. Just an idea to consider.

Behind Day 9 I added this star pattern paper - not sure what I'll add to it yet but I like it. You can also see the next transparent divider was added here - no rhyme or reason - just spreading them out within the album.

For Day 10 I've started with a pattern paper 4x6 sheet + the masking tape + embossed #10 + a bit of red stitching.

Day 11 so far includes a 4x6 printable + pattern paper + acrylic star + a mini silver brad. I like to use Tim Holtz's Retractable Craft Pick to go through shapes like this (and chipboard) before putting the brad through.

I painted the random circle chipboard page using Martha Stewart Summer Linen Satin. It took about three coats to get it to this consistency. My plan is to use this for Day 12 since there are 12 holes - most likely I'll add some of the chipboard shapes and/or photos or words. My initial plan is to print out a photo to cover up the back or I might just paint the back as well. I'd like to maintain some of the transparency of the holes so I'll be thinking of a way to work around that on the 12th.
I haven't totally tackled the other two chipboard sheets that are included in the kit. I did decided to paint over top of the calendar sheet (same paint as above) and I'm thinking I'll cut that one up and use as insert pages at some point during the project.

Day 13 so far includes the gold numbers adhered to the pinecone pattern. Above it I added one of the bokeh transparent stars + a gold glitter heart + a silver mini brad on top of the red stripe pattern paper.

Behind that bokeh star card I added a simple card that includes a gold glitter star + the stamped star circle + some of the orange pattern paper cut and adhered along the bottom.

Day 14 includes a 6x8 overlay with a piece of that cute lightbulb pattern along the bottom. I stamped "remember this" using the kit stamps.

Following that page is the full page "let there be peace on earth" - I followed what I did before on that other full page text page and added a gold glitter star in the middle of an "o."

For Day 15 I created a card that includes some of the blue striped pattern paper + the grey star pattern paper + stamped red stars + stamped "make merry" + red stitching + the #15 embossed.

Day 16 features a portion of that 6x8 star page + the number 16 stamped in red using stamps from the kit.

Day 17 includes a 3x4 overlay + red pattern paper + red stitching.
You can also see that I added the second star transparency insert here as well.

Next to the Day 17 card I cut out "merry happy everything" from the black background and added it to the pocket (love creating see-through opportunities).

That's Heidi Swapp Sweet Cherry Color Shine sprayed on top of the start pattern paper. I stamped "tis the season" from the kit stamp set and then embossed the 18 before adhering.

For Day 19 (still need to do the number) I wrapped some of the printed masking tape around the card and then paired it with the star pattern paper. I also added line of red stitching there.

Day 20 is a white sheet of paper + the "2" and the "0" from the postage stamp sticker set + the story of today stamp.

Day 21 features a 6x8 overlay + green striped pattern paper + "let your heart be light" stamped in green and grey.
I've also included the red dot transparency here with the "joy" tab stapled in place.

For Day 22 I've started with a 3x4 card (that cute little tree) and then added a gold glitter star + the embossed 22 + a stamped "happy christmas."

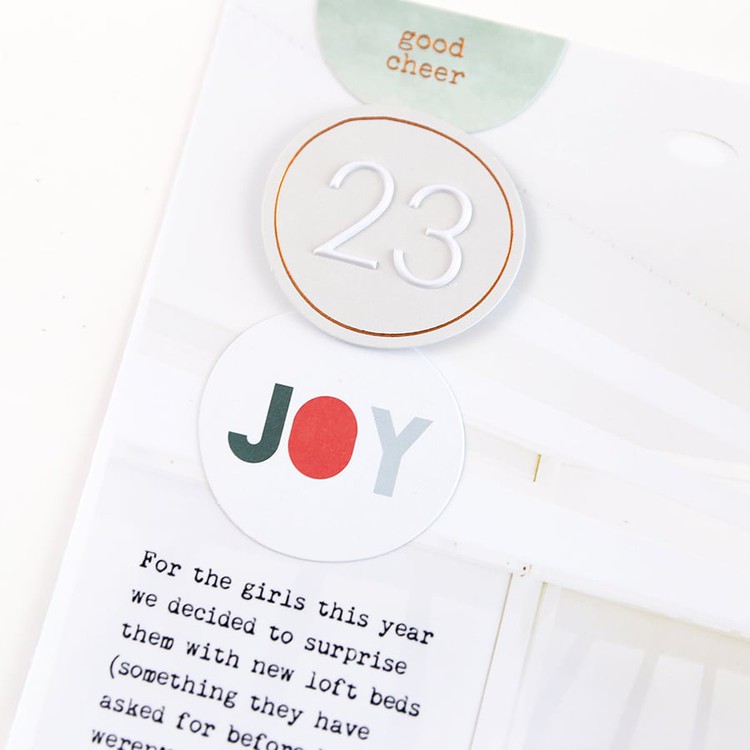
Day 23 currently features an overlay card + a gold glitter triangle/tree + a red plastic star + a mini-brad.

The last 1/2 of the transparency is included here.

For Christmas Eve so far I just have the 24 in the pocket. My plan is to stitch them inside.

All I have for Christmas Day right now is that awesome big gold foil 25. I'll likely include more page protectors for Christmas Day since we tend to have more photos on that day (and like I said there are quite a few left-over to choose from).

After the 25 I've got the large 6x8 Merry Happy Everything page included for now. I might end up moving that around based on the earlier days or I might use it as a closing page for the album.
I put together a video overview of the album that repeats a bunch of the things I outlined above.
VIDEO OVERVIEW
December Daily® 2014 | Foundation Pages from Ali Edwards on Vimeo.
ADDITIONAL SUPPLIES USED IN FOUNDATION PAGES
- KIT | December Daily® 2014 (most products used above are included in the December Daily® kit)
- INKS | Close To My Heart Cranberry Red, Memento Luxe Gray Flannel, Memento Luxe Pistachio
- EMBOSSING POWDERS | White and Gold Glitter
- EMBOSSING INK | Versamark
- HEAT GUN | American Crafts
- STAPLER | Tim Holtz Tiny Attacher
- ADHESIVE | Red Line Tape, Scotch Rolling Adhesive
- HOLE PUNCH | Crop A Dile
- SPRAY INK | Heidi Swapp Color Shine Sweet Cherry
- OVERLAYS | December Daily® Overlays Combo Pack
- PAINT | Martha Stewart Summer Linen Satin
- BRADS | Silver Mini Brads
- PAPER PIERCER | Tim Holtz Retractable Craft Pick
- SEWING MACHINE | Brother XL2600I


Love, love, love it! I got mine (Canada) on Monday and already have all my foundation pages set up because I couldn't wait to get my hands on it. This project makes my heart happy and it's a pleasure to do it every year. My only regret is that I didn't start it sooner when the kids were really little.
I prefer not to adhere things to the cover. Have you ever tried stamping the material? I'm wondering if it will bleed? Would I be better off to paint it?
I have stamped on canvas in the past and it definitely works! I've seen a few examples of both popping up on Instagram - some people inked all over their cover, some stamped with paint, some stamped with ink, etc.
Sign in or sign up to comment.
Love this! I was wondering what photo paper you are using now? You got me hooked on the Ilford Galerie Pearl and it looks like it is discontinued?
For photos I'm using Epson Glossy Photo Paper - been working well.
Sign in or sign up to comment.
Where is the overlay printable for page 2?
Hi - those are available here: http://aliedwards.com/shop/brushes/december-daily-overlays-combo-pack
Sign in or sign up to comment.
This looks great! I can't wait to see the pages start to come together and the memories get documented. I love the "reason why" page. I was wondering what you do with photos of memories after Thanksgiving but before December. I'm usually not on top of it enough to jump right into Christmas, but this year the family is doing a few Christmas things the last few days of November. I'm torn between adding the last few days of November to the December album, or just making it a December memory all together (as if it happened in December), or just putting it in my Project Life album and not putting it in the December album at all.
Hi - I generally just leave them out, but if I had something significant you could totally start your album with those stories of the days between Thanksgiving and December 1. Maybe a round-up of the stories or even just one you wanted to include. Make it work for you and your life. No one is going to question you down the road ;).
Sign in or sign up to comment.
I like to include our Thanksgiving weekend Christmas activities and traditions in my DD. I'm excited that this album has plenty of room for extra pages. I also carry the album to New years, although I don't document every day between Dec 26 and Jan. 1. This will be my third DD. I completed one in 2010 and in 2013, so when I do one I like to include our whole holiday season.
Denise :)
Have fun Denise!
Sign in or sign up to comment.
I'm in the UK and managing to scrapbook digitally (self-taught) . . . I'd love to start December Daily project and go hybrid or even all crafting - Ali, your projects look so beautiful . . . are there any UK stockists of the kit, please? I imagine shipping costs & added taxes are going to prevent me from ordering from the USA....? Has anyone ordered the kit from the UK and know the likely costs, please?
Hi - this is a kit sold only here at this time. Shipping to the UK is generally $8 I believe with options for expedited shipping. Please feel free to start a conversation with Customer Service to see what your options might be: http://aliedwards.com/conversations/new
Sign in or sign up to comment.
can't wait to get started, just waiting for for my kit!
Morning! I sent an email on to Customer Service for you Paulette - you might want to check back in with them via the "My Conversations" tab under your username. If you don't have one started there let me know!
Sign in or sign up to comment.
Ali,
I love seeing your foundation pages and hearing some of your possible ideas. It's inspiring and I am working on my album today a little bit. I loved how you cut the transparencies and used them as dividers, and I might do that too! I love the reason why page and I can't wait to add that to my album!!!! I can't wait to see your posts each day.
Super excited,
Love,
Jenn
www.thediaryofadreamer91.blogspot.com
Sign in or sign up to comment.
I love the way it seems like you just play with the supplies and this amazing album comes out! Also your "contaminated" embossing powder looks great! That little bit of gold is perfect for a DD album. They should sell that as a mixed powder. =)
Sign in or sign up to comment.
As a member of a non-Christian religion, I would like to see some non-Christmas oriented pages.
Thanks!
Hi! I almost always include non-Christmas stories in my albums on a couple days.
Sign in or sign up to comment.
When I print the 6x8 PDF it prints at 5 1/4 x 7 1/4. Not very good with computers, so how do I change this ? Thanks Christine.
Hi - sounds like you need to select "do not fit to page" or "do not scale" in your print window. There's usually an option for that when the print window comes up - otherwise your printer wants to scale it to fit the paper vs. the way it was actually designed.
Sign in or sign up to comment.
Thanks Ali for sharing your foundation pages. I spent the weekend working on mine (love, LOVE the kit). I went to download the file - thank you by the way but I'm not having any luck being able to download the file. It goes through the process of downloading it but there's nothing there at the end. It says Application not found. Have you any suggestions? I don't have PSE on this laptop so not sure if that's the issue. Any help would be most appreciated. Thanks
Morning - do you have Adobe Reader? Try using that to open. If not feel free to send a message to Customer Service and let them know and we'll get it to you.
Thanks for the reply. Still didn't work. Will get in touch with Customer Service.
Sign in or sign up to comment.
I love seeing your albums. After I decided that I wanted to join, I went through your old ones to see what you did. You gave me alot of inspiration. For my album this year, I will be using paint samples as my pages.
Sign in or sign up to comment.