December Daily® 2014 | Foundation Pages + Free "Reason Why" Printable

Hey guys!
I took some time this past weekend to get my foundation pages in order for December Daily® and I'm happy to share them with you today.
Here's a look at the steps I went through in getting this album ready for December 1:
1. Organize my page protectors. I use the term "organize" loosely as you'll see: I laid each of the four designs out on my table and put them into the album in this order: full 6x8, 4 pocket (3x4), 2 pocket (4x6) and then the 3-pocket one (4x6 and 3x4 combo). You'll run out of the 3-pocket first and then the 2-pocket next. Once I ran out of those two I just put the rest of the full page 6x8 and the 4-pocket in the back of my album. I want some flexibility. I want to decide I want another 6x8 page for my story today. The order of the page protectors really isn't super important in the long-run (and can make some people more frustrated than others). Also, as you'll see in the video - I have quite a few left over that I'm just keeping at the back of the album to work in during the month if/when I need them.
2. After I got the page protectors in the album I simply began the process of getting a number on most of the pages. I mixed in the December Daily® 2014 Overlay Combo pack with the wood veneer numbers (I embossed those in white) and the big gold numbers (+ a couple others as you'll see below).
3. I cut the three transparencies in half and am using them as fun dividers. I'll probably move them around during the month so that they go with stories I might be telling, but I might also just leave them right where I have them now. I used the Crop A Dile to punch holes in the sides (use a page protector as your guide) and then I folded over the sticker tabs and stapled them in place with a Tiny Attacher. NOTE: There is a "film" - basically a plastic layer on top of the transparencies that you should pull off when you are ready to work with them.
4. After that I really just started playing with paper and numbers and embellishments as you'll see below.
Here's a look at where my album is at right now:
2014 FOUNDATION PAGES

On the cover of my album I added a gold letter "E" for Edwards using red line tape. I embossed the wood veneer numbers using white embossing powder (mine has been contaminated by gold glitter from a previous project so there's a few flecks included here and there). If you want to learn more about embossing I showed how I do it in my Foundation Pages video last year.

The first page of my album for 2014 is a "reason why" page which is a great way to begin an album like this. Why are you participating in this project? What is your reason why? You can handwrite or open the 6x8 PNG in Photoshop and type in your words. Above "the reason why" I added one of the glitter stars and below I added the December Daily rubber banner (adhered with red line tape).
Today I'm sharing a Reason Why printable/PNG package with you:

The package includes PNG files and printable PDF files of "my reason why," "our reason why," and "the reason why" so you can choose which one fits best for your own project.
CLICK HERE TO DOWNLOAD THE REASON WHY PACKAGE.
I printed mine on Epson Matte Presentation Paper.

I can't wait to read your reasons why.

After my "reason why" my album begins with December 1. For December 1 I included a 6x8 overlay printable (these can be printout out like this or added to your photo in Photoshop).

If you are adding pattern paper strips to the printables, the size on the 6x8 that worked for me was 4.5 inches x 1.25 inches. On top of the green and white pattern paper I stamped using red ink + the strip of stars on the stamp set.

Here's the first of the transparent pages that I cut in half. To the middle edge of each I added the small word tab stickers (folded over) from the kit and stapled it in place with the Tiny Attacher. I punched holes in the transparency using the Crop A Dile. Don't forget to pull off that "film" before attaching the tab.

For Day 2 so far I've included the "All I Want For Christmas" card (I stamped those numbers on there using stamps from the kit + Gray Flannel Memento Ink) + a gold glitter tree + a red plastic star + the embossed #2.

On the back of Day 2 I started Day 3. Behind that gold glitter tree I cut pattern paper to fit and adhered it + a cute little puffy heart (from the kit). On the Day Three card I stamped "the story of today" three times.

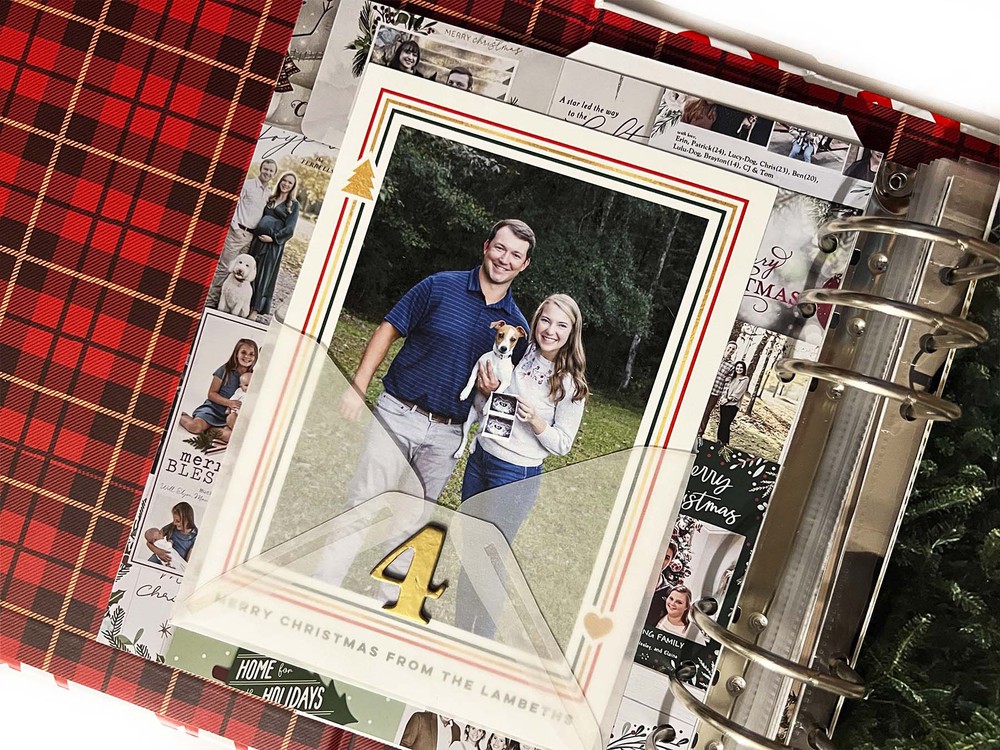
Day 4 includes the pink-border 4x6 card + the star circle stamp + an embossed #4.

For Day 5 I used the gold glitter to emboss two stars from the stamp set.

Here's the second transparent insert - love these ombre dots.

Day 6 is starting with a pocket full of tissue confetti circles + the plastic word twinkle + a plastic star + a few random gold sequins I had laying around. This pocket is going to be stitched closed, along with the #6 pocket, when I complete that day. I want to leave it open in case I want to add something else (or emboss the back of the #6).

I added one of the gold glitter stars to the "o" of "more." This is one of those places where I'm leaving a little room to play during the month (no date set on the page opposite).

Day 7 is an overlay + some of the orange triangle pattern paper + stamped "make merry" at an angle.

Day 8 is currently just the number 8.

I did emboss the back of the gold 8 - thinking I will probably do that for the other numbers. I like the back with the white vs. the plain chipboard. You can also simply back those numbers with a pattern paper - I just like the idea of keeping some of these pockets see-through.
I'm using that fun number page for Day 9 - thinking I'll stamp "remember this" at the top left and then hand-write the things I want to remember from that day along the edge there. Or not. Just an idea to consider.

Behind Day 9 I added this star pattern paper - not sure what I'll add to it yet but I like it. You can also see the next transparent divider was added here - no rhyme or reason - just spreading them out within the album.

For Day 10 I've started with a pattern paper 4x6 sheet + the masking tape + embossed #10 + a bit of red stitching.

Day 11 so far includes a 4x6 printable + pattern paper + acrylic star + a mini silver brad. I like to use Tim Holtz's Retractable Craft Pick to go through shapes like this (and chipboard) before putting the brad through.

I painted the random circle chipboard page using Martha Stewart Summer Linen Satin. It took about three coats to get it to this consistency. My plan is to use this for Day 12 since there are 12 holes - most likely I'll add some of the chipboard shapes and/or photos or words. My initial plan is to print out a photo to cover up the back or I might just paint the back as well. I'd like to maintain some of the transparency of the holes so I'll be thinking of a way to work around that on the 12th.
I haven't totally tackled the other two chipboard sheets that are included in the kit. I did decided to paint over top of the calendar sheet (same paint as above) and I'm thinking I'll cut that one up and use as insert pages at some point during the project.

Day 13 so far includes the gold numbers adhered to the pinecone pattern. Above it I added one of the bokeh transparent stars + a gold glitter heart + a silver mini brad on top of the red stripe pattern paper.

Behind that bokeh star card I added a simple card that includes a gold glitter star + the stamped star circle + some of the orange pattern paper cut and adhered along the bottom.

Day 14 includes a 6x8 overlay with a piece of that cute lightbulb pattern along the bottom. I stamped "remember this" using the kit stamps.

Following that page is the full page "let there be peace on earth" - I followed what I did before on that other full page text page and added a gold glitter star in the middle of an "o."

For Day 15 I created a card that includes some of the blue striped pattern paper + the grey star pattern paper + stamped red stars + stamped "make merry" + red stitching + the #15 embossed.

Day 16 features a portion of that 6x8 star page + the number 16 stamped in red using stamps from the kit.

Day 17 includes a 3x4 overlay + red pattern paper + red stitching.
You can also see that I added the second star transparency insert here as well.

Next to the Day 17 card I cut out "merry happy everything" from the black background and added it to the pocket (love creating see-through opportunities).

That's Heidi Swapp Sweet Cherry Color Shine sprayed on top of the start pattern paper. I stamped "tis the season" from the kit stamp set and then embossed the 18 before adhering.

For Day 19 (still need to do the number) I wrapped some of the printed masking tape around the card and then paired it with the star pattern paper. I also added line of red stitching there.

Day 20 is a white sheet of paper + the "2" and the "0" from the postage stamp sticker set + the story of today stamp.

Day 21 features a 6x8 overlay + green striped pattern paper + "let your heart be light" stamped in green and grey.
I've also included the red dot transparency here with the "joy" tab stapled in place.

For Day 22 I've started with a 3x4 card (that cute little tree) and then added a gold glitter star + the embossed 22 + a stamped "happy christmas."

Day 23 currently features an overlay card + a gold glitter triangle/tree + a red plastic star + a mini-brad.

The last 1/2 of the transparency is included here.

For Christmas Eve so far I just have the 24 in the pocket. My plan is to stitch them inside.

All I have for Christmas Day right now is that awesome big gold foil 25. I'll likely include more page protectors for Christmas Day since we tend to have more photos on that day (and like I said there are quite a few left-over to choose from).

After the 25 I've got the large 6x8 Merry Happy Everything page included for now. I might end up moving that around based on the earlier days or I might use it as a closing page for the album.
I put together a video overview of the album that repeats a bunch of the things I outlined above.
VIDEO OVERVIEW
December Daily® 2014 | Foundation Pages from Ali Edwards on Vimeo.
ADDITIONAL SUPPLIES USED IN FOUNDATION PAGES
- KIT | December Daily® 2014 (most products used above are included in the December Daily® kit)
- INKS | Close To My Heart Cranberry Red, Memento Luxe Gray Flannel, Memento Luxe Pistachio
- EMBOSSING POWDERS | White and Gold Glitter
- EMBOSSING INK | Versamark
- HEAT GUN | American Crafts
- STAPLER | Tim Holtz Tiny Attacher
- ADHESIVE | Red Line Tape, Scotch Rolling Adhesive
- HOLE PUNCH | Crop A Dile
- SPRAY INK | Heidi Swapp Color Shine Sweet Cherry
- OVERLAYS | December Daily® Overlays Combo Pack
- PAINT | Martha Stewart Summer Linen Satin
- BRADS | Silver Mini Brads
- PAPER PIERCER | Tim Holtz Retractable Craft Pick
- SEWING MACHINE | Brother XL2600I


Hi Ali - I'm so excited to get started on this project! I did your DD last year and didn't set anything up beforehand. This year, I plan to make the foundation pages before the month begins. I think I understand how to approach it now. I'm wondering, though, how to handle the photography during December. Do you try to take the photographs with the pages you've planned in mind? Or does it all end up just somehow working out? Thanks for all the inspiration! :)
I don't take photos with the pages in mind generally - usually I'm just taking pictures like I normally would and looking for a story. Sometimes I do look at the page protectors I have there and know that I might want more than one photo, but generally I just take some shots and it all ends up working out. Ha. You can do it!
Sign in or sign up to comment.
Thanks for sharing Ali! Very inspiring. I can't wait to get stuck into my foundation pages later this week.
Sign in or sign up to comment.
Wow this looks amazing Ali! So excited and can't wait to get started! Thanks for the inspiration!!
Sign in or sign up to comment.
Thank you so much Ali!
Sign in or sign up to comment.
It's here - my album and kit arrived in Nova Scotia this morning. Love it!
Sign in or sign up to comment.
Hi, Ali,
I hate to post this here, but I don't know what else to do. My kit was guaranteed to arrive in California on Thursday--and still hasn't arrived. I've reached out to customer support multiple times and nobody will get back to me. I've also filed a complaint with USPS. According to the tracking number my package is still stuck in pre-shipment. I would really like to get my kit before Thanksgiving. Can somebody please help me with this?
Hey Shannon - we will look into this for you right away.
Customer Service has not responded to me either. I contacted them last Friday - the response I got was - it would be 48 hours before they contact me. I'm not sure when the clock starts ticking for the 48 hours, since I still have heard nothing.
Opportunity blown, Ali
Hi Big Granny - we are checking into this for you. At first look we don't see that you started a conversation but we are seeing what we can find out.
Hi again Big Granny - Amanda should be personally contacting you shortly.
Our guess is that you weren't logged into your account when you sent the customer service message - in that case it goes to a different "location" vs. going into the Customer Service conversation database (hence the 48 hour email message sent to you via your personal email vs. a conversation sent back to you through your AE account which would have been located under your "My Conversations" tab).
Regardless, the goal is that you still should have been responded to within that time period so we are addressing that as well. Thank you for letting me know what was happening for you. It's definitely not what I want to be happening.
Ali,
I just wanted to say a public THANK YOU. Your team responded to me and over-nighted a second kit which is scheduled to arrive tomorrow. I REALLY appreciate having my kit in time to prep it over Thanksgiving weekend. I am very excited for this project. And I understand that sometimes stuff happens. Please know many of us are still with you and for you even after the hiccups. You have such a gift for storytelling and you make many of us better storytellers too. Thanks again. Happy Thanksgiving.
Sign in or sign up to comment.
I haven't received my album yet, so I'm not sure of the cover material, but how about using sprays to change the color or the album, or templates and sprays? I used spray on a linen album and it was super fast, easy, and looked great. Just be sure to use a light coat and dry before laying it on a table.
Yep! They are canvas - totally possible to paint or add spray ink + masks, etc.
I think this is what I'll try. Any ideas on how to protect the December Daily written on the spine?
I used Dylusions Cherry spray ink, spritzing and using a makeup sponge to smooth the color. It looks great - and the December Daily on the spine is still white.
Also loving the Tomato Soup color comments - that is completely it! I was thinking of adding a star or a snowflake mask in gold, hence the red, but I think I may just leave it as is!
Sign in or sign up to comment.
Oh Ali I absolutely love it and now wish I could of gotten the kit. Do you know if that star overlay or the other one will be available for purchase anywhere? Would kill for one piece of each.
If you can settle for a 2.5 x 8 piece of the star overlay, I can send you a piece of mine. I used a part of it already, but don't forsee using the rest...
You can message me at Studio Calico with the same username.
Sign in or sign up to comment.
Thank you Ali for supplying so many page protectors for the album! Nothing is more disappointing than having to chase down protectors for an album 1/2 way through.
As for the color of the album, I'm calling it "tomato soup" and going with the flow on this one! I love how it says "December Daily" on the spine.
I too am going with the flow on the "tomato soup" color. Not what I was expecting, but I feel the stories and pictures inside are what matters.
That said, I have to say I am extremely disappointed that the "December Daily" stamped on the spine of my album is completely off center and crooked. It really looks bad and I need to find a way to cover it up. I understand there are kinks in new processes but please, please quality check the vendors and materials.
Me again. I just want to thank you for the quick response to the conversation I started regarding the off-centered detail on the spine. I appreciate the customer service!
Sign in or sign up to comment.
Thank you Ali, this is great and also great to know you did it in 4-6 hours. I haven't got my kit yet but it makes me feel better about being able to get the foundation pages done one or two night when my kids are asleep. I cant wait to get started! This is my first DD!
Sign in or sign up to comment.
Can't wait to have time on Wednesday when I get out of work early to sit and leisurely watch your video and read through this post. Thank you for the great inspiration!
Sign in or sign up to comment.
Per usual, you rock! Thanks for the inspiration. So excited to document my first Christmas as a married lady!
Sign in or sign up to comment.
hi ali. love this and can't wait for my kit to arrive! couple of things: which sort of paper/paper quality did you use for the 6x8 pages and what font did you use in your reason why please? thank you!
I used Sentinel for the text on My Reason Why and for the printables I most often use Epson Matte Presentation Paper. We also just added some printed cards to the shop if you'd rather go that route vs. the digital overlays (https://aliedwards.com/shop/december-daily-2013).
awesome - thank you!
Sign in or sign up to comment.
Hi Ali! I received my kit on Thursday (in Northern California) and my album on Friday. I love both. I just wanted to say that, if it ever happens again, where the album or something is delayed, I would have no problem waiting for the whole thing to ship together. No need to double the shipping. Maybe customer service could let those who absolutely-had-to-have-it-immediately send them an email and ship just to them? Just a thought. :)
Thank you :).
Sign in or sign up to comment.
This is an awesome video and I'm so excited now! I purchased the kit on Saturday - does anyone know if the double paper offer is still available? I hope I didn't miss out!
Sign in or sign up to comment.
I absolutely LOVE how you're doing the long written explanation and then a big video at the end! I like reading the details but I love seeing it in the video too! You need both! I have a question....I'm going to attempt to blog every day about mine so do you usually end up taking pics of your pages at night? I'm thinking you would have to! I'm so excited! I plan to make my base tomorrow!
Sometimes I do it during the day and sometimes at night - it really just depends on what is happening as the stories unfold. For example, I know one day I'll be including my Christmas card - in that case I don't need to wait until night to do that one. Just depends on the story for the day.
Sign in or sign up to comment.
Thank you Ali!! Are you going to add InLinks for us to add links to our pages like you've done in the past? I finally blogged about my first couple of foundation pages and would love to share here and see everyone else's too!! :)
Sign in or sign up to comment.
Thank you Ali for all the inspiring photos and video! Looking forward to the arrival of the kit - I am eagerly monitoring the UPS status.
Having watched the video a second time now, I can't help asking - what's up with that sleeve? ;-)
Sign in or sign up to comment.
Love love my kit Ali!! And love seeing your process! Thanks for all your hard work!
Sign in or sign up to comment.
Just wanted to say - I'm in Australia and had my kit delivered yesterday - thank you so much for the 'free' quick delivery.My focus is my beautiful baby's 2nd christmas & this is going to be an amazing project for me to do. Thank you so much for your dedication to delivering what we NEED and WANT xx
Sign in or sign up to comment.
Hi Ali, thank you so much for the freebie "Reason Why printable/PNG package". I am very versatile in my abilities with Word Documents and importing .png files (imported as a picture file). From there I can usually add the text in. Do not know what I am doing wrong. I appreciate it that you have it set-up for a 6x8 document. I am using a MAC, which should not make a difference. Let me know if there is something I can do to get this to work. I was trying to set-up the page. By the way, I really appreciate it because I would use it for other theme sections of my album. Any help is so appreciated.
Thank you for everything you and your team do to make this a successful project for each and everyone of us. You and your team Rock!
Happy Thanksgiving
Hi! What's happening once you insert it as a picture file (meaning, where are you getting stuck)? Can you not add a text box on top or?
I'm having the same issue. I can open the document in PSE and add a text box but for some reason I cannot add text in the box. I'm not sure what I'm doing wrong. I'm using a MAC as well.
Hi Ali,
Thank you for writing back. I finally figured it after you asked the question and suggested the text box. ThSo with all that said, I plan to do some documents with a heading - just like the one I just worked with. I used the 6e text box worked by inserting below your created text pic and I formatted the picture 6x8 png files wrapping layout to "In Front of Text" and the Horizontal Alignment to "Other." I kept the size intact at Height "8 in" and Width "6 in".
I now have a bigger question - How did you create the document where the png/document is 8x6. Hope this does not sound confusing, since I am a tad bit confused. I really appreciate your help and being able to create a page will help with my overall album contents. Thank you and by the way, Happy Thanksgiving. Kathleen
Sign in or sign up to comment.
This is quite possibly my favorite blog post every single year! I am always so excited to see your DD pages, Ali. I have linked you in my blog here: http://www.blogher.com/december-album-foundation-pages-part-1
Thank you!
Sign in or sign up to comment.
Loving this Ali! I hope, no I will, work on my mine this weekend so i actually finish this year! Love this project and the kit!
Sign in or sign up to comment.
This will be my third year doing December Daily. Love this project and the memories that are documented. I lost my mother 6 months ago after a long battle with cancer. My DD from 2013 is filled with memories of my mother. I cry every time i open it. I am forever thankful to you for encouraging us all to document our stories. This year will look different with out her in the photographs but she is hear in my heart.
I'm sorry for your loss Debbie.
Sign in or sign up to comment.
Hi Ali,
Thanks for sharing! Love your foundation pages. My kit is here, delivered this afternoon (in France) and I love it so much. Just one question about the big gold letters: is that normal if there is no P, no Q, no R, no S, no T, no W, no X, no Y, no Z, no 1, no 2, no 3, no 5, no 6, no 8, no 9? Thanks
No, that is not normal. Please start a conversation with Customer Service and they will get it sorted out. Please make sure you are logged in to your account when you begin the conversation. https://aliedwards.com/conversations/new
Thanks Ali for your super fast reply. Just start a conversation. Have a nice Thanksgiving. Hope Anna feels better.
Me too - thank you.
Sign in or sign up to comment.