Week In The Life™ 2024 | Special Guest Jessica Luther
Hey there everyone, this is Jessica Luther! I’m excited to be here as a guest on the blog today to share some of my thoughts and ideas on Ali’s Week in the Life project. I’ve participated in Week in the Life for the last three years and those albums act as time capsules for stages and phases of our life that have passed us by. Before I dive into my plans for this year's album, I wanted to share what has worked for me in the past. Looking back and thinking about what I’ve done previously, helps me decide how I’d like to move forward with this year's approach.
What I’ve done in years past that has worked for me
One of my favorite pages to include with any multi page project is a title page photo collage. It’s a great spot to showcase your favorite photos from the project or include photos taken but not actually used in the project and it’s fun to get a glimpse of what's to come. Two of the three years, I’ve included my reason why on this page.

I like including an intro page in my week in the life projects specifically, it’s helpful to have a designated page that has all the details of right now. I include info like our ages, where my husband and I are working, where the kids go to school and what grade they’re in. I’ve also used this page to list the shows we watched during the week.

Three ways I’ve documented my stories from the week
In last year's album (2023), I used a few storytelling lenses that helped me gather information from that specific time. Each day had a toay card that included the temperature high of the day and some journaling, with a few other journaling areas labeled with the day of the week mixed in with the photos. The lenses I used were: around here, some days + most days, moments not captured with a photo, this year vs. last year, the hard parts… the easy parts… the awesome parts, conversations, saturdays are for. I gathered information throughout the week and put them into the different lens categories and added a digital stamp that said “this week” onto each of those pages.

The previous year’s approach (2022) was much less structured in gathering and documenting all the stories. I used the daily facts + feelings cards and included things like temperature, steps and word of the day. I also used the digital stamps to create consistent journaling cards using story + today + I want to remember. Those journaling cards were used each day. An extremely detailed look at this album can be found as a bonus lesson in the Storytelling with Week in the Life class Ali released last year.

My first year (2021) I used so many digital stamps to create the journaling cards, I also had purchased a few of the shop embellishments from that year's collection. I picked a color for each day based on the leather tags and used that color to create any of the filler cards and journal areas. I also had a quote of the day for most of the days and it is by far my favorite, I’ll be listening extra hard this year for those wonderful gems.

My plan for documenting this year
I’ll be documenting my week in the life May 13-19, 2024 and this year I’ve decided to do Monday-Sunday. Typically I like to break up my Saturday and Sunday to provide a better look at what weekends look like for us at the time. Often our two days run into each other and documenting Sunday-Saturday has worked really well for me in the past. However, I’m really excited about changing it up this year and using the main kit as it was designed.
To gather my stories throughout the week I use Ali’s Daily Sheets that she shared a number of years ago. In addition to those, I’ve created a sheet that includes prompts that will help me collect specific details for this year’s project. You can download that file here.

I’ll be using Canva to layout and create all the pieces I need to print for my album. I like to place everything into the album file for visual reference, even if I plan to use the physical products. I guess you could say, this file set-up is my digital version of foundation pages. I’ll be starting my album out this year with a few 4x6 cards from the main kit. The stories of the week card is so bright and fun, it really sets the tone for the rest of the album. I hope to have a 4x6 family selfie for above the days of the week card. For that card, I plan to handwrite descriptive words from each day. The facing 2x2 pocket page will have photos of each of us and some currently details. I’ve already placed our ages since I already have that info. The backside of the 2x2s will have numbers from the week and possibly an image of the audiobook I’m listening to that week and a show I’m hoping to be watching (Bridgerton S3 releases that week!)
The ideas I’m sharing below are using photos from years past to provide a visual of what I’m thinking about doing.
Me + You + Us // 2x2 cards (mini kit)
These would be super fun to pair with black and white photos, especially if the photos vary in lighting quality and have color casts. Depending on the story I’m documenting with these 2x2’s, the front side of this 12 pocket page protector could be all about us. The non-photo pockets would probably be filled with the words and I thought it would be fun to also include these large you + me 2x2’s if there was room. They were created with the icons digital stamp set, using the same colors from Monday.

I suspect that I won’t have a human or pet relationship to document with these cards each day, so I wanted to do a little brainstorming prior to the documenting week. Thinking of a material item that I rely on heavily to act as one of my “you” subjects. I could write about how using it makes a difference in my daily life as the “us” card. If I were highlighting my favorite felt-tip colored pens, my storytelling could be something like, “with our powers combined, my task list looks fun and appealing.”

Daily highs + lows // 4x6 cards (main kit)
The paper stock these cards are printed on is so nice, its quality stock that feels good in my hand so I want to use it in my album as opposed to printing the digital card with my journaling. I plan to handwrite on the upper high + low area in just a few words the high and low from the day and I’ll print my longer journaling on sticker paper to adhere to the lower section of the card. I purchased the same sticker paper Ali has been using and the link is in the supply list below.
When I was playing with the digitals, I wanted to come up with other ways I might use the 4x6 cards. For days when I don’t need it for words, it is the perfect spot for photos. Below are some ideas, along with some 3x4 filler cards I found in my digital stash. I linked where you can get them in the supplies list below.

Another way I might use these is to include some details about the highs + lows from the day in the upper area and two photos to support those details down below.
The striped card below is made from the 3x4 Simply Remember card in the main kit. I just covered the words with red. In the sample below, I paired it with a vellum ampersand from the mini kit and one of those fun word strips from the main kit.

Morning + Afternoon + Evening // 3x8 inserts (main kit)
In my album I’ll be using a 3x8 - 2 pocket page protector for the morning/afternoon/evening cards. I plan to attach the vellum pocket card to the outside of the 3x8 pocket next to it and have a quote from the day in the same pocket (inside the page protector). To help with keeping the bulk more level throughout my album, I’ll be rotating the morning/afternoon/evening card from the left to right pocket and placing the vellum pocket at the tops and bottoms of the adjacent pocket.

I’ve been holding the vellum pockets in place with a paperclip, but after removing it to photograph this and seeing the indentation it’s making, I’ve taken the paperclips out and just slid them into nearby pockets.
Depending on the colors in my photos, I may make all these images black and white. A high contrast black and white image would look awesome with the bold colors of this collection.

Another decision that will need to be made is whether to have a small white border around the photos I add onto these cards.
More ideas using digital products
On the backside of the morning/afternoon/evening card, I’ve created a 3x8 card for journaling. Here are a few ideas I was playing around with. I'm leaning towards using the one in the middle that is made using the day 3x4 card from the collection paired with a cropped portion of the digital chipboard banner from the same day.

3x4 Journaling Card Options
I’m not sure that I’ll need a 3x4 journaling card option, but I wanted to come up with one (or more) to make sure I’m ready when it comes time to put my stories into the album.
The upper left option is the 4x6 card in half with a photo covering the high/low words, lower left is the blank portion of the 4x6 card with a cropped rectangle of the digital chipboard banner and it has a few color blocks flanking it that coordinate with the day colors, the lower right is the blank portion of the 4x6 card with Monday cropped from the 4x6 that has all the days listed and a thin black line added below the day.

On the adjacent page you can see another filler card I created with the striped pattern and a transparent white ampersand stamp.
Ideas for the back of the Hello day dividers
There are so many possibilities with the backside of these inserts. If I were to use them for journaling, I would print my typed up stories on clear sticker paper and overlay it on the entire insert and just trim flush to the edge.
As of now, prior to my documenting week I plan to use it for a large photo. I love the idea of having it be a high contrast black and white image, but I’m totally open to a color photo if it looks good there. I’d like to add a stamped word or a word phrase strip to the tab area.
In the below photo you can see one of the 3x4 filler cards I made with the digitals. I love the look of a transparent white stamp (heart) on top of the striped background. It’s a great spot to add a physical embellishment or add it in the pocket just as it is.

One of my favorite things about digitals is the ability to create something new. Maybe you didn’t get the physical mini kit or maybe 2x2 is just too small for the you, me and us topics you want to include. The back of the insert is a fun spot to create your own photo + card + journaling collage. In the two examples below, I just used a cropped portion of the us card, covered the day letter and added the heart stamp in its place. Then I added a small area to include some words with my photo(s). I plan to just print the square collage and attach it to the physical inserts, but if you don’t have them you could print it as is, fussy cut around the solid line, punch some holes and add it into your album.

A look at my formula and file set-up using Canva
Here’s a look at the Canva file I’ve set up with the design formula I plan to use for the week. Each day has been set-up with the appropriate cards and colors applied to the quote cards. Keep in mind that I like to have my file represent the final project as closely as possible, so I place the digital version of the physical items I plan to use in the locations they will be used in the album. A great example of that are the transparent dividers, hello day inserts and banners. All of those items will be physical items that I already have, I just have them placed in the file so I can have a better visual of what it will look like when it’s all pulled together.

What you’re seeing in the above screenshot is my opening title pages, all of my Monday pages and the majority of Tuesday. I used the black digital version for the transparency dividers so they would show up better in my file. I will be using the physical transparencies in my album.
All the variations of journaling cards and photo options that I shared above are included at the bottom of my file for easy access when it comes time to plug in all my photos and words. I like to do as much brainstorming and creating prior to the documenting week as possible, so I’m able to start bringing it all together as soon as I get my photos edited.
Thank you so much for joining me here, I hope that something you’ve seen or read has sparked an idea for your own project. If you’d like to see how my project unfolds, I invite you to follow me on Instagram @jlutherdesigns
If you’re interested in learning Canva, I recommend taking the Create with Canva course.


Awesome ideas!
Thank you :)
Sign in or sign up to comment.
Love your plan! Do you remember from what kit the quote about the value of moments that become memories is? I adore that page 3>
Thank you so much! I'm not exactly sure which card you're referring to, but most of the digitals I used from my stash came from the 2023 WITL Prep Day. It had a large digital package included with it, it's still available in the class section.
Sign in or sign up to comment.
You mentioned a “supply list below” in your text, but I don’t see one. Will there be one?
It wasn't included in the blog post, sorry. Is there something specific you're looking for?
Sign in or sign up to comment.
So many good ideas here, great post!
Thank you so much.
Sign in or sign up to comment.
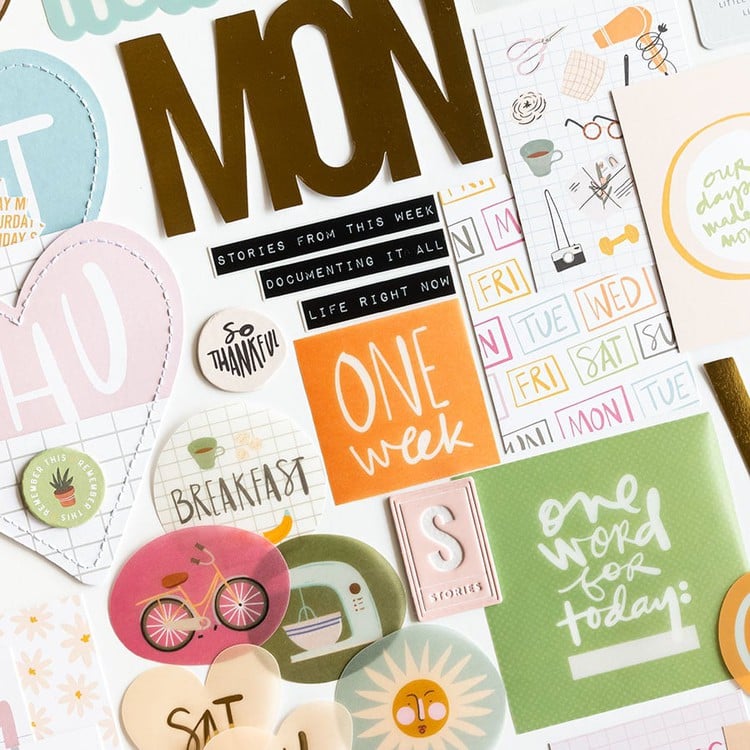
Great ideas! In the first picture of the blog post, there is a wordart that says "our life right now", I would love to know what kit that came from! Thanks!
Thanks so much! That saying came with the WITL 2021 Prep Day class, I believe the class is still available.
Sign in or sign up to comment.
So many great tips! Thanks for the prompt sheet too!
Thank you and you are so very welcome!
Sign in or sign up to comment.
You are a Canva queen! I am using the physical kit, and I just realized that the digital kit was included with it. So I am looking at a couple of things to alter a little. So many great ideas you have!
You are too funny... Canva Queen :) It was an awesome surprise to get the digitals with the main kit purchase. I love working with digitals and physicals to create hybrid projects.
Sign in or sign up to comment.
What is the name of the photo collage you used? I do have Canva but I’m not seeing that one.
All of my collages and page layouts are custom made in Canva, I don't use the preset ones. You can create them pretty easily using a grid that has the number of rows you want and duplicating it to create columns. Then adjust the entire thing to fit your page.
Sign in or sign up to comment.
Thank you!
Sign in or sign up to comment.
For your 2023 album, the Today prompts that you used in the first picture, with all of the journaling. Did you make them yourself, or where did you find them from? I would love to use them in this years project!
I did create the journaling card myself using Canva and some AE products. The word "today" is from a digital stamp set that isn't available currently called "prompts." The weather icon from a digital stamp set from the 2021 WITL collection https://aliedwards.com/shop/week-in-the-life-2021-weather-4x6-digital-stamp-set.
Hope this is helpful :)
Sign in or sign up to comment.