3 Things : playing with printing + a giveaway
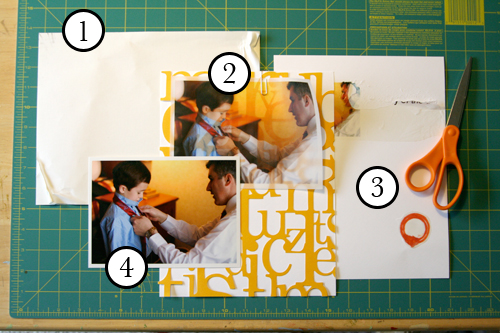
Staying in the theme of words + photos this week I wanted to experiment with a couple different inkjet printing surfaces. I took that photo of Chris & Simon and the tie and printed it on each of the following using my HP Photosmart D7360
[ Warning : any of my experiences below could very well be operator error. ]
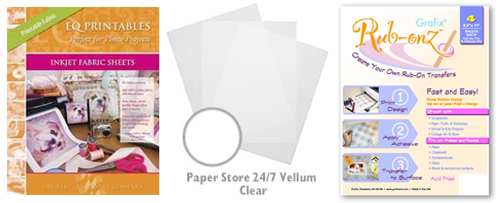
WorldWin Inkjet Printable Translucent Vellum : Quick and easy. Great result. See sample below. It's been awhile since I last used vellum and it was fun to reintroduce it into my supplies. Definitely want to play with it more: thinking about layering with transparencies and text and photos.
EQ Printables Peel & Stick Fabric Sheets
Grafix Rub Onz - Create your own rub ons. Super cool idea. I wanted to see if this would work with a photo + some words...and at least in my case it was a challenge. This is a multi-step process that includes printing, then placing adhesive paper on top, and then adhering your image to final paper. The real challenge is getting the adhesive paper onto your image without bubbles. The second challenge is in the choice of the paper you rub on to. I tried it on textured cardstock and it didn't seem to work - it just tore the paper. I will probably try this whole process again to see if I can make it work.
[1]
EQ Printables Peel & Stick Fabric Sheets
And now, the giveaway:
3 readers will receive the following from The Papermill Store/Worldwin:
• 1 pack 27 lb WorldWin Inkjet Printable Translucent Vellum
• 1 pack 40 lb WorldWin Inkjet Printable Translucent Vellum
• 1 pack 12x12 WorldWin Doublemates Cardstock
• 1 pack 12x12 WorldWin Rouche Cardstock
For more information on The Papermill Store/WorldWin, check out their blog here.
For a chance to win this selection of papers leave a comment below with your favorite photo tip or what you want to work related to taking photos. Winners will be drawn tomorrow at 5pm Pacific.
Don't miss today's words + photos post below.


I don't have an amazing photo tip other than the obvious...always have your camera handy...you never know when something's going to happen and you don't wnat to be standing there saying "Man I wish I had a camera!" Sorry that's the best I can do after working in my yard the past two days ;-) Have a super week!
Sign in or sign up to comment.
My favorite photo tip really has more to do with personal style than anything else, but I LOVE! upclose and personal images. The kind where you almost have a hard time destinguishing what it is. It is a fun element to add to more clear cut photos.
I would love to try that fabric paper! I hope I can maybe have better luck :) AND I hope you can get it to work!
Sign in or sign up to comment.
Try printing your photo on Bazzil Paper. With it's textured surface, your picture looks like it has been printed on canvas. I have tried white, blush and pink paper and it adds alot to a picture. Give it a try!
Sign in or sign up to comment.
I need to work more on capturing our lives, and not just a few snapshots here an d there. Your photography inspires me so much. I want my kids to have those kinds of memories to look back on. Thanks, Ali!
Sign in or sign up to comment.
Practice, practice, practice!!!
Experiment with angle and lighting.
Take lots and lots of pictures.
Let life happen, keep shooting it "real".
Cheers,
Karen Geckler
Sign in or sign up to comment.
I really want to work on learning how to do some photo editing. My husband gave me Photoshop Elements 6 for my birthday, and I just picked up the Classroom in a Book that I had reserved from the library, now I can't wait to get started learning. I am eager to try adding text and graphics to my photos. Thanks for your inspiration!
Jeannine
Sign in or sign up to comment.
I love taking jpictures with out flash and having that warm yellow glow to them. I will try the suggestion to print on Bazzil paper what a good idea.
thanks ali for all the inspiration.
Sign in or sign up to comment.
I love this idea. I too have been interested in trying printing onto different surfaces. Have you ever tried the iron on paper? I have used that for putting text onto fabric, I wonder what a picture would look like printing on the transfer then ironing onto either fabric or paper?
Anyway, thanks for the contest, look forward to reading more...
Michelle
Sign in or sign up to comment.
I can't narrow it down to just one tip, but:
1. Take lots of pics. Don't look for just the "right" moment to pic. Some of the greatest photos are the ones you didn't expect.
2. Turn off your flash and play with the white balance. This has transformed my photos.
2. Play with the angle and distance from which you shoot. Get closer (and closer still), stand on a chair, take a photo through the window or a doorway. You'll be amazed what a change in perspective can do for your photos.
As for me, I am seriously thinking about taking a course in photography. I think it would help me take my photos to the next level.
Ali, I am loving this week's feature on photos and words. Amazing!
Sign in or sign up to comment.
My photo tip is get close to my subject...especially when photographing little kiddos.
Sign in or sign up to comment.
One of my favorite things to do with photos is to print them directly onto 100% cotton. This works with quotes or anything else you can print out. You iron the cotton to a piece of waxed paper (this makes it stiff enough to go through the printer), trim to the correct size, and print just like you would on regular paper. I like the frayed edges and the fabric is easy to attach with glue, brads, eyelets, stitching, anything really. It looks cool if you use an oatmeal colored fabric and print in black and white or sepia. Love that antiqued look!
Sign in or sign up to comment.
I tried to print some photos of art glass (from a Chihuly exhibit) on transparency. I planned to use them in a clear acrylic album -- a glass transparency acylic thing goin' on in my head.
It didn't really work -- photos, it seems, require a ... base ...
But ... it is still in my head and I'm still "zenning" how it might work.
Sign in or sign up to comment.
I am loving this week's blog! So much good info, now I want a new camera too :-) I like to take closeup photos of my daughter, little kids have such beautiful skin... and faraway pictures of me... ha! I need to work on giving the camera to my husband because I don't have very many photos of myself and I am definitely here!!
Sign in or sign up to comment.
my favorite photo tip is to let my daughter take over the camera and take a few pictures from her perspective. we gave her our old digital camera when we got a new one and it's amazing to see what she notices! thanks.
Sign in or sign up to comment.
when I take photos of my girls at school functions they always seem dark, with and without flash. I am still playing around with my camara to make it work.
Sign in or sign up to comment.
Great tips for printing...One thing I like to do is take scads of pictures and hope that I get that one great shot that I'm looking for...With 5 grandkids someone's either not looking or not smiling...so I just keep snapping away...Thanks for the chance to win the goodies...
Sign in or sign up to comment.
My tip is to try turning your camera around for different angles of your subject. I love your ideas and cannot wait to try them.
Rebecca
Sign in or sign up to comment.
I have 2 favorite photo tips. I use the self timer on my camera alot - my kids think that it is hilarious to see if I will "make it" by quick running to get in the picture. Something about not quite knowing when the picture will be taken works for them.
I also use the continuous action setting all the time (not just during sports) but at the park, down the waterslide, off the diving board, etc I have great photos of my kids in mid air with great expressions that way. But the key for this one is to make sure you delete all the photos you get of only water and splash! There will be lots of them!
Sign in or sign up to comment.
Since there are all ready 490 comments, I am guessing my odds are kind of slim, but hey let's try :) I'd LOVE to win!!!
My photo tip - for a fun perspective don't use the view finder and just snap, snap, snap, and you will get some pretty awesome angles and points of view!
Sign in or sign up to comment.
If you need a better way to lay down the adhesive paper try either the edge of a ruler or a credit card depending on the size of the paper. Should keep the bubbles out.
I want to learn more about photoshop. That's my big goal. I'm totally intimidated by it and by the idea of doing digital scrapbooking at all. Which is goofy since I'm a computer nerd by trade.
Sign in or sign up to comment.
I like to take multiple shots of my subject while I am moving around them just so I can get different background features. This works well when you are outside.
Thanks for the tips. I love it.
Cindy
Sign in or sign up to comment.
Totally love those ideas. There's so much one can do with the right supplies.
Sign in or sign up to comment.
It is consoling that even the experts like you can encounter a problem with a particular technique. I am working on backgrounds in my photos. Thanks for the chance to win!
Sign in or sign up to comment.
You are so inspiring.....one of my favourite looks is to print my photos on book paper. It creates a warm photo with a softness to it.
Sign in or sign up to comment.
I've seen this in the comments already from others, but my best tip is to always have a camera with you! Also no flash!
I need to work on being a more ruthless deleter for sure.
Sign in or sign up to comment.