3 Things : playing with printing + a giveaway
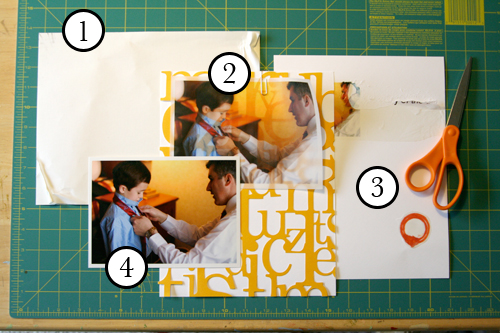
Staying in the theme of words + photos this week I wanted to experiment with a couple different inkjet printing surfaces. I took that photo of Chris & Simon and the tie and printed it on each of the following using my HP Photosmart D7360
[ Warning : any of my experiences below could very well be operator error. ]
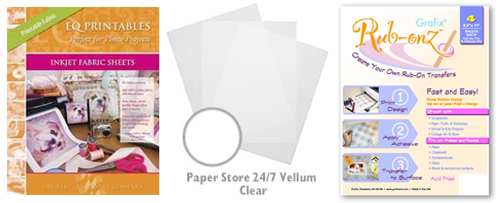
WorldWin Inkjet Printable Translucent Vellum : Quick and easy. Great result. See sample below. It's been awhile since I last used vellum and it was fun to reintroduce it into my supplies. Definitely want to play with it more: thinking about layering with transparencies and text and photos.
EQ Printables Peel & Stick Fabric Sheets
Grafix Rub Onz - Create your own rub ons. Super cool idea. I wanted to see if this would work with a photo + some words...and at least in my case it was a challenge. This is a multi-step process that includes printing, then placing adhesive paper on top, and then adhering your image to final paper. The real challenge is getting the adhesive paper onto your image without bubbles. The second challenge is in the choice of the paper you rub on to. I tried it on textured cardstock and it didn't seem to work - it just tore the paper. I will probably try this whole process again to see if I can make it work.
[1]
EQ Printables Peel & Stick Fabric Sheets
And now, the giveaway:
3 readers will receive the following from The Papermill Store/Worldwin:
• 1 pack 27 lb WorldWin Inkjet Printable Translucent Vellum
• 1 pack 40 lb WorldWin Inkjet Printable Translucent Vellum
• 1 pack 12x12 WorldWin Doublemates Cardstock
• 1 pack 12x12 WorldWin Rouche Cardstock
For more information on The Papermill Store/WorldWin, check out their blog here.
For a chance to win this selection of papers leave a comment below with your favorite photo tip or what you want to work related to taking photos. Winners will be drawn tomorrow at 5pm Pacific.
Don't miss today's words + photos post below.


Thanks for sharing your tips with us. There are several things I still need to figure out on my camera but I'd love to master depth of field.
~ Rachel in TX
Sign in or sign up to comment.
How fun!!! I sure would love to see if those "make Your Own Rub Ons" work out because I sure would love to play with those too.
Photography tip...well, I am not a very good photographer yet but I am working on it..so my tip may be a lame one but here it goes:
READ YOUR CAMERA'S MANUAL!!! (I'm on page 20...now, if only I can remember the contents on pages 1 through 19 that would be helpful).
Thank you Ali for this giveaway!!!
Sign in or sign up to comment.
Ali,
BRAVO AGAIN!!!!!!!!!!!! I had to read this twice. I play around with alot of different modes. I get great photos and not so great photos, I also use the not so great photos
in layouts. I need to practice more with the timer to get myself in photos.I get the most interesting shots when I least expect it.
Your the best thanks again.
Annette
Sign in or sign up to comment.
How fun!!! I sure would love to see if those "make Your Own Rub Ons" work out because I sure would love to play with those too.
Photography tip...well, I am not a very good photographer yet but I am working on it..so my tip may be a lame one but here it goes:
READ YOUR CAMERA'S MANUAL!!! (I'm on page 20...now, if only I can remember the contents on pages 1 through 19 that would be helpful).
Thank you Ali for this giveaway!!!
Sign in or sign up to comment.
Hi Ali,
thanks for all these great inspirations.
I really liked when you said that the photos should tell the story!
What I would like to read about? Stuff like Photoshop...your tricks to make thinks look good :)
Thanks!
Sign in or sign up to comment.
My photo tip: NEVER forget your camera. Always take it with you, even if you think you won't need it because more than likely there will always be a photo op. And don't be afraid to keep clicking. That's what the delete button is for.
And don't forget: YOU. So often we get wrapped up in capturing those moments of others that as we look through photos and pages, we can't find any of ourselves. Let YOU be the subject every once in awhile.
Sign in or sign up to comment.
Loving to print pictures on vellum paper these days. Also, made use of a ladder in the grandkids palyroom (while painting the room) and took top down pics - which really looked great.
Also, started to take portions of bodies (Tara would be so proud) - latest, was my grandboy standing barefoot on the rocks, on the shore of a mountain creek. Rolled up pants, splattered with icey water... but love his baby toes. Took it from the thighs down and framed it for my home!
Sign in or sign up to comment.
My tip;let the story spill out of the frame of the picture. I won a photo contest once with a picture of my two girls running on the beach and one of them has run one third of the way off the print. I did not mean to take the picture this way but when I saw it, I loved it. Since then I look for ways to recreate the same sort of story telling.
what I want to work; I want to be able to take better indoor pictures. I find my shots are either too blurry or the color is just plain weird.
Sign in or sign up to comment.
My photo tip is to play around with non-standard sizes, you can have lots of fun with photos that aren't just 4x6 or 5x7 try making a layout and incorporate your index print sheet.
As for wishes I wish my home printer would be true to the colours I see on my computer screen. Totally frustrating when my photos come out dark and dismal.
Heather Main
Sign in or sign up to comment.
Thanks for your wonderful web site. I love reading you. I need to learn how to better crop my pictures and how to take close ups of people.
Sign in or sign up to comment.
Photo tip... take lots and lots of pictures. I'm bound to get a handful of good ones to scrap when I have a wide variety to choose from to tell my story. Your pics always come out so crisp and clear... would love to find out your favorite photo editing techniques. TFS :)
Sign in or sign up to comment.
WOW!!! I LOVE that vellum! Thanks so very much for sharing with all of us!!!!!!!
My favorite tips would to avoid using flash whenever possible. Natural sunlight is your best friend and remember that when outside have the sun to your back...not the subjects! Learning lots from te comments alone ^---^
Love everything new :),
-Karla
Sign in or sign up to comment.
i really want to try to do some more journaling on my photos...i've only done it a few times, and I love the results
Sign in or sign up to comment.
ok, the very first thing i do and i really think EVERYONE should also do is.... USE YOUR CUSTOM WHITE BALANCE! i understand that for many people this might mean reading your camera's manual (thats always a good thing too! ;D) but it sooo worth it! all your colors will come out true and beautiful!
kate v
folsom CA
Sign in or sign up to comment.
My favorite photo tip. Photograph people from aroudn the bust area up. So many people hate their photo taken but when they see the result of that type of photo they seem much happier and are willing to smile and have more photos taken.
Sign in or sign up to comment.
Wow, there are so many comments here. I think my favorite tip(s?) would be to keep your camera in your purse at all times and don't be afraid to whip it out, and also upping the contrast just a skosh adds a little something. It just gives the photo a little more depth.
Sign in or sign up to comment.
Probably mentioned a million times, but with photos, I love to change perspective. Get low, take them from up high, tilt the camera...whatever works to change the perspective I'm seeing the world from. Fun experiments!
Bernadette (Seattle)
Sign in or sign up to comment.
love your inspiration...as always!
i want to figure out how to store my photos...backup. also i want to learn how to take better photos, just got my very first SLR so i'm learning a lot right now and am awaiting my first photography class! can't wait to learn more!
Sign in or sign up to comment.
I would have to say that my favorite tip is to always have your camera handy so that you can always capture those special moments! I try to take as many candid pictures as possible too, as it makes it so that you can really feel the moment of the picture!
~ Angie {Utah}
Sign in or sign up to comment.
This may sound a little odd, but unfolded cake boxes provide a cheap but great background for photographing artwork. It bounces the light a little and gives a nice, clean shot.
Sign in or sign up to comment.
I really want to work on taking good quality low light photos -- I struggle with getting good exposure without blurring or weird colours.
Carmen.
Sign in or sign up to comment.
Nice tips... since my creativity is at level 0 for now, maybe I should play more and think less about doing a great layout. Hope I can find this supply in Europe.
thanks
Sign in or sign up to comment.
I just need help the the technical, switching to av makes me sweat, but once every 20 times I get a good shot. I would love to improve the ratio with the knowledge I need.
Beth
Sign in or sign up to comment.
My favorite photo tip is to learn. Learn everything that your camera can do. You don't have to learn it all at once, even one button (white balance, anyone?) can make an amazing difference in the quality of your photos. (Taking a photography class, especially from Karen Russell, doesn't hurt either!)
Right now, I'm practicing the skills I learned in class. What I really need to work on is moving around more while taking pictures. I tend to get stuck in one place.
Sign in or sign up to comment.
I've been experimenting with lighting lately and discovered that parchment paper makes a GREAT diffuser when crumpled over a shop light. It is heat resistant so it can handle up to 500watt bulbs. I take a lot of product shots for people's blogs and this evens out the light for professional looking shots. Using it saves tons of $$$, too!
Sign in or sign up to comment.